

Glute Workout With Resistance Bands: Sculpt Stronger Glutes Fast
Glute Workout With Resistance Bands
Strong glutes are more than just a fitness trend. They support your lower back, improve posture, and help you move better in daily life. Many people want toned, powerful glutes but often think they need heavy gym equipment. In reality, you can get an excellent glute workout using just resistance bands. These simple tools are affordable, portable, and effective for all fitness levels.
In this guide, you’ll discover how resistance bands can help you build and shape your glutes. You'll learn the best exercises, how to use the bands safely, and ways to progress as you get stronger. Whether you’re a beginner or have some experience, you’ll find clear advice, practical tips, and answers to common questions.
Why Train Your Glutes?
Your glutes are made up of three main muscles: gluteus maximus, gluteus medius, and gluteus minimus. These muscles control hip movement, support your spine, and give power to actions like walking, running, and jumping. Weak glutes can lead to poor posture, back pain, or even knee issues.
Training your glutes brings many benefits:
- Better posture: Strong glutes keep your hips and spine in line.
- Injury prevention: They protect your lower back and knees.
- More power: Useful for sports and daily tasks.
- Improved appearance: Many people want rounder, firmer glutes.
A common mistake is thinking squats or lunges are enough. While these work your legs, they may not target the glutes fully—especially if you rely on bodyweight alone. This is where resistance bands shine.
How Resistance Bands Boost Glute Workouts
Resistance bands add extra tension to your exercises. This means your muscles work harder, leading to better results. Bands are especially useful for glutes because they keep your muscles active through the whole movement. Unlike machines or free weights, bands also let you train at home, in a hotel, or even outside.
Here’s what makes resistance bands special:
- Constant tension: Your muscles must stay engaged.
- Versatility: You can do many different glute exercises.
- Joint-friendly: Bands are gentle on your knees and back.
- Adaptable: You can change the band strength as you get stronger.
Many people overlook how much muscle activation you can get with bands. Studies show that glute exercises with bands can activate muscles as much as using free weights, as long as you use the right resistance and form.

Credit: www.youtube.com
Choosing The Right Resistance Band
Not all bands are the same. Picking the right one makes your workout safer and more effective.
Types of bands for glute training:
- Loop bands (mini bands): Short, thick bands you place around your legs.
- Long resistance bands: Can be looped or flat, useful for standing exercises.
- Fabric bands: Often wider and more comfortable, less likely to roll up.
Key things to consider:
- Strength level: Start with a medium band if you’re a beginner.
- Band width: Wider bands are more comfortable for the legs.
- Material: Fabric bands don’t slip as much as rubber ones.
- Length: Shorter bands are best for glute activation.
Here’s a quick look at the most common band types:
| Band Type | Best For | Pros | Cons |
|---|---|---|---|
| Mini Loop Band | Side steps, clamshells | Portable, easy to use | May roll up |
| Fabric Band | Squats, bridges | Comfortable, strong grip | Bulkier, higher cost |
| Long Flat Band | Standing kickbacks | Versatile, multi-use | Can be tricky to set up |
Pro tip: For most glute workouts, a medium or heavy fabric band works well. If you can do more than 20 reps easily, switch to a stronger band.
Key Glute Exercises With Resistance Bands
Below are some of the most effective glute exercises using bands. Each one targets your glutes in a slightly different way. For best results, include a mix of movements.
1. Banded Glute Bridge
- How to do it:
- Lie on your back, knees bent, feet flat.
- Place the band above your knees.
- Press your feet into the floor and lift your hips.
- Squeeze your glutes at the top, then lower down.
- What it works: Mainly the gluteus maximus.
- Tip: Push your knees out against the band for more activation.
2. Banded Squat
- How to do it:
- Stand with feet shoulder-width apart.
- Place the band above your knees.
- Sit back and down like you’re sitting in a chair.
- Press your knees out against the band as you stand up.
- What it works: Glutes, quads, and hips.
- Tip: Keep your chest lifted and back straight.
3. Lateral Band Walk
- How to do it:
- Place the band above your ankles or knees.
- Bend your knees slightly, step side-to-side.
- Keep tension on the band at all times.
- What it works: Gluteus medius (side glutes).
- Tip: Take slow, controlled steps.
4. Banded Clamshell
- How to do it:
- Lie on your side, knees bent, feet together.
- Place the band above your knees.
- Lift your top knee as high as you can without moving your hips.
- Lower slowly.
- What it works: Hip rotators and side glutes.
- Tip: Don’t roll your hips back.
5. Standing Glute Kickback
- How to do it:
- Place a band around your ankles.
- Stand tall, hold onto a chair or wall.
- Kick one leg straight back, squeeze your glute.
- Return and switch sides.
- What it works: Gluteus maximus.
- Tip: Keep your upper body still.
6. Banded Hip Thrust
- How to do it:
- Sit with your upper back on a bench.
- Band above your knees, feet flat.
- Push through your heels to lift hips up.
- Squeeze glutes at the top, then lower.
- What it works: Full glutes, especially for more advanced users.
- Tip: Pause at the top for extra burn.
7. Fire Hydrant
- How to do it:
- Band above your knees, on all fours.
- Lift one knee out to the side.
- Lower back down, repeat other side.
- What it works: Side glutes and hips.
- Tip: Keep your foot flexed.
8. Seated Abduction
- How to do it:
- Sit on a bench or chair.
- Band above your knees.
- Open and close your knees, keeping feet flat.
- What it works: Outer glutes, hip stabilizers.
- Tip: Squeeze at the widest point.
9. Glute Bridge March
- How to do it:
- Start in a bridge position.
- Band above knees, alternate lifting one foot off the ground.
- Keep hips high.
- What it works: Glutes and core.
- Tip: Don't let hips drop as you march.
10. Single-leg Glute Bridge
- How to do it:
- Lie on your back, band above knees.
- One foot on floor, one leg extended.
- Push through your heel, lift hips, keeping other leg straight.
- What it works: Glutes, hamstrings, stability.
- Tip: Go slow for balance.
Sample Glute Workout Routines With Bands
It helps to see how these exercises fit into a routine. Here are two sample workouts: one for beginners, one for more advanced users.
Beginner Glute Band Routine
- Banded Glute Bridge: 3 sets of 12 reps
- Lateral Band Walk: 3 sets of 10 steps each side
- Banded Clamshell: 2 sets of 15 reps each side
- Seated Abduction: 2 sets of 20 reps
Rest: 30-60 seconds between sets.
Frequency: 2-3 times per week
Intermediate/advanced Glute Band Routine
- Banded Hip Thrust: 4 sets of 10-12 reps
- Standing Glute Kickback: 3 sets of 15 reps per side
- Banded Squat: 3 sets of 12 reps
- Fire Hydrant: 3 sets of 15 reps per side
- Glute Bridge March: 2 sets of 20 marches
Rest: 30-45 seconds between sets.
Frequency: 3 times per week
For both routines, always warm up before starting. This can be 5-10 minutes of brisk walking or dynamic stretches.
How To Progress And Get Results
Progress is key for building glute strength and shape. Many people don’t see results because they do the same routine with the same band every time.
Ways to progress:
- Increase band resistance: Move to a thicker band as you get stronger.
- Add more reps or sets: Gradually increase your workload.
- Slow down the movement: More time under tension means better muscle growth.
- Try tougher exercises: Move from glute bridges to single-leg versions, or add pulses at the top.
A common beginner mistake is ignoring mind-muscle connection. Focus on squeezing your glutes, not just moving your legs. Another tip: Take short videos of your form to see if you’re using the right muscles.
Example progression plan:
| Week | Band Level | Sets | Reps | Notes |
|---|---|---|---|---|
| 1-2 | Light/Medium | 2-3 | 10-12 | Focus on form |
| 3-4 | Medium | 3 | 12-15 | Increase reps |
| 5-6 | Medium/Heavy | 3-4 | 15-20 | Try harder moves |
| 7+ | Heavy | 4 | 15-20 | Add single-leg work |
Common Mistakes And How To Fix Them
Even simple band exercises can go wrong if you’re not careful. Here are the errors to watch out for:
- Letting the band roll up: Use a wider or fabric band. Place bands higher on the legs, not at the knees.
- Poor posture: Keep your chest up and back straight in standing moves.
- Not pushing knees out: Always press outward to keep glutes working.
- Using a band that’s too light: If the exercise feels easy, upgrade your band.
- Rushing reps: Slow, controlled movements give better results.
Another insight: If your lower back or quads feel tired instead of your glutes, check your form. With glute bridges, push through your heels, not your toes.
How To Combine Bands With Other Workouts
Resistance bands fit well into many routines. You can use them alone, or with other exercises like bodyweight squats, lunges, or even weights.
Ways to use bands in your routine:
- Warm-up tool: Bands activate glutes before heavy workouts.
- Superset: Pair a banded exercise with a compound move (e.g., squats).
- Finisher: Add band walks or abductions at the end of your session to “burn out” the glutes.
For runners or athletes, band training helps correct muscle imbalances and boosts hip stability. Dancers and team sports players also benefit from the added hip control.

Credit: nilds.gov.ng
Can You Build Big Glutes With Resistance Bands Alone?
Many wonder if bands can really build size, or if they’re only for “toning.” The answer: bands can build both strength and shape, as long as you use enough resistance and challenge your muscles.
Scientific studies show muscle activation is high when bands are used correctly. The key is to train close to failure (where the last reps are tough), and to switch to stronger bands as you improve.
However, if your main goal is maximum muscle size (like a bodybuilder), you may eventually need heavier weights. Still, for most people, you can see clear changes in shape, firmness, and power using only bands.
Recovery And Stretching After Band Workouts
Working your glutes hard means you need to recover well too. This helps your muscles grow and prevents soreness.
Good recovery habits:
- Stretch your hips and glutes after each workout (hold for 20-30 seconds).
- Foam roll the glutes, hips, and thighs to ease tightness.
- Stay hydrated and eat enough protein for muscle repair.
- Rest at least 48 hours before training glutes hard again.
Common stretches:
- Lying glute stretch: Pull one knee to your chest, hold.
- Figure-4 stretch: Cross ankle over knee, pull legs toward you.
- Hip flexor stretch: Kneel, push hips forward gently.
These small habits help you avoid pain and get the most from your training.
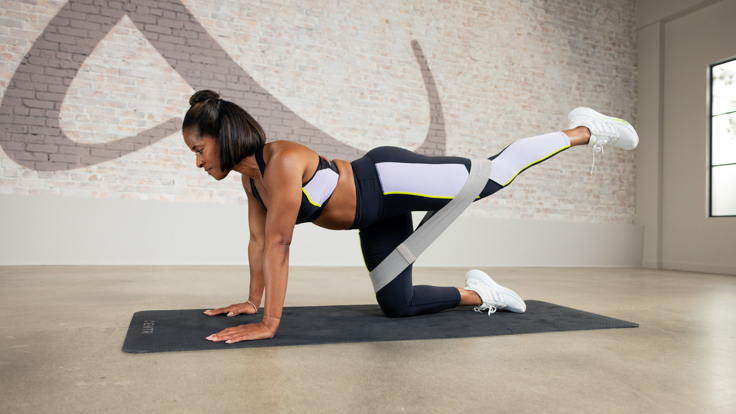
Credit: centr.com
Advanced Tips For Faster Progress
Once you’ve mastered the basics, try these advanced strategies for even better results:
- Add pauses and pulses: Hold the top of a glute bridge for 3 seconds, or pulse for extra reps.
- Try combo moves: Mix two exercises together (e.g., bridge with abduction at the top).
- Vary your stance: Try wider or narrower feet to hit different glute fibers.
- Train at different angles: Do some moves lying down, some standing, some on all fours.
A smart approach: Track your workouts. Write down sets, reps, and band color. This helps you see progress and avoid plateaus.
How To Set Up Your Space For Band Workouts
You don’t need a big space or fancy gear. Here’s how to set up for success:
- Choose a flat, non-slip floor: A yoga mat adds comfort.
- Have a sturdy chair or bench: Useful for hip thrusts or kickbacks.
- Wear workout clothes: Shorts or leggings help the band stay in place.
- Keep bands handy: Store them in a basket or bag.
If you train at home, a mirror helps check your form. For outdoor workouts, bring a towel or mat for ground exercises.
Real-life Success Stories
Many people see great results with resistance bands. For example, a study of women doing banded glute exercises three times a week found a clear increase in muscle activation and hip strength after eight weeks. One personal trainer shared that her clients—many of whom had never lifted weights—saw firmer, stronger glutes within two months of regular band training.
A common insight: Consistency matters more than the perfect routine. Even if you only have 20 minutes, a focused band workout can make a difference.
Cost And Convenience: Bands Vs. Other Equipment
One reason resistance bands are so popular is their low cost and portability compared to weights or gym machines.
Here’s a look at the differences:
| Equipment | Cost (Approx.) | Portability | Best For |
|---|---|---|---|
| Resistance Bands | $10-$40 | Very portable | Home/travel |
| Dumbbells | $30-$100+ | Not portable | Home/gym |
| Gym Machines | Expensive | Stationary | Gym only |
Bands are easy to pack in a suitcase, so you can keep up your routine anywhere. This makes them a favorite for busy travelers and people with small living spaces.
Safety Tips For Resistance Band Training
While bands are safe, you still need to be careful:
- Check for tears or cracks before each use.
- Don’t overstretch the band past double its length.
- Anchor securely if attaching to a door or object.
- Control every movement—don’t let the band snap back.
A less-known tip: Bands can break if left in the sun or heat for too long. Store them in a cool, dry place.
If you ever feel sharp pain (not muscle fatigue), stop the exercise and check your form or swap for a lighter band.
How To Keep Workouts Fun And Engaging
Sticking to a routine is easier if you enjoy it. Here are ways to add variety:
- Change your playlist: Upbeat music boosts energy.
- Work out with a friend: Motivate each other and share band sets.
- Follow online videos: Try new routines or trainers for fresh ideas.
- Set small goals: Like mastering the single-leg bridge or increasing resistance.
Remember, your body adapts quickly. Mixing up exercises every few weeks keeps your glutes growing and prevents boredom.
Nutrition Tips For Glute Growth
Exercise is only half the story. To build muscle, including your glutes, you need the right fuel.
Basic nutrition tips:
- Eat enough protein: Aim for at least 0.7 grams per pound of body weight.
- Don’t skip carbs: They give you energy for hard workouts.
- Healthy fats: Nuts, avocados, and olive oil support recovery.
- Stay hydrated: Muscles need water to work well.
If your goal is to build muscle, eat in a small calorie surplus. For more details, check trusted sources like Healthline.
Frequently Asked Questions
How Often Should I Do Glute Band Workouts?
Most people see results with 2-3 sessions per week. Give your muscles at least one full day to recover between workouts. If you still feel very sore, add more rest.
What Resistance Band Should A Beginner Use?
Start with a light or medium band. If you can do more than 20 reps easily, move up to a stronger band. Comfort matters—fabric bands are less likely to slip or roll.
Can I Lose Fat With Resistance Band Workouts?
Glute band workouts help build muscle, which can increase your metabolism. For fat loss, combine workouts with a healthy diet and overall calorie control. Bands alone won’t burn fat but will shape your muscles.
Why Don’t I Feel My Glutes Working?
This is common. Focus on form and the mind-muscle connection. Push your heels into the ground during bridges, and always push your knees out against the band. If you feel it more in your quads or back, check your posture.
Can I Use Resistance Bands Every Day?
It’s possible, but not recommended for the same muscle group. Your glutes need rest days to recover and grow. You can use bands for other body parts on off days, or do light stretching and mobility work.
Strong, toned glutes are within reach—even without a gym. With resistance bands, you can build muscle, improve your shape, and boost daily movement. By following these tips, staying consistent, and paying attention to your progress, you’ll see real changes in how you look and feel.
Remember, the best workout is the one you enjoy and stick with. Happy training!
