

Glute Bridge Workout: Build Stronger Glutes Fast
The glute bridge workout is simple, but it is one of the most effective movements for your lower body. Many people overlook this exercise, thinking it is too basic or only for beginners. In reality, the glute bridge can help almost anyone—athletes, desk workers, or those just starting with fitness.
Whether you want stronger glutes, better posture, or less back pain, the glute bridge can play a key role in your routine.
You might be surprised how much your glutes matter. They are the largest muscles in your body, supporting your hips, lower back, and even helping you walk or stand upright. When glutes are weak, problems can appear: back pain, knee aches, and poor athletic performance. The glute bridge is a safe way to wake up these muscles and build strength without needing a gym. It can be done on your living room floor, in a hotel room, or even outside.
As you read on, you’ll discover the science behind the glute bridge, learn the right way to perform it, explore variations for every level, and find tips to get the most from your workout. You’ll also see how this movement fits into a balanced exercise plan.
If you’re ready to unlock better movement and stronger glutes, let’s dive in.
Why The Glute Bridge Workout Matters
Many people don’t realize how much daily movement depends on the glutes. They control hip extension, help stabilize your core, and protect your lower back. Weak glutes make it harder to climb stairs, lift objects, or even walk for long periods. This is why the glute bridge is important for almost everyone, no matter your age or fitness level.
Research shows that exercises targeting the glutes can help reduce lower back pain and improve overall stability. According to a study published in the Journal of Orthopaedic & Sports Physical Therapy, weak glutes are linked with injuries in the knees and hips.
In fact, runners with stronger glutes are less likely to suffer knee pain.
One key insight is that sitting for long hours—at work, in the car, or at home—can make the glutes “forget” how to work properly. This is called gluteal amnesia. The glute bridge is an antidote: it “wakes up” these muscles and reminds them how to fire correctly.
Muscles Worked By The Glute Bridge
The glute bridge is more than just a glute exercise. It also activates your hamstrings, core, and lower back. Here’s a breakdown of the main muscles involved:
- Gluteus maximus (the largest glute muscle, main mover)
- Gluteus medius and minimus (side glutes, help with hip stability)
- Hamstrings (back of your thighs)
- Erector spinae (muscles along your spine)
- Hip flexors (get a good stretch during the movement)
- Core muscles (help stabilize your body)
This combination makes the glute bridge a true compound movement, meaning it works several muscles at once.
How The Glute Bridge Compares To Other Glute Exercises
Many people ask how the glute bridge stacks up against squats, lunges, or hip thrusts. The truth is, each exercise works your glutes differently. The glute bridge is unique because it isolates the glutes more, with less stress on your knees and lower back.
Here’s a quick look at how common glute exercises compare:
| Exercise | Main Muscles Worked | Knee Stress | Best For |
|---|---|---|---|
| Glute Bridge | Glutes, hamstrings, core | Low | Beginner-friendly, safe for knees |
| Squat | Glutes, quads, hamstrings | Medium to high | Building overall leg strength |
| Lunge | Glutes, quads, calves | Medium | Balance and coordination |
| Hip Thrust | Glutes, hamstrings | Low | Maximum glute activation |
Notice that the glute bridge is gentle on the knees, which makes it a smart choice for people with joint concerns or those recovering from injuries.
How To Do The Basic Glute Bridge
Doing the glute bridge with good form is key. Many people rush the movement or use the wrong muscles, which means less benefit and more risk of injury. Here’s how to do it step by step:
- Lie on your back on a mat or soft surface.
- Bend your knees and place your feet flat on the floor, about hip-width apart. Your arms should rest by your sides, palms facing down.
- Pull your feet close to your glutes, so your fingertips can just touch your heels.
- Brace your core (pull your belly button toward your spine) and keep your chin slightly tucked.
- Press through your heels and lift your hips toward the ceiling. Squeeze your glutes hard at the top.
- Pause for 1–2 seconds at the top, making sure your body forms a straight line from shoulders to knees.
- Lower your hips slowly back to the starting position.
Repeat for the desired number of reps.
Common Mistakes And How To Fix Them
Even though the glute bridge looks easy, it’s common to make small mistakes that reduce its effectiveness. Here are some errors to watch out for:
- Arching your back: If your lower back arches, you’re using your back, not your glutes. Focus on squeezing your glutes and keeping your core tight.
- Pushing through your toes: This works your quads more than your glutes. Always press through your heels.
- Not pausing at the top: Rushing reduces muscle activation. Hold for a second or two at the top.
- Feet too far away: If your feet are too far, you’ll feel it in your hamstrings, not your glutes. Bring them closer to your body.
Glute Bridge Variations For All Levels
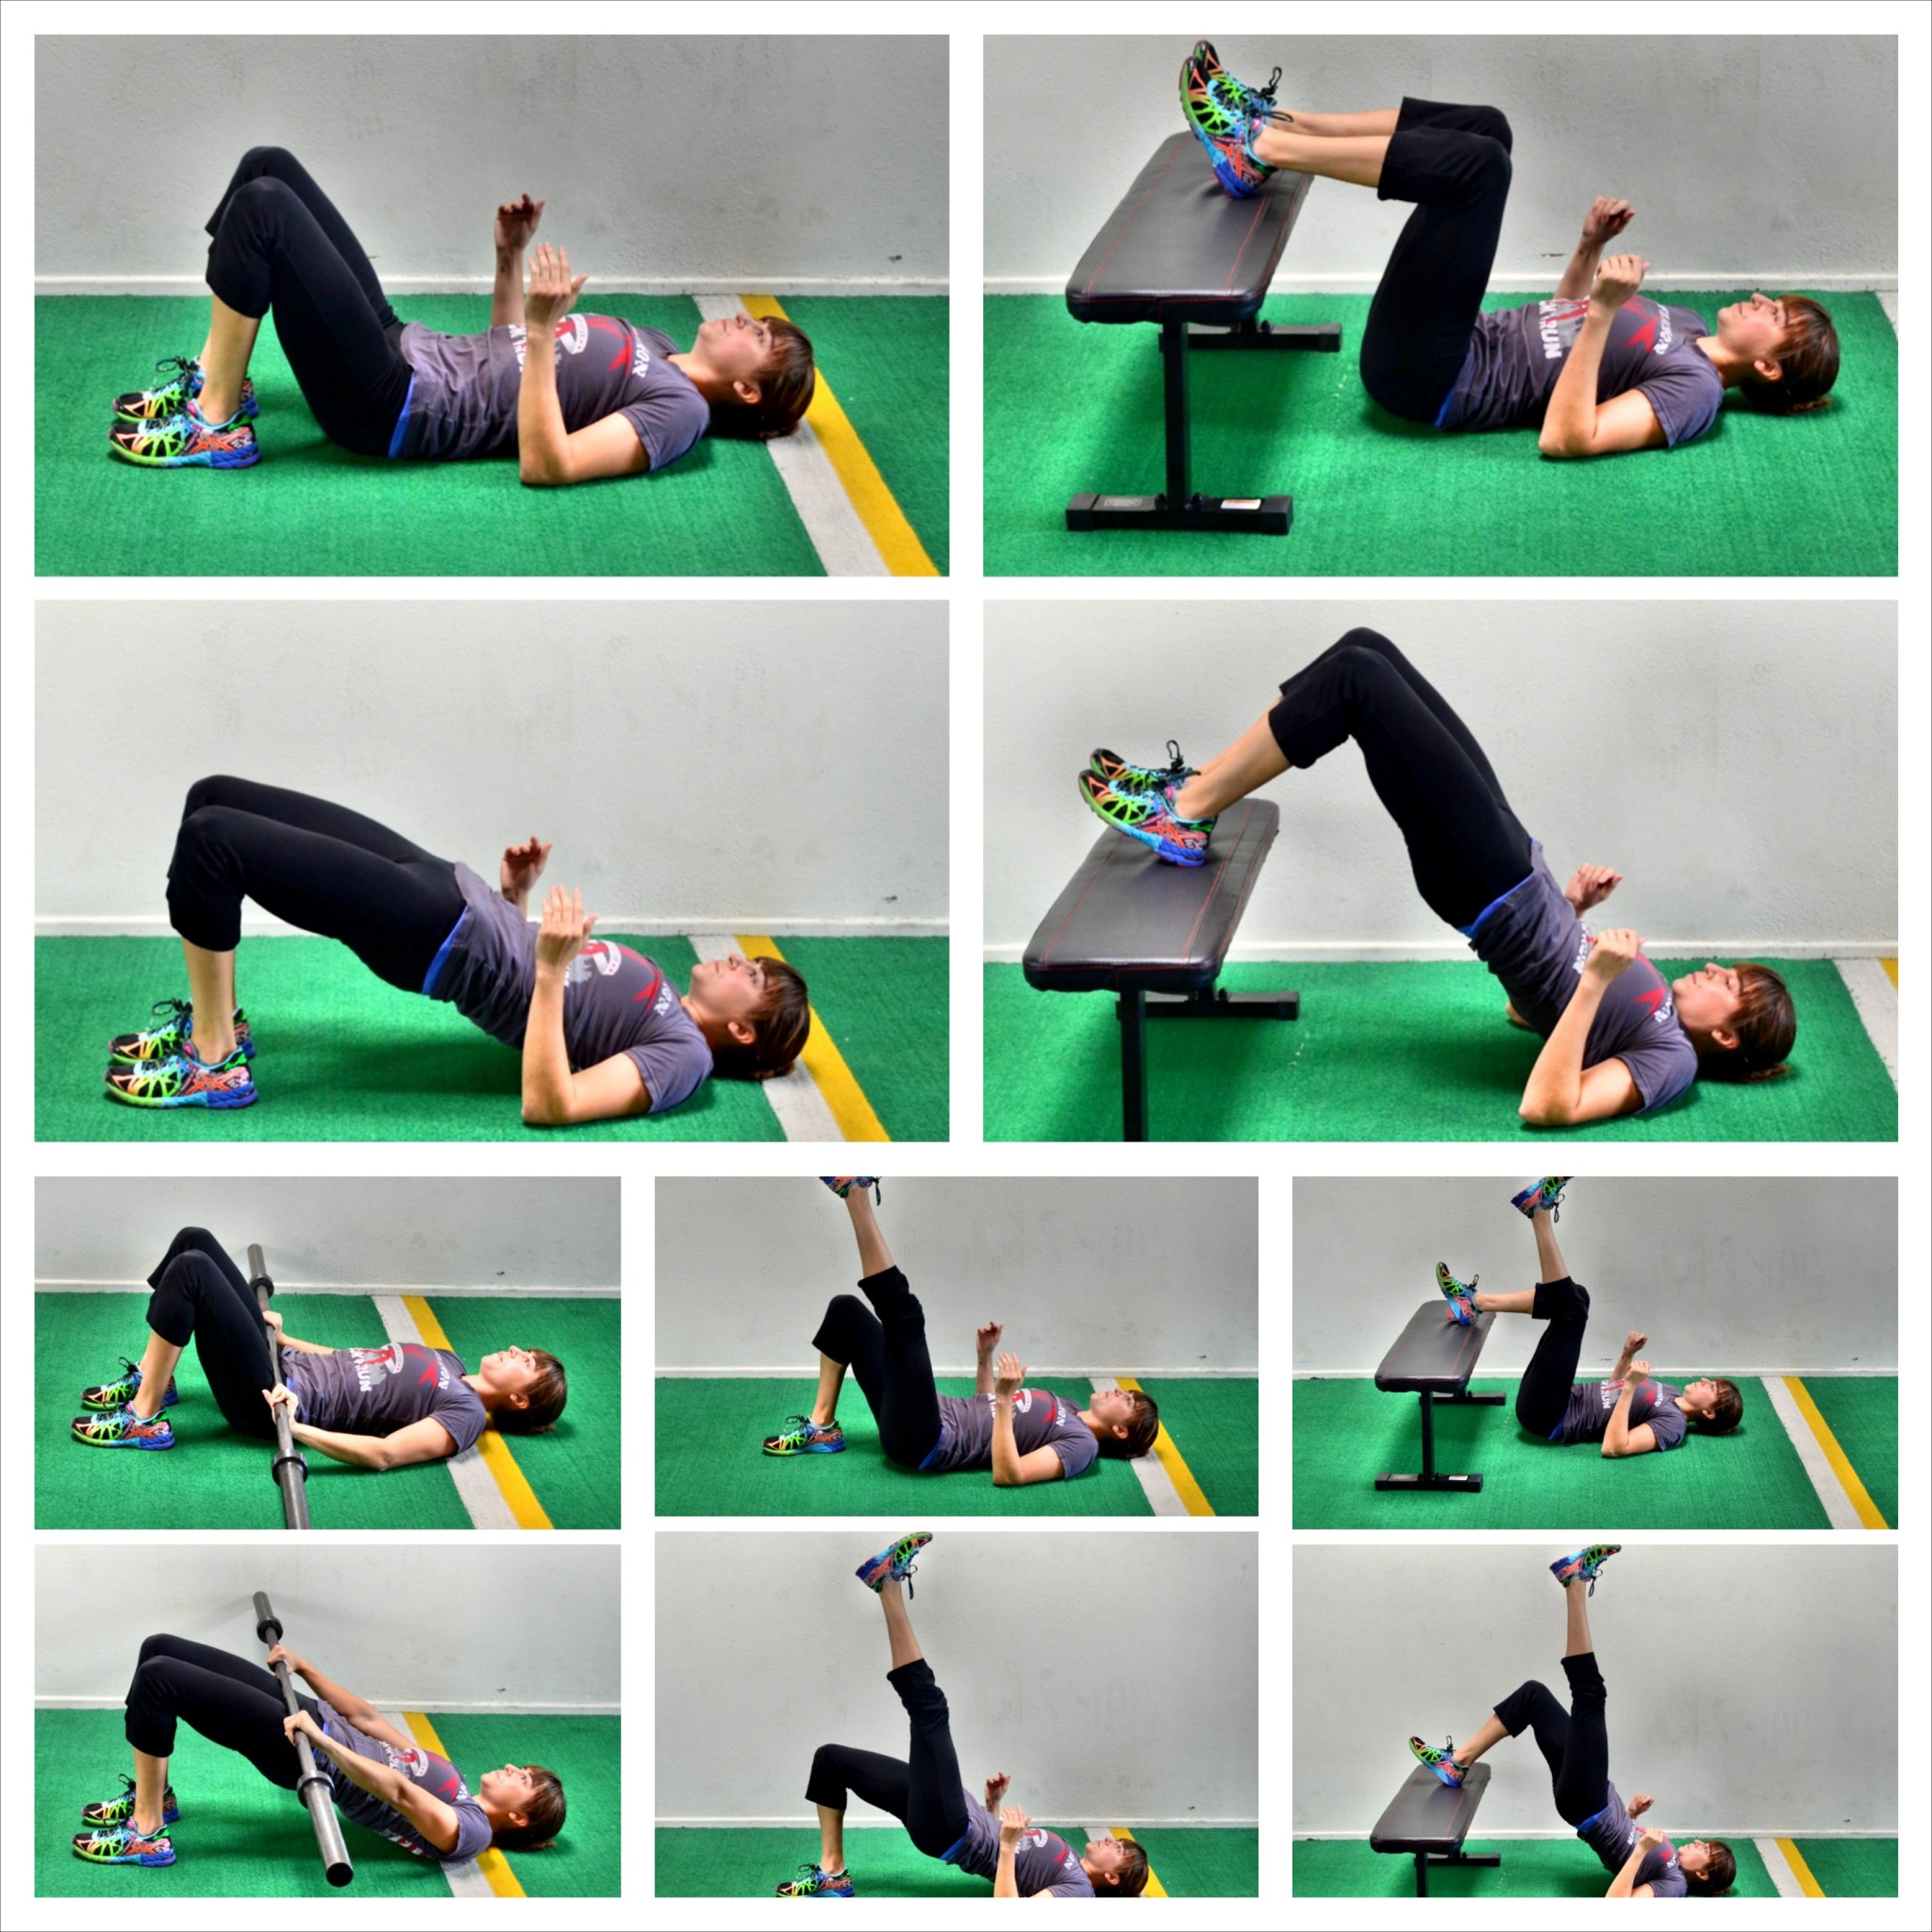
One of the best things about the glute bridge is how many ways you can change it. These variations help you progress, target different muscles, or add challenge as you get stronger.
1. Single-leg Glute Bridge
This version is harder and builds balance. Lie on your back as usual, but lift one foot off the ground. Push through the heel of your grounded foot and lift your hips, keeping the other leg straight. This targets each glute separately and improves hip stability.
2. Banded Glute Bridge
Place a resistance band above your knees. Perform the bridge as usual, pushing your knees out against the band. This increases activation in the gluteus medius, which helps with hip stability.
3. Elevated Glute Bridge
Put your feet on a bench or step, so they are higher than your hips. This increases the range of motion and makes your glutes work harder.
4. Weighted Glute Bridge
Hold a dumbbell, kettlebell, or barbell across your hips. Push up as usual, keeping your core braced. This adds resistance and builds more strength.
5. Frog Pump
Bring the soles of your feet together and let your knees fall out to the sides. Bridge up from this position. The frog pump hits the outer glutes more.
6. Marching Glute Bridge
Perform a basic bridge and, at the top, lift one knee toward your chest, then switch legs. This adds a balance challenge and works your core.
7. Glute Bridge Hold
Lift your hips and hold the top position for 20–60 seconds. This builds endurance and helps your glutes “learn” to stay tight.
Progression Table For Glute Bridge Variations
Here’s a simple way to see how each variation compares in difficulty and which might be right for you:
| Variation | Difficulty | Best For |
|---|---|---|
| Basic Glute Bridge | Easy | Beginners, injury rehab |
| Banded Glute Bridge | Easy–Medium | Hip stability, glute activation |
| Single-Leg Glute Bridge | Medium–Hard | Balance, strength |
| Weighted Glute Bridge | Medium–Hard | Strength, muscle growth |
| Elevated Glute Bridge | Medium | Range of motion, advanced activation |
| Frog Pump | Medium | Outer glute focus |
| Marching Glute Bridge | Medium | Core, coordination |
| Glute Bridge Hold | Easy–Medium | Endurance, rehab |
How To Add Glute Bridges To Your Workout
You don’t need to dedicate a whole session to glute bridges. Instead, use them as part of your warm-up, during your main workout, or as a “finisher” at the end.
Sample Glute Bridge Routine
For most people, two or three sets of 10–20 reps is enough. If you use heavier weights, lower the reps to 8–12. Rest for 30–60 seconds between sets. Here’s a simple routine you can try:
- Basic Glute Bridge: 2 sets x 15 reps (warm up)
- Single-Leg Glute Bridge: 2 sets x 10 reps each leg
- Banded Glute Bridge: 2 sets x 15 reps
- Glute Bridge Hold: 1 set x 30 seconds
You can add this routine to any lower body or full body workout. For best results, do glute bridges 2–3 times per week.
When To Do Glute Bridges
- Before heavy lifting: To wake up the glutes so they work during squats or deadlifts.
- After sitting: To reverse the effects of long hours at a desk.
- On rest days: For active recovery and blood flow.
Common Questions About Glute Bridges
Many people wonder about glute bridges. Here are answers to some of the most frequent questions.
Are Glute Bridges Good For Beginners?
Absolutely. The glute bridge is safe, low-impact, and easy to learn. You don’t need any equipment, so you can start right away at home. It’s also easy to make harder as you get stronger.
Can Glute Bridges Help With Back Pain?
Yes, if done correctly. Strong glutes support your lower back and pelvis, which can reduce pain. However, form is key: don’t arch your back or rush the movement.
How Do You Feel Glute Bridges In Your Glutes More?
If you feel glute bridges mostly in your hamstrings or lower back, try these tips:
- Bring your feet closer to your body.
- Focus on pressing through your heels.
- Squeeze your glutes hard at the top.
- Pause for 1–2 seconds at the peak.
How Long Before You See Results?
Everyone is different, but most people notice stronger glutes, better posture, or less back pain in 2–4 weeks if they do glute bridges 2–3 times a week. Visible muscle growth takes longer—often 8–12 weeks of consistent training.
Can You Do Glute Bridges Every Day?
It’s possible, but not necessary for most people. Two to three times a week is enough for strength and muscle growth. If you do them daily, keep the volume low to avoid overtraining.
:quality(85):extract_cover()/2024/06/03/079/n/1922729/2ab7552f665e65aeb24393.59417838_.jpg)
Credit: www.popsugar.com
How Glute Bridges Support Athletic Performance
Many top athletes use glute bridges to boost performance and reduce injury risk. Strong glutes are critical for running, jumping, and changing direction quickly. In sports like soccer, basketball, or track, glute strength powers explosive moves.
A study from the National Strength and Conditioning Association found that athletes with stronger glutes jump higher and sprint faster. The glute bridge is often part of their warm-up or strength routine because it’s safe and effective.
One non-obvious benefit: glute bridges can help with hip lockout in sports like powerlifting and Olympic lifting. This means finishing lifts with power and stability, thanks to strong glutes.
Glute Bridge Vs. Hip Thrust: Key Differences
Many people confuse the glute bridge with the hip thrust. While both exercises look similar, there are important differences.
- Setup: In a glute bridge, your back stays on the floor. In a hip thrust, your upper back rests on a bench.
- Range of motion: Hip thrusts allow for more movement, which can mean greater muscle activation.
- Weight used: It’s easier to add heavy weights in hip thrusts.
Here’s a quick comparison:
| Feature | Glute Bridge | Hip Thrust |
|---|---|---|
| Body position | Back on floor | Shoulders on bench |
| Best for | Beginners, home workouts | Advanced, gym strength work |
| Muscle activation | High | Very high |
| Weight used | Bodyweight to moderate | Moderate to heavy |
If you’re new, start with the glute bridge. As you get stronger, try hip thrusts to keep challenging your glutes.
Programming Glute Bridges For Different Goals
How you use glute bridges depends on your main fitness goal. Here’s how to adjust your routine:
For Strength
Use fewer reps (8–12), more sets (3–5), and add weight if possible. Focus on quality and full range of motion.
For Muscle Growth (hypertrophy)
Do 10–20 reps per set, for 3–4 sets. Use variations like the banded or weighted glute bridge to increase resistance.
For Endurance
Try higher reps (20+) or long holds at the top (30–60 seconds). Marching or holding the bridge position builds endurance and stability.
For Injury Rehab
Stick with the basic glute bridge. Use slow reps, focus on form, and avoid adding weight. Ask your physical therapist if you’re rehabbing from injury.
Glute Bridge Workout Tips For Better Results
Small details can make a big difference with the glute bridge. Here are some tips:
- Warm up first: Even a few minutes of walking or dynamic stretches help activate your muscles.
- Don’t rush: Slow, controlled reps build more muscle than fast, sloppy ones.
- Check your feet: Your feet should be flat and close enough to feel your glutes working.
- Use a mirror: If possible, check your form from the side to ensure your back isn’t arching.
- Add variety: Don’t do the same version every time. Mixing in different types keeps your muscles challenged.

Credit: spotebi.com
When Not To Do Glute Bridges
While glute bridges are safe for most people, there are a few times to be careful:
- If you have recent hip or back surgery, check with your doctor first.
- If you feel pain (not just muscle effort) in your knees, hips, or back, stop and review your form.
- Pregnant women may need to avoid lying flat on their back after the first trimester; ask your healthcare provider for guidance.
Real-world Success Stories
Many people have improved their strength, reduced pain, or reshaped their bodies with glute bridges. For example, office workers who add glute bridges to their routine often report better posture and less back discomfort after just a few weeks. Runners find they can run farther with less knee pain.
Even older adults use glute bridges to maintain hip strength and reduce fall risk.
A lesser-known benefit: glute bridges can help with balance and walking speed in older adults. Stronger glutes mean a more stable stride, which can help prevent falls.
Combining Glute Bridges With Other Exercises
While glute bridges are powerful alone, they’re even better as part of a full workout. Try pairing them with:
- Squats: For total lower body strength
- Deadlifts: For hip and back development
- Planks: For core stability
You can also use glute bridges as an activation exercise before heavy lifts. This “primes” your glutes so they help more during squats or deadlifts, not just your back or thighs.
Glute Bridge Myths And Mistakes
There are a few myths about glute bridges you should know:
- Myth: Glute bridges are only for women.
Fact: Men and women both need strong glutes for health and performance.
- Myth: You need a gym for glute bridges.
Fact: Bodyweight versions are effective, and you can add resistance at home.
- Mistake: Using only your lower back.
Fix: Focus on squeezing your glutes and keeping your core tight.
- Mistake: Doing hundreds of reps.
Fix: Quality beats quantity. Slow, focused reps work better than high numbers.
Glute Bridge And Everyday Life
Strong glutes aren’t just for athletes. They help with lifting groceries, climbing stairs, or even standing up from a chair. If your glutes are weak, other muscles try to help—and that can lead to injury over time.
One practical tip: try doing a few glute bridges after long car rides or workdays. You’ll feel your hips loosen, and your lower back will thank you.
How To Stay Consistent With Glute Bridges
Many people start strong but forget to keep doing glute bridges. The key is to make them a habit:
- Add them to your regular workout days.
- Set a reminder on your phone.
- Do them while watching TV or after brushing your teeth.
Remember, small steps add up over time.
Credit: redefiningstrength.com
Frequently Asked Questions
How Many Glute Bridges Should I Do Per Day?
Most people get results with 2–3 sets of 10–20 reps, done two or three times a week. You don’t need to do glute bridges every day unless you use low intensity for warm-ups or rehab.
What Equipment Do I Need For Glute Bridges?
You only need your body and a soft surface. For more challenge, use a resistance band, dumbbell, or a bench for elevated versions.
Can Glute Bridges Help With Posture?
Yes. Strong glutes support your pelvis and spine, which can improve how you stand and walk. Many people notice better posture after a few weeks.
What’s The Difference Between A Glute Bridge And A Pelvic Tilt?
A glute bridge lifts your hips off the ground, using your glutes and hamstrings. A pelvic tilt is a smaller movement, tilting your pelvis without lifting your hips. Both can help with back health, but glute bridges build more strength.
Where Can I Learn More About Glute Bridge Science?
You can read more research and exercise guides at the Wikipedia glute bridge page, which links to studies and expert resources.
The glute bridge workout is a simple tool for better movement, less pain, and stronger muscles. If you want an exercise that fits into any routine, needs no equipment, and delivers results for everyone—start bridging today. With good form and regular practice, you’ll feel the difference in your daily life and workouts.
