
Crochet Tank Top Step by Step: Easy DIY Guide for Beginners
Crochet Tank Top Step By Step
Crochet tank tops are more than just a summer trend. They are a creative project that can reflect your unique style and skill. Many people love crochet tank tops because they are cool, lightweight, and easy to wear. But making your own crochet tank top can seem hard if you have never tried a garment before.
The truth is, with the right steps and tips, anyone—even a beginner—can make a beautiful tank top with crochet.
This guide will show you each step to crochet a tank top, from choosing the right materials to finishing touches. You will learn how to read patterns, measure correctly, shape your work, and avoid common beginner mistakes. Along the way, you’ll also find practical advice that can save you time and frustration.
Whether you want to create a simple summer piece or a stylish layering top, this guide will help you every step of the way.
Why Make Your Own Crochet Tank Top
Making a crochet tank top is about more than saving money or finding the perfect fit. It gives you full control over the design, color, and feel of the garment. When you make your own, you can:
- Choose colors that match your wardrobe
- Pick yarns that feel good on your skin
- Adjust the fit to your body shape
- Learn valuable crochet skills
A handmade tank top also makes a thoughtful gift. It shows care and effort in every stitch. Plus, every project you finish builds your confidence for more advanced crochet clothing in the future.
Essential Materials And Tools
Before you begin, gather all the supplies you need. Having the right materials will make your work smoother and help you avoid problems later.
Yarn Selection
The yarn you choose affects the look, feel, and wearability of your tank top. Here’s what to consider:
- Fiber Content: Cotton is the most popular choice for tank tops. It’s breathable, soft, and holds its shape well. Bamboo and linen blends are also good for warm weather. Avoid thick or fuzzy yarns, which can feel hot or look bulky.
- Yarn Weight: Use a light or medium weight yarn. Most patterns recommend DK (double knit), sport, or worsted weight. Lighter yarns make a more delicate, airy top, while medium yarns give a solid, classic look.
- Color: Lighter colors reflect heat and give a casual, summer look. Dark or bold colors can be more stylish and show off stitch details.
Hook Selection
Crochet hooks come in many sizes and materials. The best hook depends on your yarn:
- Recommended Hook Size: Check your yarn label or pattern. Most tank tops use a 3.5mm to 5.5mm hook.
- Material: Aluminum hooks are smooth and durable. Plastic and bamboo hooks are lighter, which is easier on your hands for large projects.
Other Supplies
You’ll need a few more items:
- Measuring tape: For checking your gauge and measuring your body.
- Stitch markers: To mark important points, like the start of a round or armhole edges.
- Scissors: For cutting yarn neatly.
- Yarn needle: For weaving in ends and sewing pieces together.
- Row counter or notebook: To track rows or pattern repeats.
Having these tools ready will keep your project stress-free.
Understanding Crochet Patterns For Tank Tops
Reading a crochet pattern can feel confusing if you are new. Patterns use short codes and terms to save space. Let’s break down what you need to know.
Common Abbreviations
- Ch: Chain
- Sc: Single crochet
- Dc: Double crochet
- Sl st: Slip stitch
- St(s): Stitch(es)
- Rep: Repeat
- Inc: Increase (add stitches)
- Dec: Decrease (remove stitches)
Patterns will often have a key or legend explaining the abbreviations. Always read this before starting.
Reading Sizing Information
Most patterns include different sizes, such as small, medium, and large. Sizing is usually shown like this: (S, M, L). Choose the size based on your measurements, not your usual clothing size, since crochet fabric stretches differently.
Gauge Swatch
The gauge is how many stitches and rows fit into a certain size, like 10x10 cm. Always make a gauge swatch before starting. If your stitches are too tight or too loose, your tank top won’t fit as expected.
- If your swatch is too small: Use a larger hook.
- If your swatch is too big: Use a smaller hook.
Skipping this step is one of the most common mistakes beginners make.
Measuring For A Perfect Fit
Getting the right measurements is key for a tank top that looks and feels good. Use a soft measuring tape and measure over what you plan to wear under the tank top.
Key Measurements
- Bust: Measure around the fullest part of your chest.
- Waist: Measure around the smallest part of your waist.
- Length: Measure from the top of your shoulder to where you want the tank top to end.
- Armhole Depth: Measure from the top of your shoulder down under your armpit.
Write down your numbers. Compare them with the pattern’s finished size. If you fall between sizes, it’s usually better to size up for a comfortable fit.
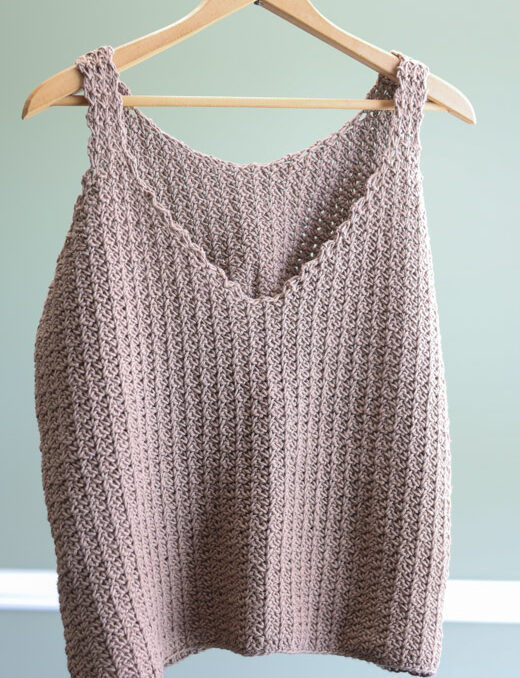
Credit: saltypearlcrochet.com
Choosing The Right Tank Top Style
There are many types of crochet tank tops. Each style has its own look and construction method. Here are some popular options:
| Style | Description | Best For |
|---|---|---|
| Basic Shell | Simple, straight body with minimal shaping. | Beginners, casual wear |
| Racerback | Back straps join at the center, sporty look. | Active wear, layering |
| Cropped | Shorter length, ends above the waist. | Trendy, high-waisted outfits |
| Lace | Openwork stitches for a light, airy look. | Dressy, hot weather |
| Fitted | Shaped to hug the body, more advanced construction. | Formal, tailored look |
Pick a style that matches your skill and fashion preference. If you’re new, a basic shell tank is the easiest place to start.
Step By Step: Crochet Tank Top Instructions
Let’s walk through the process of making a simple crochet tank top, step by step. This method works for most basic tank top patterns and can be adjusted for size or style.
1. Make A Gauge Swatch
Before starting, crochet a small square (about 10x10 cm) using the yarn and hook you plan to use. Count how many stitches and rows fit in the square. Compare with the pattern’s gauge.
- If your swatch matches the pattern, you’re ready.
- If not, adjust your hook size and try again.
Spending 20 minutes on this step can save hours later.
2. Chain The Base
Start with a foundation chain that matches the width of your chosen size. This will form the bottom edge of the tank top.
- Chain loosely to avoid a tight, curling edge.
- Double-check your stitch count before moving on.
3. Work The Body In Rows
Most basic tank tops are worked in two rectangles (front and back), then sewn together. For each rectangle:
- Crochet rows of your chosen stitch (usually single or double crochet) until the piece reaches your desired length.
- For a lace look, use openwork stitches like mesh or shell patterns.
- Measure as you go to keep your length accurate.
4. Shape The Armholes
Once you reach the armhole area, you’ll need to shape the edges. This usually means:
- Stopping short a few stitches at each end of the row (decreasing).
- Working fewer stitches on each new row to create a gentle curve.
Use stitch markers to keep track of where the armhole shaping begins.
5. Shape The Neckline (front Piece)
For the front piece, you’ll often need to create a neckline.
- When you reach the neckline, crochet the first shoulder section, then fasten off.
- Rejoin yarn at the other side to work the second shoulder.
- Make sure both sides have the same number of rows and stitches.
6. Make The Back Piece
Repeat the same steps as the front piece. Some patterns use a higher neckline or straight edge for the back.
7. Block Your Pieces
Blocking is the process of gently wetting and shaping your finished pieces before sewing them together.
- Pin the pieces flat on a towel, matching the correct size and shape.
- Mist with water or use steam to relax the stitches.
- Let them dry completely.
Blocking helps your tank top look neat and even. It’s a step many beginners skip, but it makes a big difference.
8. Seam The Sides And Shoulders
Use a yarn needle to sew the front and back pieces together.
- Start with the shoulder seams, then sew the sides from the bottom up to the armhole.
- Use a mattress stitch or whip stitch for flat, nearly invisible seams.
Check your work for gaps or uneven spots as you sew.
9. Add Finishing Edges
Many patterns finish with a border around the neckline and armholes.
- Crochet a round of single crochet or slip stitch for a clean edge.
- You can add decorative edging, like picots or shells, if you want extra flair.
10. Weave In Ends And Try On
Use a yarn needle to weave in any loose ends. Turn your tank top right side out and try it on.
- Check the fit and comfort.
- If anything feels tight or loose, you may be able to adjust the border or seams.
Congratulations! You’ve completed your crochet tank top.
Credit: hayhaycrochet.com
Example: Basic Shell Tank Top Pattern
Here’s a simple pattern outline you can follow or adapt for your own size.
Materials:
- 2-3 skeins cotton DK yarn (approx. 400-600 meters, depending on size)
- 4mm crochet hook
- Scissors
- Yarn needle
- Stitch markers
Measurements Needed:
- Bust
- Length
- Armhole depth
Pattern Steps:
- Front Piece:
- Chain enough stitches for your bust width (measurements plus ease).
- Work in double crochet for the desired length.
- Shape armholes by decreasing 2 stitches at each end every row for 4 rows.
- Shape neckline by working each shoulder separately.
- Back Piece:
- Repeat as front, but make the neckline higher or straight if desired.
- Finishing:
- Block pieces.
- Sew shoulders, then sides.
- Work a round of single crochet around neck and armholes.
- Weave in ends.
You can adjust this pattern for different sizes or use a different stitch for variety.
Tips For Customizing Your Crochet Tank Top
One of the joys of crochet is personalizing your projects. Here are ways to make your tank top unique:
- Change the Stitch Pattern: Try mesh, shell, or granny stitches for different textures.
- Add Stripes or Color Blocking: Use leftover yarns to add color bands or sections.
- Play With Length: Make a cropped tank or a tunic length by adding or reducing rows.
- Embellish: Sew on beads, fringe, or small crochet flowers.
- Adjust Fit: Add shaping at the waist or bust by increasing or decreasing stitches.
Remember, you can always modify a pattern to suit your taste and body.
Troubleshooting: Common Problems And Solutions
Even experienced crocheters run into problems. Here’s how to solve some common issues:
| Problem | Possible Cause | Solution |
|---|---|---|
| Tank top is too tight | Gauge too small, wrong hook size | Use a larger hook, add extra stitches, or block more aggressively |
| Armholes are uneven | Missed decreases, counting errors | Use stitch markers and count stitches at each row end |
| Seams are bulky | Thick yarn, tight stitching | Use a lighter yarn for seams, sew loosely with a yarn needle |
| Edges curl | Tight foundation chain or border stitches | Chain loosely, try a different border stitch, or block well |
| Fabric is too loose | Large hook, loose tension | Use a smaller hook or tighter stitches |
A non-obvious insight: Many beginners forget to check their work at each step. Regularly measuring and counting stitches can prevent most problems before they grow.
Washing And Caring For Crochet Tank Tops
How you care for your finished tank top will affect how long it lasts and how good it looks.
- Hand wash: Most cotton or bamboo tops do best with gentle hand washing in cool water.
- Dry flat: Lay the tank top flat on a towel to dry. Hanging can stretch the fabric.
- Store carefully: Fold your tank top and store it in a drawer or on a shelf, not on a hanger.
If your yarn is machine washable, always follow the yarn label’s advice.

Credit: www.youtube.com
Advanced Techniques For Experienced Crocheters
Once you’re comfortable with basic tank tops, try these to level up your skills:
- Shaping with short rows: This technique lets you add curves to the bust or waist for a perfect fit.
- Seamless construction: Some patterns are worked in the round, meaning no side seams.
- Lace motifs: Join small crochet motifs together for a delicate, openwork tank.
- Built-in straps: Instead of sewing straps, crochet them directly onto the body.
Experimenting with these methods can make your next tank top even more special.
Sustainable Yarn Choices
If you care about the environment, consider eco-friendly yarns:
- Organic cotton: Grown without harmful chemicals.
- Bamboo: Fast-growing, renewable, and silky soft.
- Recycled fibers: Some yarns are made from recycled cotton or plastic bottles.
These yarns are not only good for the planet but also feel great to wear. For more on sustainable yarns, see Craft Yarn Council.
Two Non-obvious Insights For Beginners
- Swatching for Borders: Many beginners only swatch the main stitch, not the border. Some edging stitches can change the stretch or size of the opening. Always test your planned border on a small swatch.
- Yarn Direction Matters: When working with some cotton or bamboo yarns, the way you pull from the skein can twist the fibers. This can make your stitches look uneven. Try pulling from the outside of the skein for smoother results.
Small details like these can make your finished tank top look much more professional.
Frequently Asked Questions
How Long Does It Take To Crochet A Tank Top?
The time needed depends on your skill, the yarn weight, and the pattern. For a beginner using medium-weight yarn, expect about 10 to 20 hours spread over several days. Faster crocheters or those using thick yarn may finish sooner.
Can I Use Acrylic Yarn For A Crochet Tank Top?
You can, but acrylic can feel warmer and less breathable than cotton or bamboo. Acrylic is good for cooler weather or layering. For hot climates, cotton or blends are more comfortable.
What If My Tank Top Doesn’t Fit Right?
If it’s too tight, try blocking it larger or adding an extra border. If it’s too loose, you can add a drawstring, elastic, or take in the side seams. Always check your measurements and gauge before starting to avoid major fit problems.
How Do I Fix A Mistake In The Middle Of My Project?
Use a crochet hook or yarn needle to gently pull out stitches back to the mistake (called “frogging”). Fix the error, then continue. Don’t be afraid to undo work—every crocheter makes mistakes and learns from them.
Where Can I Find More Crochet Tank Top Patterns?
There are many free and paid patterns on websites like Ravelry, Pinterest, and the Craft Yarn Council. Local yarn shops may also have printed patterns or classes.
Finishing your own crochet tank top is a rewarding experience. With patience and the right steps, you can create a garment that fits your body, style, and lifestyle perfectly. As your skills grow, you’ll discover even more ways to make your crochet projects unique and enjoyable.
Happy crocheting!