
Glute Bridges Workout: Boost Your Glute Strength Fast
Glute Bridges Workout: Build Strength, Power, And Shape
The glute bridge is a simple exercise with surprising power. Many people think it’s just for athletes or fitness fans, but the truth is everyone can benefit. Whether you sit at a desk, love running, or want to shape your lower body, glute bridges are for you.
Why? Because this move targets your glutes, the biggest muscles in your body. Strong glutes help your posture, protect your back, and make daily movements easier. Plus, glute bridges need no equipment and can be done almost anywhere.
But there’s more. When you do glute bridges correctly, you work your hamstrings, core, and even your hips. You’ll feel stronger, more stable, and notice improvements in how you walk, stand, and even lift things.
In this guide, you’ll learn everything about the glute bridges workout: what it is, how to do it, the muscles worked, benefits, variations, common mistakes, and how to add it to your routine. You’ll also see data tables, get simple tips, and find answers to common questions.
What Is A Glute Bridge?
A glute bridge is a bodyweight exercise where you lie on your back, bend your knees, and lift your hips off the floor. The main goal is to squeeze your glutes at the top. It looks easy, but doing it right makes a big difference.
Some people confuse glute bridges with hip thrusts. The hip thrust uses a bench to support your upper back, while the glute bridge is done on the floor. Both are great, but the glute bridge is easier for beginners.
Muscles Worked In The Glute Bridge
The glute bridge is not just for your butt. It’s a full lower body and core exercise. Here’s a breakdown:
- Gluteus maximus (main glute muscle)
- Gluteus medius and gluteus minimus (side and deep glutes)
- Hamstrings (back of your thighs)
- Core muscles (abs, obliques, lower back)
- Hip flexors (front of hips, stretched during the move)
- Quadriceps (front of your thighs, support the movement)
The glute bridge helps these muscles work together. This balance is important for sports, walking, and preventing injuries.
Muscle Activation Comparison
Here’s how the glute bridge stacks up against other popular lower body exercises:
| Exercise | Glute Activation | Hamstring Activation | Quad Activation |
|---|---|---|---|
| Glute Bridge | High | Moderate | Low |
| Squat | Moderate | Low | High |
| Lunge | Moderate | Moderate | High |
| Deadlift | High | High | Low |
Notice that the glute bridge focuses more on your glutes and less on your quads than squats or lunges. This makes it a smart choice if you want to target your backside.
How To Do A Perfect Glute Bridge
Getting the basics right is key. Here’s a step-by-step guide:
- Start Position: Lie on your back on a mat. Bend your knees so your feet are flat on the floor, hip-width apart. Place your arms at your sides, palms down.
- Foot Placement: Your heels should be about a hand’s length away from your glutes.
- Brace Core: Pull your belly button toward your spine. This protects your lower back.
- Lift Hips: Press through your heels and squeeze your glutes to lift your hips up. Your body should form a straight line from shoulders to knees.
- Hold and Squeeze: Pause at the top for 1–2 seconds. Focus on squeezing your glutes hard.
- Lower Down: Slowly lower your hips back to the floor. Don’t let your back arch or your knees fall out.
- Repeat: Aim for 10–15 reps to start.
Tips For Best Results
- Keep your chin slightly tucked, not reaching up.
- Push through your heels, not your toes.
- Don’t over-arch your lower back.
- Move slow and controlled—no bouncing.
Common Mistakes To Avoid
Many beginners make small errors that reduce results or cause pain. Watch out for these:
- Arching the lower back instead of squeezing the glutes.
- Pushing through the toes which works the quads more than the glutes.
- Flaring knees out or letting them cave in—keep them in line with your hips.
- Lifting too high so your ribs pop up, which stresses your back.
Benefits Of Glute Bridges
The glute bridge offers more than a good-looking backside. Here are some important benefits:
1. Stronger Glutes
Weak glutes can cause hip, knee, or back pain. Glute bridges help you build real strength in your hips and butt.
2. Lower Back Support
Because you engage your core and glutes, this move helps protect your lower back. It’s often used in physical therapy for people with back pain.
3. Better Posture
Strong glutes keep your pelvis in the right position. This makes standing and sitting more comfortable, with less slouching.
4. Improved Athletic Performance
Powerful glutes help you run faster, jump higher, and lift heavier weights. Many athletes add glute bridges to their warmups or strength routines.
5. Mobility And Flexibility
The move stretches your hip flexors, which get tight from too much sitting. This helps you move better in daily life.
6. Easy To Learn And Adapt
You don’t need a gym or equipment. You can make the exercise harder or easier, depending on your level.
7. Injury Prevention
By balancing your lower body muscles, glute bridges help prevent knee, hip, and back injuries.
8. Core Activation
Many people don’t realize how much the glute bridge works your abs and lower back. This can lead to a stronger, more stable core.
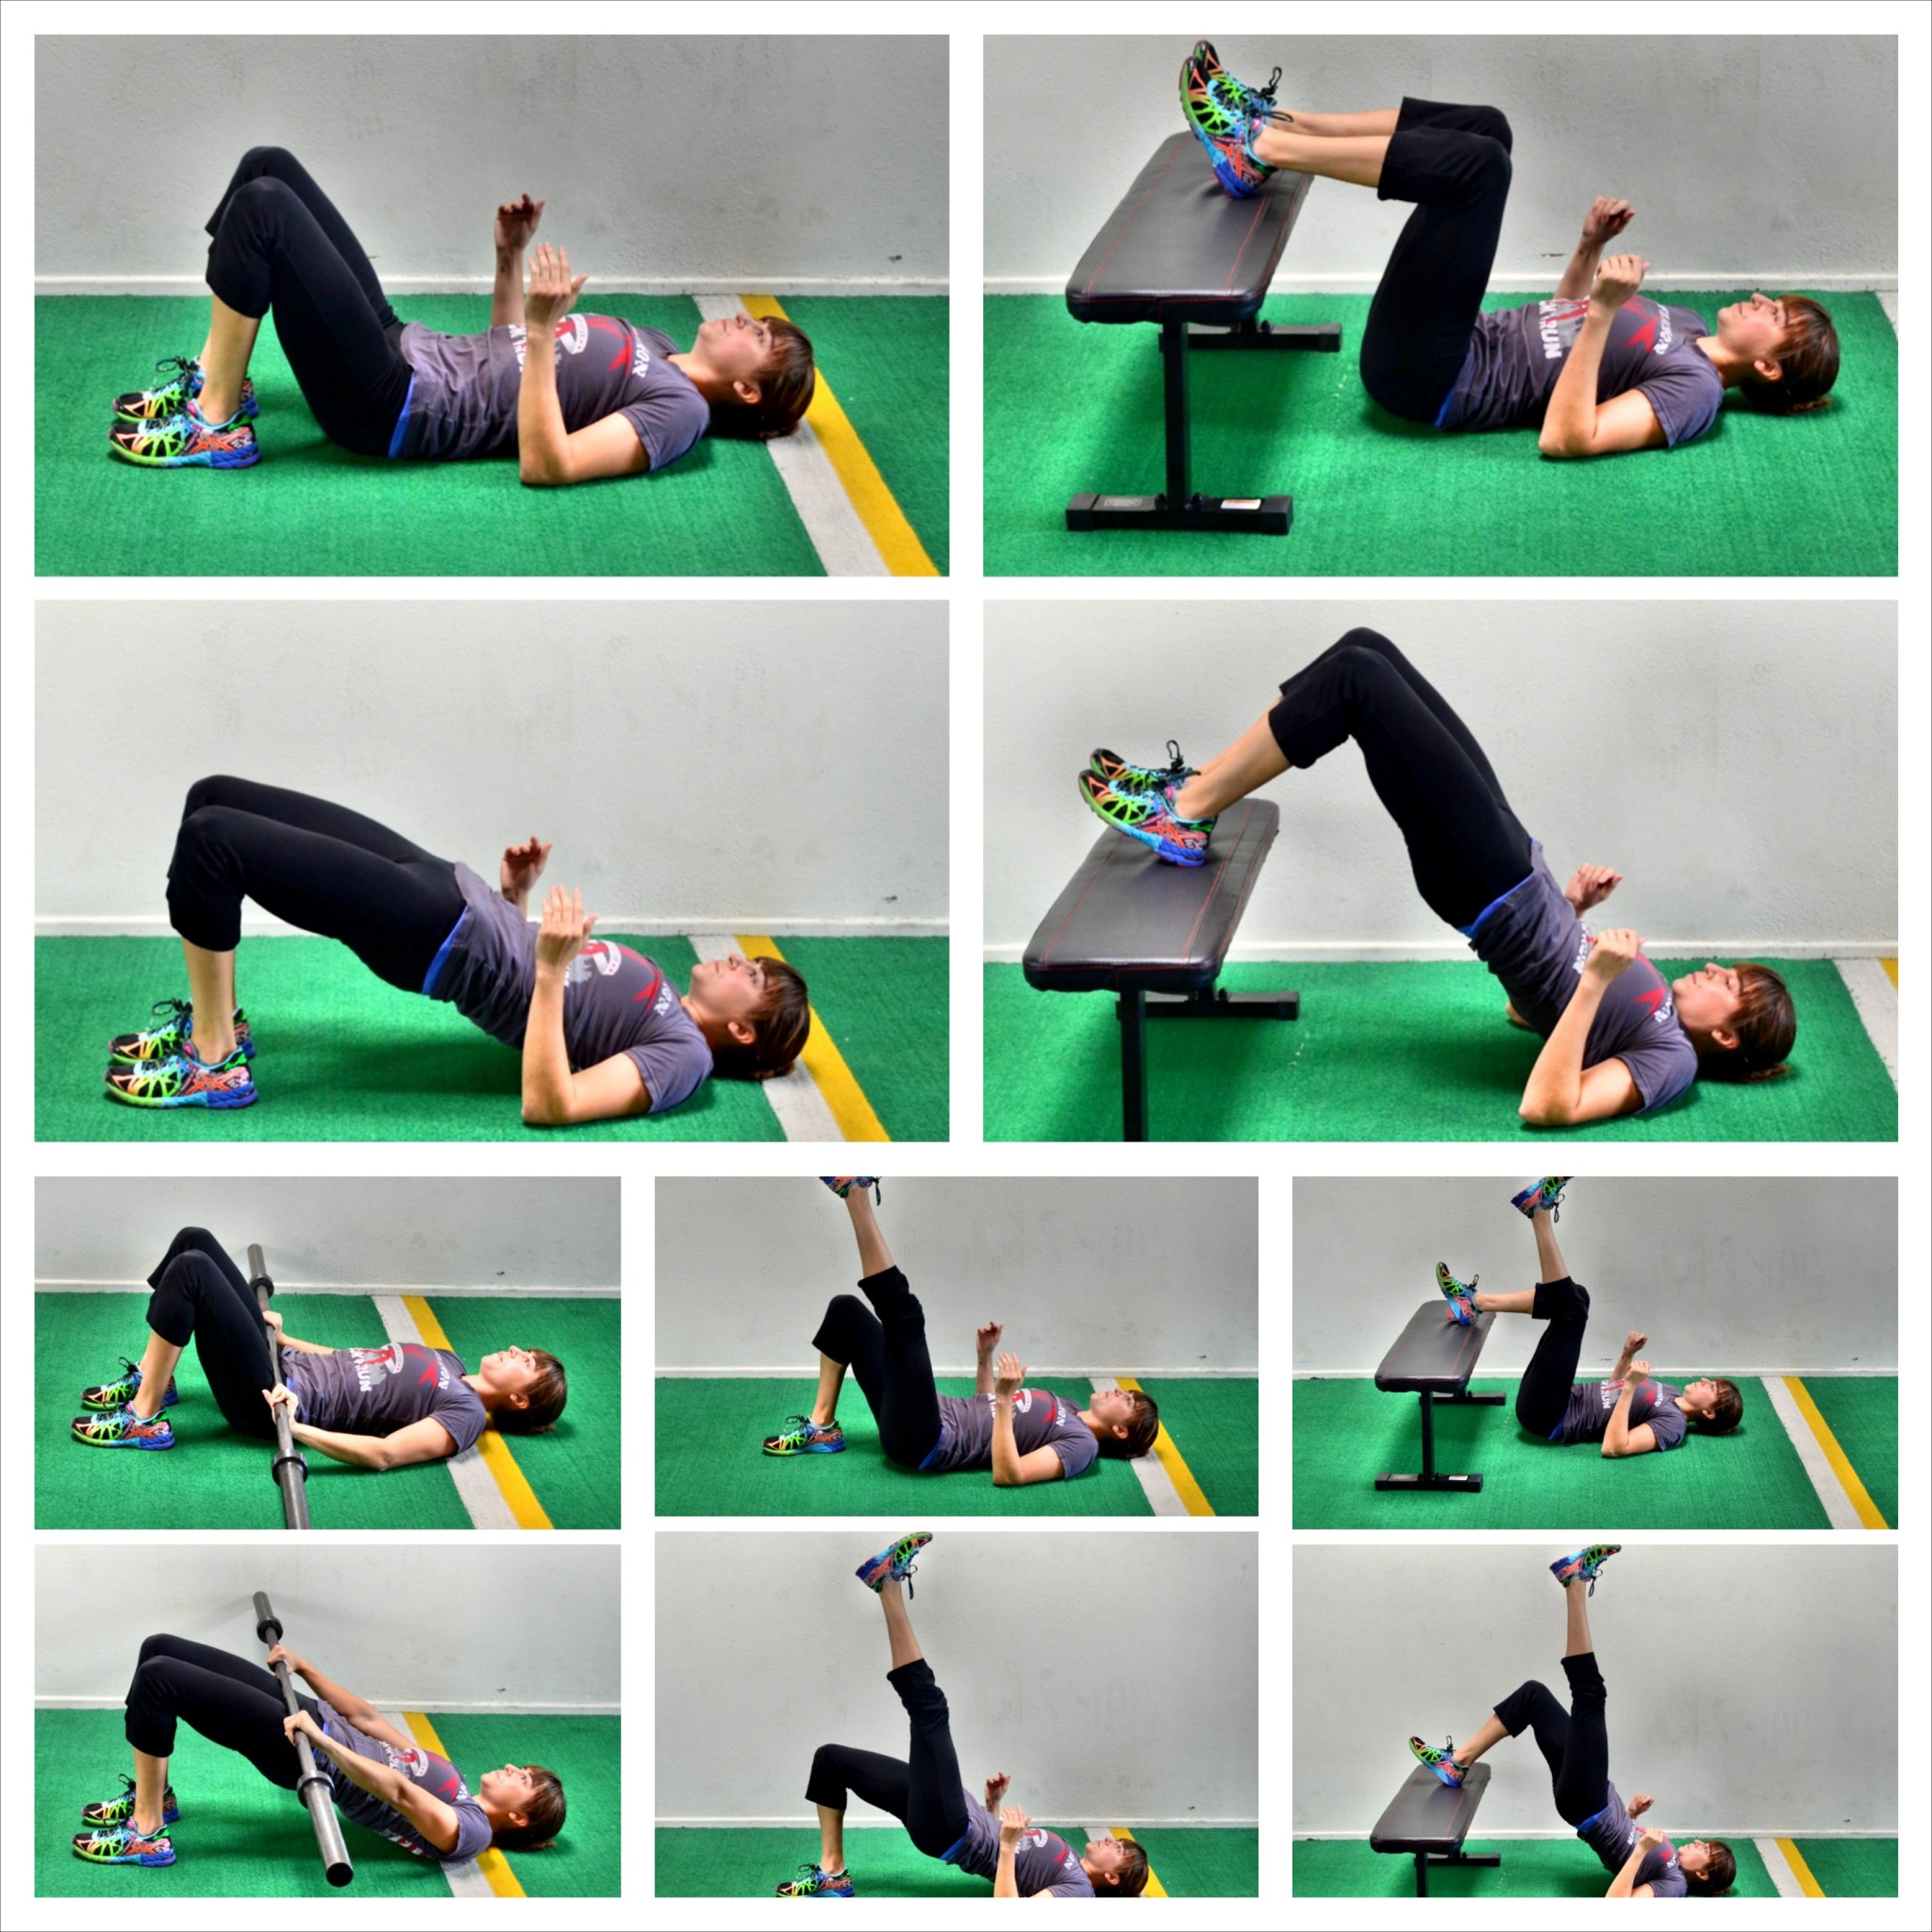
Glute Bridge Variations
Once you master the basic glute bridge, you can try many variations. Each one has a unique benefit. These moves keep your workouts fresh and challenge your muscles in new ways.
1. Single-leg Glute Bridge
Lift one foot off the ground and do the bridge with the other leg. This increases the challenge, works your balance, and targets each glute separately. It’s harder than it looks!
2. Weighted Glute Bridge
Place a dumbbell or weight plate on your hips. Hold the weight with your hands and perform the bridge as usual. This helps you build more strength and muscle.
3. Banded Glute Bridge
Put a resistance band around your thighs, just above your knees. As you lift your hips, push your knees out against the band. This targets your side glutes (glute medius).
4. Elevated Glute Bridge
Put your feet on a step or bench, keeping your shoulders on the floor. This increases the range of motion and works your hamstrings more.
5. Marching Glute Bridge
At the top of the bridge, lift one knee toward your chest, then switch sides. This challenges your core and stability.
6. Frog Pump
Put the soles of your feet together and let your knees fall out to the sides. Then bridge up. This version targets the inner and outer glutes.
7. Isometric Glute Bridge Hold
Instead of reps, hold the bridge at the top for 20–60 seconds. This builds endurance in your glutes and core.
8. Hip Thrust
Use a bench to support your upper back and push your hips up. You can add heavy weights to make this a powerful glute-building move.
9. Pulsing Glute Bridge
At the top of the bridge, do small pulses up and down for 10–20 reps before lowering. This creates a strong burn and muscle activation.
10. Feet-together Vs. Feet-apart Glute Bridges
Changing the distance between your feet shifts which glute fibers work hardest. Feet closer together focus more on the outer glutes.
How To Add Glute Bridges To Your Workout Routine
You can use glute bridges as a warmup, main exercise, or finisher. Here are some ideas for different fitness levels:
Beginners
- 2–3 sets of 10–15 reps
- Rest 30 seconds between sets
- Do 2–3 times per week
Intermediate
- 3–4 sets of 12–20 reps or 10–12 weighted reps
- Add single-leg or banded versions
- Rest 20–40 seconds between sets
Advanced
- 4–5 sets of 15–20 reps, use weight or advanced variations
- Try isometric holds or pulses at the end of each set
- Pair with squats, lunges, or deadlifts
For Athletes
- Use as a warmup to activate glutes before explosive lifts or sprints
- 2 sets of 8–10 reps with a pause at the top
For Injury Rehab
- Focus on slow reps and perfect form
- Avoid weight until you’re pain-free
- Consult a physical therapist for best options
Sample Weekly Plan
| Day | Variation | Sets | Reps |
|---|---|---|---|
| Monday | Basic Glute Bridge | 3 | 15 |
| Wednesday | Single-Leg Bridge | 3 | 10 (each leg) |
| Friday | Weighted or Banded Bridge | 4 | 12 |
Pro tip: You can do glute bridges after cardio, or pair them with other lower body moves for a strong workout.
Glute Bridge Vs. Hip Thrust: What’s The Difference?
Many people wonder if the glute bridge and hip thrust are the same. They are similar but have key differences.
- Glute bridge: Done on the floor, bodyweight or light weight, easy for all levels.
- Hip thrust: Upper back on a bench, bigger range of motion, allows heavy weights, best for building maximum glute size and strength.
When starting, the glute bridge is safer and simpler. As you get stronger, you can move to hip thrusts for more challenge.
Comparison Table
| Feature | Glute Bridge | Hip Thrust |
|---|---|---|
| Equipment Needed | None (optional mat or band) | Bench or box, optional barbell |
| Difficulty | Beginner to Intermediate | Intermediate to Advanced |
| Glute Activation | High | Very High |
| Best For | Learning, Rehab, Home Workouts | Strength, Muscle Growth |
Who Should Do Glute Bridges?
Almost everyone can benefit from glute bridges:
- Beginners: Easy to learn, low risk of injury.
- Athletes: Improves power and reduces injury risk.
- Desk workers: Counters the effects of sitting all day.
- Older adults: Helps with balance, walking, and daily movements.
- People with back pain: Builds glute and core strength to support the spine.
However, if you have a current hip or back injury, talk to a physical therapist before starting.
How Many Glute Bridges Should You Do?
It depends on your goals. For general fitness, 2–3 sets of 10–15 reps, 2–3 times a week, is a good start. If you want to build muscle, increase the sets, reps, or add weight.
Important insight: Quality matters more than quantity. Ten perfect reps are better than thirty sloppy ones. Always focus on squeezing your glutes at the top.
Progression: How To Make Glute Bridges Harder
If you’ve been doing glute bridges for a while, your muscles will adapt. To keep improving, try these:
- Add weight: Use a dumbbell, kettlebell, or weight plate on your hips.
- Single-leg bridges: Balancing on one leg is much harder.
- Pause at the top: Hold for 3–5 seconds each rep.
- Increase range of motion: Put your feet on an elevated surface.
- Use a band: Loop a resistance band around your thighs.
- Add pulses or isometric holds: After your set, hold or pulse at the top.
- Superset with other exercises: Do bridges after squats or lunges for more challenge.
Common Mistakes And How To Fix Them
Many people miss out on results or get hurt by making simple errors. Here’s what to watch for:
1. Using The Lower Back
If you feel the bridge in your lower back, not your glutes, you’re probably arching. Fix it by bracing your core and tucking your pelvis slightly.
2. Feet Too Far Or Too Close
If your feet are too far, you’ll feel it in your hamstrings. Too close, and you might stress your knees. The right spot: heels a hand’s length from your glutes.
3. Not Squeezing At The Top
Don’t just lift your hips—focus on maximal glute squeeze at the top for 1–2 seconds.
4. Knees Falling In Or Out
Keep your knees in line with your hips and ankles. Use a mirror or film yourself to check.
5. Going Too Fast
Fast reps use momentum, not muscle. Slow down and control each rep.
Hidden tip: Filming your form with your phone can reveal mistakes you don’t feel.
Glute Bridges For Different Goals
Glute bridges can be adapted to fit many goals:
For Muscle Growth
- Use heavy weights, 8–12 reps, 3–5 sets.
- Choose hip thrusts or weighted bridges.
- Focus on progressive overload—add weight over time.
For Fat Loss
- Use high reps (15–20+), short rests, and combine with other exercises.
- Add pulses or holds to increase intensity.
For Rehab And Mobility
- Use bodyweight, slow reps, and isometric holds.
- Focus on perfect form and muscle activation.
For Sports
- Use single-leg bridges and banded versions for stability.
- Add explosive hip thrusts for power.
Glute Bridges For Women Vs. Men
Both women and men benefit from glute bridges, but goals can differ:
- Women often use glute bridges to shape and lift the butt.
- Men may focus on strength, power, or athletic performance.
Either way, the muscle activation is similar. The main difference is in weight, sets, and how you combine the exercise with others.
Real-life Benefits: What You’ll Notice
Glute bridges do more than look good in the gym. Here’s what people often notice after a few weeks:
- Walking and standing feel easier—less back or hip fatigue.
- Better posture—less slouching at your desk.
- Climbing stairs or hills feels stronger.
- Sports performance improves, especially in running and jumping sports.
- Reduced knee, hip, or back pain (for many, but not all).
Unexpected insight: Many people report better balance and confidence in daily movements, especially older adults.

Credit: spotebi.com
Glute Bridges Vs. Other Butt Exercises
How does the glute bridge compare to squats, lunges, or deadlifts? Each has a role, but glute bridges are unique.
- Squats: Full lower body, but knees and quads do more work.
- Lunges: Good for glutes, but also work balance and quads.
- Deadlifts: Heavy glute and hamstring work, but harder to learn.
- Glute bridges: Isolate glutes, low risk, easy to adapt for all levels.
For best results, combine glute bridges with other lower body moves.
Equipment For Glute Bridge Progression
You don’t need equipment for basic glute bridges, but these tools can help as you get stronger:
- Resistance bands: For added tension around thighs.
- Dumbbells or kettlebells: For more weight.
- Barbell: For heavy hip thrusts.
- Step, bench, or box: For elevated variations.
- Yoga mat: For comfort.
Choose equipment based on your goals and what you have at home.
Glute Bridges For Beginners: Common Questions
Beginners often wonder about safety, soreness, and results. Here are two insights most people don’t hear:
- You might feel sore in your hamstrings at first. This is normal. As your form improves, you’ll feel it more in your glutes.
- If you can’t feel your glutes working, try “waking them up” with a few bodyweight squats or band walks before your bridges.
Tracking Progress And Results
To keep improving, track your workouts:
- Note how many sets and reps you do.
- Write down the weight used if any.
- Record how the exercise feels (where you feel it, any pain, etc. ).
- Every 2–4 weeks, try a harder variation or add weight.
Hidden tip: If you can do 20+ reps with perfect form and no fatigue, it’s time to make the move harder.
Glute Bridge Safety Tips
While glute bridges are safe for most, keep these tips in mind:
- Warm up your hips and core before starting.
- Stop if you feel sharp pain (especially in your back or hips).
- If you have a recent injury, check with a doctor or therapist first.
- Use a mat for comfort and to prevent slipping.
Glute Bridge Myths Vs. Facts
Let’s clear up some common myths:
- Myth: Only women need glute bridges.
Fact: Men benefit just as much, especially for strength and sports.
- Myth: You need heavy weights for results.
Fact: Bodyweight and bands work well, especially for beginners.
- Myth: Glute bridges are only for the butt.
Fact: They also help your core, hamstrings, and hips.
:quality(85):extract_cover()/2024/06/03/079/n/1922729/2ab7552f665e65aeb24393.59417838_.jpg)
Credit: www.popsugar.com
Supporting Science
Research shows glute bridges activate the glute muscles very well. A study published in the Journal of Strength and Conditioning Research found that the glute bridge had higher glute activation than many other common lower body exercises. For more on this, see the Wikipedia page on glute bridges.
Frequently Asked Questions
What’s The Difference Between A Glute Bridge And A Hip Thrust?
The glute bridge is done on the floor with your shoulders and feet on the ground. The hip thrust uses a bench or box for your shoulders, allowing a greater range of motion and heavier weights. Hip thrusts are more advanced and target the glutes even more.
How Often Should I Do Glute Bridges?
You can do glute bridges 2–4 times per week, depending on your goals. Allow at least one day of rest between hard sessions to let your muscles recover and grow.
Why Don’t I Feel Glute Bridges In My Glutes?
This usually means you’re using your lower back or hamstrings too much. Make sure your feet are in the right spot, brace your core, and focus on squeezing your glutes at the top. Slowing down your reps also helps.
Can Glute Bridges Help With Lower Back Pain?
Yes, if done correctly. Glute bridges strengthen the muscles that support your lower back. Start with bodyweight only, use perfect form, and stop if you feel pain.
Do I Need Equipment For Glute Bridges?
No, you can do glute bridges with just your bodyweight. As you get stronger, you can use resistance bands, dumbbells, or a barbell to make the exercise harder.
Glute bridges are simple but powerful. By adding this exercise to your weekly routine, you’ll build stronger glutes, better posture, and a healthier body. Start today and see the difference.
Credit: redefiningstrength.com