
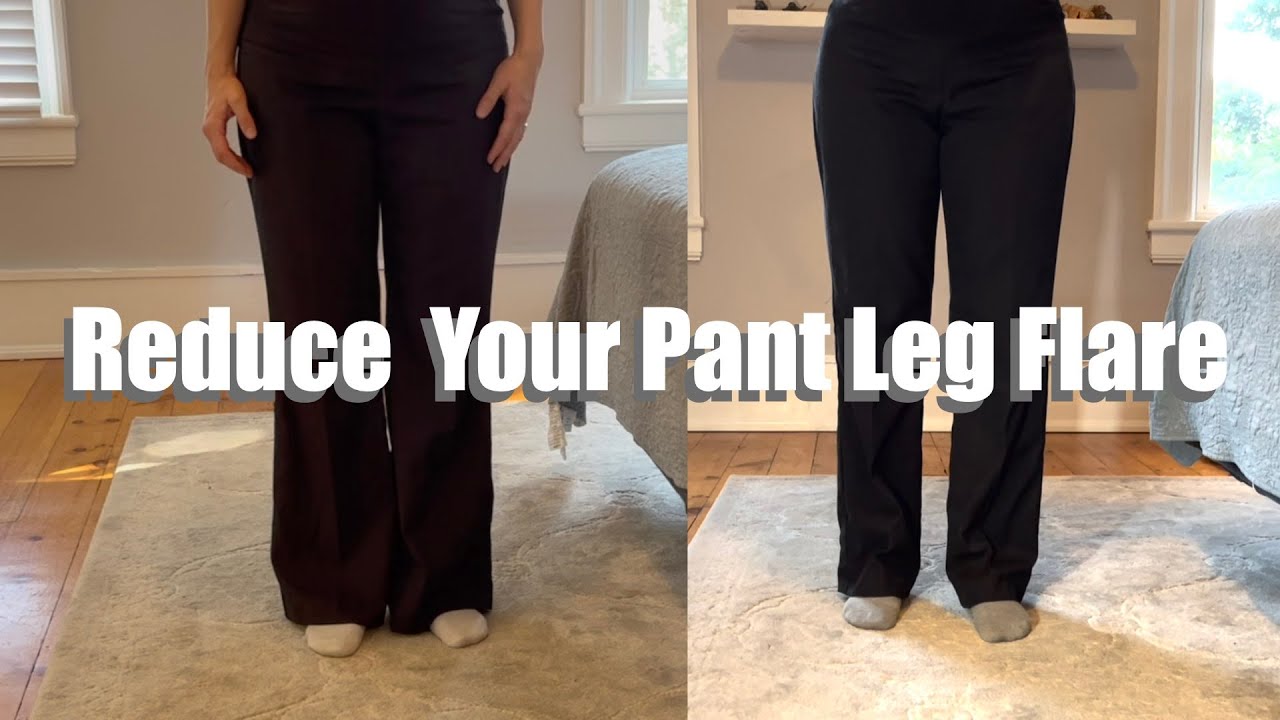
How to Reduce Flare in Pants: Easy Tailoring Tips
How To Reduce Flare In Pants
Finding the right pair of pants can be a challenge, especially when the flare at the bottom doesn’t match your style or body type. Many people love the idea of flared pants for their retro vibe or leg-lengthening effect, but sometimes the flare is just too much.
Whether you’ve bought flared pants online and they arrived wider than expected, or your tastes have simply changed, you might want to make them less dramatic. Reducing flare in pants is not only possible—it’s easier than you might think. With the right knowledge and some careful steps, you can transform your pants to better suit your look and comfort.
This guide will walk you through everything you need to know about reducing flare in pants. You’ll discover why flare happens, how to judge the right amount to remove, and which techniques work best for different fabrics and styles. Whether you want a subtle bootcut or a straight-leg, you’ll learn methods for both home alteration and working with a tailor. Along the way, you’ll get practical advice, common mistakes to avoid, and tips most beginners overlook. By the end, you’ll feel confident about reshaping your pants for a cleaner, more modern fit.
Understanding Flare In Pants
To change the flare, you need to understand what it is. Flare refers to how much the fabric widens from the knee down to the hem. This shape can be subtle, like in a bootcut, or dramatic, like in bell-bottoms. Designers add flare to create movement, add style, or balance body proportions. However, too much flare can overwhelm smaller frames, look outdated, or clash with your personal style.
Why Pants Flare More Than Expected
Flare can be exaggerated by several factors:
- Fabric weight: Light fabrics like rayon or polyester drape differently and may look more flared.
- Pattern design: Some brands cut pants with extra width at the hem for trend reasons.
- Shrinkage or stretching: Washing or wearing can change how pants fall and increase the flare.
- Body type: If you have slim calves, the flare stands out more.
Understanding these points helps you judge whether you need a simple adjustment or a more detailed alteration.
Deciding How Much Flare To Remove
Before you start cutting or sewing, decide what final look you want. Do you prefer a straight-leg, a slight bootcut, or just a less dramatic flare? Here are some steps to guide you:
- Try on the pants and stand in front of a mirror. Pin or fold the fabric at the sides to visualize different shapes.
- Mark the desired width at the hem and at your knee. Use chalk or pins, but be careful not to mark too high or low.
- Compare with other pants you like. Lay a pair of well-fitting straight or slim pants on top to guide your changes.
Reducing flare is about balance. Too little shaping can look baggy, while too much can make the pants tight or uncomfortable.
Credit: www.youtube.com
Methods To Reduce Flare In Pants
There are several ways to change the shape of your pants. Some are simple and can be done at home, while others require a sewing machine or a professional tailor. Here’s a breakdown of the main methods:
1. Basic Home Alteration With Hand Sewing
If you don’t have a sewing machine, you can still make changes by hand. This method is best for small adjustments and lightweight fabrics.
Steps:
- Turn the pants inside out and put them on.
- Pin along the side seams, starting from just below the knee down to the hem, to mark the new shape.
- Remove the pants and use chalk to draw a line following the pins.
- Sew along this line using a strong backstitch.
- Trim excess fabric, leaving 1 cm for finishing.
- Finish the raw edge with a zigzag stitch or fabric glue to prevent fraying.
Practical tip: Always sew a little less than you think you need. You can take in more, but it’s hard to add fabric back.
2. Using A Sewing Machine For Precise Results
A sewing machine gives a smoother, more durable finish and works better for denim or heavy fabrics.
Steps:
- Turn the pants inside out and pin the sides as before.
- Use a ruler to draw a straight or gently curved line from just below the knee to the hem.
- Sew along the line with a straight stitch, then a zigzag or overlock stitch to secure the edge.
- Try on the pants to check the fit before trimming the fabric.
- If satisfied, trim the excess and press the seam flat.
Example: If your pants flare 5 cm wider than you like, you might remove 2.5 cm from each side for a total of 5 cm.
3. Tapering The Inner And Outer Seams
Professional alterations often taper both the inner (inseam) and outer (side seam) for a more natural look.
- Mark and pin both seams evenly so the pants hang straight.
- Sew and finish both sides.
- This technique works well for wide-leg or very flared pants.
Non-obvious insight: Only changing one seam can twist the leg and make the pants fit awkwardly. Always check both seams for balance.
4. Working With A Tailor
If you’re unsure or want a perfect finish, a professional tailor is a smart choice. They can reshape pants precisely, match thread and finish, and handle tricky fabrics like wool or stretch denim.
Cost: Depending on your location, tapering pants can cost between $15 and $40, but high-end fabrics may cost more.
Extra tip: Bring shoes you usually wear with the pants. This helps the tailor shape the flare to match your real-life style.
5. Temporary Solutions (no Cutting)
Not everyone wants to commit to a permanent change. Here are ways to make flare less noticeable without sewing:
- Double-sided fashion tape: Tuck in some fabric and secure it.
- Safety pins: Pin the inside for a quick, hidden adjustment.
- Boots or high-top shoes: These can cover or support the flare, making it less obvious.
These are useful for events or if you’re unsure about changing the pants forever.
Choosing The Right Pants Shape For Your Body
Reducing flare works best when you know which shapes suit you. Here’s a quick overview of pant shapes and who they flatter:
| Pant Shape | Description | Best For |
|---|---|---|
| Straight-leg | Same width from knee to hem | Most body types, classic look |
| Bootcut | Slight flare at hem | Balancing hips, wearing boots |
| Slim/skinny | Narrow from thigh down | Petite or slim frames |
| Wide-leg | Loose all the way down | Tall frames, relaxed style |
If you’re not sure, try on different styles before altering your flared pants. Photos can help you compare and decide.
Tools And Materials You’ll Need
Altering pants at home is easier with the right tools:
- Pins or fabric clips
- Tailor’s chalk or washable marker
- Sharp fabric scissors
- Measuring tape
- Sewing machine (optional, but preferred for denim)
- Seam ripper (for undoing stitches)
- Iron and ironing board
- Matching thread
Quality tools lead to neater, longer-lasting results.
Step-by-step Example: Reducing Flare In Denim Jeans
Let’s look at a real example. Say you have classic blue jeans with a wide flare. You want to make them a straight-leg style.
- Wash and dry the jeans as you normally would. This prevents shrinking after alteration.
- Turn the jeans inside out and lay them flat. Smooth out wrinkles.
- Lay a pair of straight-leg jeans (that fit well) on top. Align the waist and crotch.
- Mark the new leg shape with chalk, following the straight-leg outline from the knee to the hem.
- Pin along the line to keep fabric in place.
- Sew along the chalk line with a straight stitch, using matching thread.
- Try on the jeans before trimming. Check the look and comfort.
- Trim the excess fabric if satisfied, leaving a 1 cm seam allowance.
- Finish the raw edge with a zigzag stitch or overlocker.
- Press the seams with an iron for a crisp finish.
Advanced tip: For jeans with topstitching, you may need to redo the outer seam’s double stitch. This keeps the jeans looking store-bought.
Special Considerations For Different Fabrics
Different materials react to alteration in their own ways. Here’s what to keep in mind:
Denim
- Thick, holds shape well.
- Must use strong needles and thread.
- Press seams well to reduce bulk.
Stretch Fabrics (like Jeggings)
- Use a stretch stitch if possible.
- Don’t make the leg too tight—it may strain the fabric.
- Try on after pinning to check movement.
Lightweight Or Flowing Fabrics
- Pin very carefully to prevent shifting.
- Use fine needles to avoid holes.
- Hand sewing is sometimes easier for delicate materials.
Wool Or Dress Pants
- Mark and pin with care.
- Use a pressing cloth to prevent shiny marks when ironing.
- Consider a tailor for expensive items.
Non-obvious insight: Some fabrics shrink or stretch after sewing. Always wash and press before starting.
Common Mistakes And How To Avoid Them
Even experienced home sewers make errors. Here’s how to avoid the most frequent problems:
- Taking in too much at once: Alter in small steps. It’s easier to sew more than fix a too-tight seam.
- Uneven legs: Always mark and pin both legs at the same time. Try on pants after sewing one leg before finishing the other.
- Ignoring the hem shape: Some flared pants have curved hems. If you narrow the legs, you may need to re-hem for a straight look.
- Using the wrong thread or needle: For denim, use strong thread and a denim needle. For silk, use fine thread and needle.
- Forgetting about pockets or side seams: If the new seam runs through a pocket, you may need to reattach or adjust it.
Practical tip: Keep the original seam allowance until you’re completely sure of the fit.
Credit: www.walmart.com
Comparing Diy Vs. Tailor Alterations
Should you do it yourself or go to a professional? Here’s a quick comparison:
| Factor | DIY | Tailor |
|---|---|---|
| Cost | Low (just materials) | Medium to high |
| Time | 1-2 hours | Usually 2-7 days |
| Skill Needed | Beginner to intermediate | Expert |
| Finish Quality | Good to excellent (with practice) | Professional |
| Best For | Casual pants, learning | Expensive or complex pants |
If you’re new to sewing, start with inexpensive pants first. For designer or tailored pants, a professional is usually worth the investment.
Making Sure Your Pants Still Fit
Narrowing the leg can affect how the pants feel and move. After altering, check:
- Can you walk and sit easily?
- Do the pants pull at the knees or calves?
- Is the hem at the right spot for your shoes?
If you feel restricted, undo some of the stitching and make the flare slightly wider.
Pro tip: Wear the pants for a few hours at home after altering. This reveals fit issues you might miss in a quick try-on.
Credit: www.walmart.com
How To Maintain The New Shape
To keep your pants looking sharp:
- Wash on a gentle cycle and avoid high heat drying.
- Press the new seams after each wash.
- Store pants hanging by the waistband to prevent creasing.
- If the edge starts to fray, re-stitch or use fabric glue quickly.
Non-obvious insight: The way you care for your pants after alteration matters as much as the initial sewing. Seams can shift if not pressed and cared for.
When Not To Reduce Flare
Not every pair of pants should be altered. Consider leaving flare if:
- The fabric is very delicate (like silk or lace).
- The pants are vintage or have collectible value.
- The flare is part of a special design or embroidery.
- You might want to wear the style again in the future.
In these cases, try temporary fixes or just style the pants differently for a new look.
Styling Tips For Less Flared Pants
Once you’ve reduced the flare, you might need to rethink your outfit combinations. Here are some ways to style your new, slimmer pants:
- Pair with fitted tops: This balances the slimmer leg.
- Wear low-profile shoes: Sneakers, loafers, or flats work well with straight and slim legs.
- Try cuffing the hem: For a casual look, roll up the bottom.
- Add a belt: Defines your waist and finishes the look.
If you’re used to wide flares, a change in silhouette can inspire new outfits.
Sustainability: Why Alter Instead Of Buy New
Changing your pants at home is not just about style—it’s also better for the environment and your wallet.
- Saves money: Altering costs less than buying new pants.
- Reduces waste: Fewer clothes end up in landfills.
- Personalizes your wardrobe: You get exactly the fit and style you want.
According to the U.S. Environmental Protection Agency, millions of tons of clothing are discarded every year. Small changes, like altering instead of replacing, make a real difference.
Frequently Asked Questions
How Do I Know How Much Flare To Remove From My Pants?
The best way is to try on the pants and pin the sides to the shape you like. Walk around, sit, and check the look from the front and side. Compare with another pair of pants that fits well. Mark the new line with chalk before sewing anything.
Can I Reduce Flare In Pants Without Any Sewing?
Yes, you can use double-sided fashion tape or safety pins inside the leg to temporarily hide some of the flare. This works for events or short-term changes. For a permanent fix, sewing is needed.
Is It Better To Alter Pants Myself Or Use A Tailor?
If you’re comfortable with basic sewing and the pants are not expensive, you can try altering them yourself. For valuable, lined, or complex pants, a tailor will give the best results. Beginners should practice on old pants first.
Will Reducing The Flare Make My Pants Shorter?
It can, especially if you need to re-hem the pants or if the new seam pulls up the fabric. Always check the length after pinning and before trimming any fabric. If needed, add a small fabric insert at the hem to keep the length.
What If I Make A Mistake While Altering My Pants?
If you sew a seam too tight, you can unpick it with a seam ripper and try again. Always start with small changes and test the fit. For serious mistakes, a tailor may be able to help fix the problem.
Altering flared pants is a skill that gets easier with practice. With the right tools, patience, and attention to detail, you can achieve a custom fit that flatters your shape and suits your style. Remember: clothing adjustments are normal, and even professionals alter store-bought clothes. Don’t be afraid to experiment—your perfect pair of pants is only a few steps away.