
How to Pattern Leggings: Step-by-Step Guide for Perfect Fit
How To Pattern Leggings
Designing your own leggings can be a fun and empowering journey, especially if you want a perfect fit or a unique style that no store can offer. Patterning leggings means creating a paper or digital template that matches your body’s measurements.
This template can then be used to cut fabric and sew leggings that fit you exactly. Many people think that pattern making is only for experts, but with the right steps, anyone can learn how to pattern leggings at home.
In this guide, you’ll learn how to create your own leggings pattern from scratch. We’ll cover all the essentials, from understanding basic measurements to adjusting for different body shapes and adding special touches. You’ll discover tips that even some experienced home sewists miss, such as how to handle stretch fabrics and avoid common mistakes that lead to twisting or sagging.
If you’re ready to dive into the world of DIY fashion, this guide will help you take your first confident steps.
Why Create Your Own Leggings Pattern?
Buying leggings off the rack can be hit or miss. Store-bought options often fit poorly, especially around the waist, hips, or ankles. Some people find them too tight in some places and too loose in others. Making your own pattern lets you control every detail.
You can choose your preferred rise, length, and fit, and even add pockets or custom panels.
Patterning leggings yourself also saves money in the long run and gives you the freedom to use any fabric you like. Whether you want bold prints, technical fabrics for sports, or just something comfortable for lounging, your own pattern opens new possibilities.
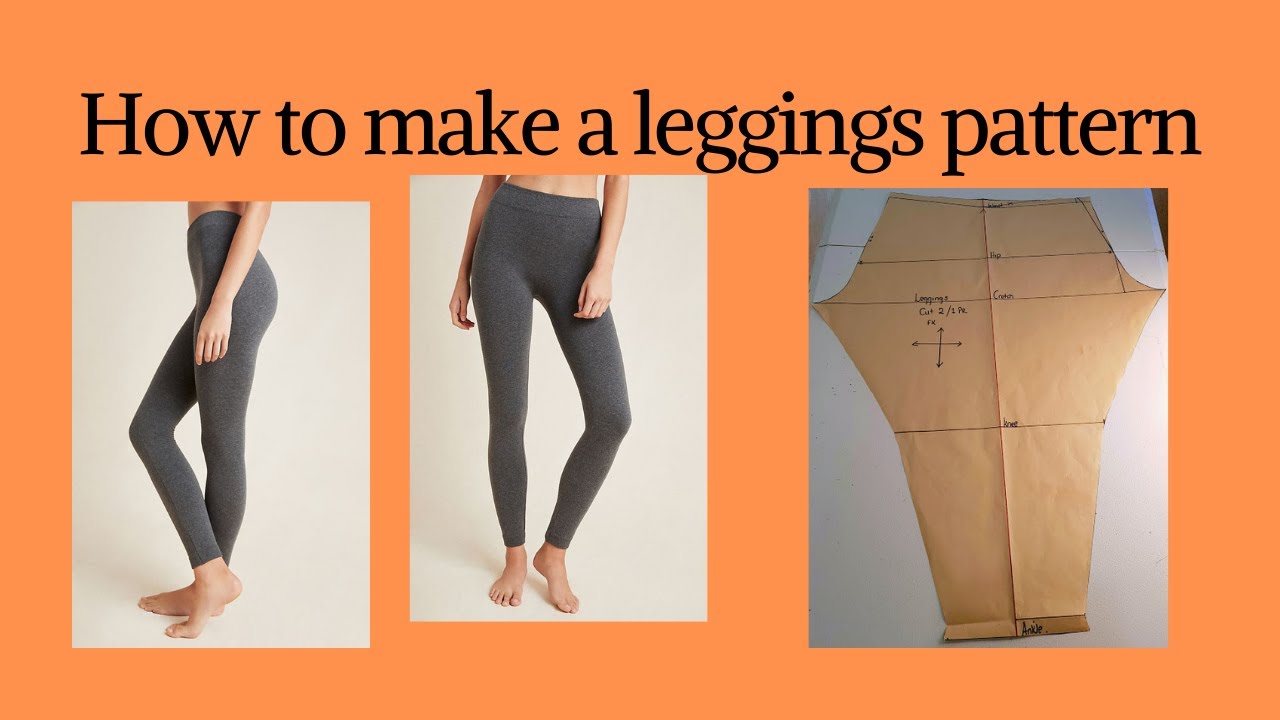
Understanding Leggings Pattern Basics
Before starting, it’s helpful to know what a leggings pattern looks like. Most leggings are made from two main pieces: the front leg and the back leg. These are cut from stretchy fabric and sewn together along the inside and outside of the legs, plus the crotch seam.
Leggings patterns are different from other pants patterns because they are designed for stretch fabrics. This means the pattern pieces are smaller than your actual body measurements, so the fabric stretches to fit snugly. The amount of this reduction is called negative ease.
What Is Negative Ease?
Negative ease means the garment’s measurements are less than your body’s measurements. For leggings, you usually want 10-20% negative ease, depending on the fabric’s stretch.
For example:
If your hip is 100cm and your fabric stretches 20%, your pattern hip width might be 90cm (10% negative ease).
Ignoring negative ease is a common mistake. If you use your exact body measurements, the leggings will be baggy and may fall down.
Gathering Tools And Materials
To make a leggings pattern, you’ll need a few basic tools. Most of these are affordable and easy to find:
- Measuring tape (soft, flexible)
- Large sheet of paper (pattern paper, craft paper, or even wrapping paper)
- Pencil and eraser
- Ruler (preferably a long straight one and a curve ruler)
- French curve or hip curve (for smooth lines)
- Clear tape (for joining pieces if needed)
- Scissors (paper scissors, not fabric scissors)
- Calculator (for working out ease and measurements)
- Notebook (for writing down measurements and adjustments)
Optional but helpful:
- Pattern weights (to keep paper flat)
- Tracing wheel and tracing paper (to transfer patterns)
- Digital pattern software (if working digitally)
Taking Accurate Body Measurements
Good leggings start with accurate measurements. Wear tight-fitting clothes or underwear when measuring yourself. Stand straight but relaxed.
Key measurements for leggings:
1. Waist Circumference
Measure at your natural waist—the smallest part, usually above the belly button.
2. Hip Circumference
Measure around the widest part of your hips and buttocks.
3. Rise
Measure from the center front waist, between your legs, up to the center back waist. This is your full rise.
4. Inseam
Measure from the crotch point down the inside of your leg to your ankle.
5. Outseam
From the waist (where you want the top of your leggings) down the side of your leg to the ankle.
6. Thigh Circumference
Around the fullest part of your thigh.
7. Knee Circumference
Around your knee where you want the leggings to fit.
8. Calf Circumference
Around the widest part of your calf.
9. Ankle Circumference
Around your ankle bone.
Pro Tips For Measuring
- Use a mirror or ask a friend to help.
- Keep the tape snug but not tight.
- Double-check measurements, especially if you are new to sewing.
Credit: www.youtube.com
Deciding On Leggings Style
Leggings come in many styles. Before you draft your pattern, decide:
- Waist height: High, mid, or low rise.
- Length: Full, 7/8, capri, or shorts.
- Fit: Super-tight, standard, or relaxed.
- Details: Pockets, seams, panels, gussets.
Write down your choices. They will guide your pattern shape and adjustments.
Calculating Pattern Measurements
Once you have your body measurements, you must adjust them for negative ease. The amount depends on your fabric’s stretch.
How To Calculate Negative Ease
Let’s say your fabric stretches 20%. For leggings, reduce your body measurement by 10-15% for a snug fit.
Example calculation for hip:
- Hip circumference: 100cm
- Negative ease: 12%
- Pattern hip width: 100cm - (100cm x 0.12) = 88cm
Do this for waist, hip, thigh, and ankle. Write down both your actual measurements and your pattern measurements in a table for easy reference.
| Body Part | Body Measurement (cm) | Negative Ease (%) | Pattern Measurement (cm) |
|---|---|---|---|
| Waist | 80 | 12 | 70.4 |
| Hip | 100 | 12 | 88 |
| Thigh | 58 | 12 | 51 |
| Ankle | 22 | 12 | 19.4 |

Credit: mellysews.com
Drafting The Basic Leggings Pattern
Now, you’re ready to draw the actual pattern. This is the foundation for all leggings styles.
Step 1: Draw A Vertical Line
- On your paper, draw a long vertical line. This is your center line (grainline).
- Mark the waist point at the top.
- At the bottom, mark the ankle point. The length from waist to ankle is your outseam.
Step 2: Mark Key Horizontal Lines
Along the vertical line, measure and draw lines at:
- Hip level (measured from waist down)
- Thigh level (around crotch level, about 6-8cm below hip)
- Knee level (from waist to knee)
- Calf level (from waist to calf)
- Ankle level (bottom of pattern)
Label each line. This helps you keep track as you draw.
Step 3: Add Pattern Widths
From the center line, use half the pattern measurement for each body part (since you’re drawing half of the leg):
- At the waist, measure out from the center line: Half the waist pattern width.
- At the hip, half the hip pattern width.
- At the thigh, half the thigh pattern width.
- At the knee, half the knee pattern width.
- At the calf, half the calf pattern width.
- At the ankle, half the ankle pattern width.
Mark these points on each horizontal line.
Step 4: Connect The Dots
Use your ruler or a French curve to connect the points smoothly. The side seam should curve gently from hip to ankle. The inside leg seam (inseam) is usually straighter but curves in near the crotch.
Step 5: Draw The Crotch Curve
At the top inner side of the leg, shape the crotch curve. For basic leggings:
- Extend the top line at the crotch by about 2-4cm horizontally (for the back piece, extend a bit more than the front).
- Draw a smooth curve from the inseam up to the waistline.
Step 6: Add Seam Allowance
Add seam allowance (usually 0.7cm or 1cm) around all edges. Mark it clearly.
Step 7: Cut Out The Pattern
Cut out the pattern piece. You now have the basic leg pattern. For leggings, the front and back are often almost the same, but the back has a longer crotch extension.
Creating The Back Leg Pattern
Leggings need a back piece with a slightly deeper crotch curve. This helps the leggings fit your body’s curves better and stops them from pulling down at the back.
- Place your front pattern on another sheet of paper.
- Trace around it.
- At the crotch seam, extend the curve by 1-2cm.
- Slightly raise the waist at the back (about 2-3cm higher than the front).
- Smooth out the side seam if needed.
Cut out the back pattern piece.
Comparing Leggings Pattern Vs. Regular Pants
Some people try to use a jeans or trousers pattern for leggings, but the results are usually poor.
| Feature | Leggings | Regular Pants |
|---|---|---|
| Fabric Type | Stretch knit | Woven/non-stretch |
| Ease | Negative | Positive/zero |
| Seams | Simple, minimal | More, with darts and fly |
| Waistband | Elastic or yoga style | Fitted, often with closure |
Key takeaway: Always draft your leggings pattern specifically for stretch fabrics. Do not use a jeans or pants pattern as a base.
Adjusting The Pattern For Custom Fit
Every body is unique. You may need to adjust your pattern for special needs:
- Fuller thighs or calves: Add width at these points.
- Large or small buttocks: Adjust the back crotch curve and raise or lower the back waist.
- High or low waist preference: Change where the waistline is placed.
- Short or long legs: Adjust the inseam and outseam length.
How To Test The Fit
Cut your pattern from inexpensive fabric (like cotton jersey). Sew it together quickly with a long stitch. Try on the test leggings (called a muslin or toile). Check for:
- Wrinkles or pulling: May mean too little width or poor curve shape.
- Sagging at knees or seat: Could be too much length or not enough negative ease.
- Waist rolling down: May need a higher rise or firmer elastic.
Mark needed changes directly on the test fabric, then adjust your paper pattern.
Patterning Special Features
Once you master the basic pattern, you can add design elements.
Adding A Gusset
A gusset is a small diamond-shaped insert in the crotch for extra comfort and durability.
- Draw a diamond shape (about 6-10cm wide).
- Cut the crotch seam open on your pattern and add the gusset piece.
- This is common in athletic leggings.
Adding Pockets
Pockets can be side panel style, hidden waistband, or patch pockets.
- For side pockets, add a side panel to your pattern. Mark the pocket opening.
- For hidden waistband pockets, add a small pocket piece to the waistband pattern.
Creating A Yoga Waistband
Instead of elastic, a yoga waistband uses a wide band of fabric.
- Draft a rectangle (width = waist, height = 15-20cm).
- Fold in half when sewing to create a smooth, comfortable waistband.
Choosing The Right Fabric
Fabric choice can make or break your leggings. The wrong fabric can cause see-through problems, sagging, or uncomfortable seams.
Best Fabrics For Leggings
- Cotton-spandex jersey: Soft, breathable, moderate stretch.
- Nylon-spandex (athletic knits): Smooth, high stretch, moisture-wicking.
- Polyester blends: Strong, holds color, good for prints.
Check the fabric’s stretch percentage by stretching 10cm of fabric and measuring how far it goes. For leggings, you want at least 40-60% stretch.
| Fabric Type | Stretch (%) | Pros | Cons |
|---|---|---|---|
| Cotton-spandex | 40-60 | Comfortable, easy to sew | Can fade, less durable |
| Nylon-spandex | 60+ | Strong, holds shape | Less breathable |
| Polyester blends | 40-80 | Vibrant prints, quick dry | May pill, can be shiny |
Non-obvious tip: Always do a squat test with your fabric stretched over your hand to check for transparency.
Laying Out And Cutting The Pattern
Once your paper pattern is ready, it’s time to cut the fabric.
Preparing The Fabric
- Wash and dry the fabric to pre-shrink.
- Lay it flat, smooth out wrinkles.
- Fold the fabric in half with stretch running across the width (most leggings are cut with the greatest stretch around the body).
Placing The Pattern
- Align the long edge of the pattern with the grainline (parallel to selvage).
- Pin or weight the pattern to the fabric.
- Mark notches and any important points (crotch, knee).
Cutting Tips
- Use sharp scissors or a rotary cutter.
- Cut slowly and carefully—stretch fabrics can shift.
- Mark the front and back pieces clearly.
Secret tip: If your fabric has a one-way print or nap, make sure both legs face the same direction.
Sewing A Test Pair
Before making your final leggings, sew a test pair. This helps you spot fitting issues early.
- Sew with a stretch stitch or narrow zigzag.
- Use a ballpoint needle for knits.
- Try on the test leggings. Move around—sit, squat, walk.
Check for:
- Fit around waist, hips, thighs, knees, and ankles.
- Crotch comfort (no pulling or sagging).
- Length—do they end where you want?
Mark any adjustments and return to your paper pattern before sewing your final pair.
Patterning For Different Body Shapes
Everyone’s body is unique. Here’s how to adjust your leggings pattern for common shapes:
Curvy Hips
- Add width at the hip line and blend into the waist and thigh.
- Raise the back waist if needed.
Narrow Hips
- Use less negative ease at the waist to avoid gaping.
- Taper the leg more if desired.
Athletic Or Muscular Legs
- Increase width at thigh, calf, or knee.
- Test with muslin to fine-tune fit.
Plus Sizes
- Check stretch percentage carefully—more negative ease may not be comfortable.
- Use a gusset for extra comfort.
Non-obvious insight: For very curvy bodies, it’s sometimes better to add a side seam for more precise shaping.
Pattern Grading For Multiple Sizes
If you want to make leggings for friends or sell your pattern, you’ll need to grade the pattern to different sizes.
- Start with your base size.
- Use grading increments—for example, add 2-3cm at the hip per size.
- Adjust all pattern points evenly.
- Blend curves smoothly between sizes.
Grading can be tricky for beginners, but it’s a valuable skill for custom sewing.
Digitizing Your Leggings Pattern
Many sewists prefer digital patterns for easy storage and sharing.
- Scan your paper pattern or draw directly in a program like Adobe Illustrator or Inkscape.
- Use vector lines for precision.
- Add size labels, seam allowances, grainlines, and notches.
- Save in PDF for printing or sharing.
Digital patterns let you scale up or down easily and print replacements if your original gets damaged.
Troubleshooting Common Leggings Pattern Issues
Not every pattern works perfectly on the first try. Here’s how to solve some frequent problems:
Twisting Legs
- Usually caused by off-grain cutting. Make sure pattern is aligned with fabric grain.
- Check that both legs are cut in the same direction.
Sagging Knees Or Seat
- Too little negative ease. Reduce pattern width.
- Try a firmer fabric.
Waistband Rolling Down
- Waist too low or elastic too soft.
- Raise the waist or use a wider, stronger elastic.
Camel Toe
- Crotch curve too shallow or too short.
- Deepen and lengthen the front crotch curve slightly.
Baggy Ankles
- Ankle measurement too wide.
- Taper pattern more at the ankle.
Adding Style Elements To Your Pattern
Once you master the basics, you can get creative:
- Color blocking: Add seam lines and use different fabrics for panels.
- Decorative topstitching: Use contrast thread on side seams.
- Ruching: Add gathers at the ankle or side seam for texture.
- Mesh inserts: Cut out sections and sew in mesh for breathability.
Customizing your pattern lets you design leggings as unique as you are.
Saving And Storing Your Pattern
Keep your finished pattern safe for future projects:
- Roll up and store in a tube or flat in a folder.
- Label with size, style, and date.
- For digital patterns, back up files on a cloud drive.
Well-organized patterns save time and effort for your next project.
Resources For Pattern Makers
Learning to pattern leggings is just the start. Explore more with online tutorials, books, and pattern-making communities. A great starting point is the Wikipedia page on sewing patterns for detailed background.
Frequently Asked Questions
How Do I Know How Much Negative Ease To Use For Leggings?
Negative ease depends on your fabric’s stretch. For most leggings, use 10-15% negative ease for a snug but comfortable fit. If your fabric is very stretchy, you can use more negative ease. Always make a test pair to check comfort before cutting expensive fabric.
Can I Use A Pants Pattern To Make Leggings?
No. Pants patterns are designed for non-stretch fabrics and have extra room (positive ease). Leggings need a special pattern with negative ease and shaped crotch curves for stretch fabrics. Using a pants pattern for leggings usually results in poor fit and sagging.
What Is The Best Fabric For Home-sewn Leggings?
The best fabric is a 4-way stretch knit with at least 40-60% stretch. Cotton-spandex, nylon-spandex, or polyester blends work well. Test your fabric by stretching it and checking for recovery (it should snap back to its original shape). Do a squat test to check for opacity.
Why Do My Leggings Twist When I Wear Them?
Leg twisting is usually caused by cutting the pattern off-grain. Always align the pattern grainline with the fabric’s grain and make sure both legs are cut in the same direction. Also, check that your sewing is even and not stretching the fabric out of shape.
How Do I Add Pockets To My Leggings Pattern?
To add pockets, modify your pattern by creating a side panel or attaching a pocket piece to the waistband. For a side pocket, draw a new seam line down the side of the leg and add a pocket opening. For a hidden waistband pocket, add a small pocket to the back of the waistband piece.
Always test pocket size and placement before sewing your final leggings.
Designing your own leggings pattern is a rewarding project that combines creativity, technical skill, and personal style. With the right steps, you’ll soon have leggings that fit better than anything you can buy in stores—made by you, for you.
Credit: greenstyle.com