
How to Make Tank Top from T Shirt: Easy DIY Transformation
How To Make Tank Top From T Shirt
Turning an old t-shirt into a tank top is more than just a fun DIY project. It’s a great way to refresh your wardrobe, save money, and reduce waste. Many people have t-shirts they don’t wear often—maybe they’re too loose, the sleeves feel uncomfortable, or the print isn’t stylish anymore.
With a few simple steps, you can transform these forgotten shirts into comfortable, fashionable tank tops. You don’t need advanced sewing skills or expensive tools. You just need a bit of patience, attention to detail, and a willingness to experiment.
This guide will take you through every detail of making a tank top from a t-shirt. You’ll learn how to choose the right shirt, mark your cutting lines, use different cutting techniques, and even finish the edges for a professional look.
By the end, you’ll know how to create a tank top that fits you perfectly, matches your style, and lasts a long time. Whether you’re making this for hot weather, the gym, or just as a layering piece, you’ll get clear, step-by-step instructions to do it right.
Why Turn A T Shirt Into A Tank Top?
Many people wonder why they should bother turning a t-shirt into a tank top instead of just buying one. There are several good reasons:
- Cost savings: Making your own tank top is usually cheaper than buying a new one. You use a shirt you already have, so you don’t spend extra money.
- Customization: You get to choose the shape, fit, and style. Store-bought tank tops might not fit perfectly or look how you want.
- Eco-friendly: Reusing old clothes reduces waste and helps the environment. The fashion industry creates a lot of textile waste, so upcycling helps.
- Sentimental value: Maybe your t-shirt has a logo, memory, or design you love. Turning it into a tank top gives it a new life.
- Skill-building: Learning basic cutting and sewing skills is useful for other clothing projects.
Many beginners miss this: a t-shirt’s material is often softer and more broken-in than a new tank top. This makes your DIY tank top extra comfortable from the start.
What You Need: Tools And Materials
Before you start, gather everything you’ll need. This makes the process smoother and helps you avoid mistakes.
- T-shirt: 100% cotton works best, but blends are fine. Avoid shirts with lots of holes or heavy graphics that might crack when cut.
- Sharp fabric scissors: Dull scissors tear fabric and make uneven edges.
- Chalk or washable fabric marker: For marking your cut lines.
- Ruler or measuring tape: Ensures straight, even cuts.
- Pins or clips: Hold layers together if your fabric is slippery.
- Needle and thread or sewing machine (optional): For finishing edges or adding straps.
- Iron and ironing board: Pressing helps get sharp, neat edges.
- Seam ripper (optional): For removing existing seams.
- Cutting mat (optional): Protects your table and helps with accuracy.
If you don’t have a fabric marker, a light pencil works in most cases. Avoid markers that bleed through or stain permanently.
Credit: www.thismomsgonnasnap.com
Choosing The Right T Shirt
Not every t-shirt is perfect for turning into a tank top. Here’s how to choose the best one:
- Size: Pick a shirt that’s a little bigger than your normal fit. Cutting away the sleeves and collar will make it smaller.
- Material: Thicker shirts hold shape better, while thinner shirts drape more but may stretch out. Jersey cotton is ideal.
- Condition: Avoid shirts with big stains, holes, or worn-out fabric around the neck and sleeves.
- Color and design: Choose a shirt with a color or graphic you still like. If the print is too close to the edges, it may get cut off.
- Stretch: Check if the shirt stretches. Too much stretch can make the tank top lose shape.
A common mistake is using a shirt that’s already tight or has a small neck. Your new tank top may feel restrictive or look uneven after cutting.
Planning Your Tank Top Style
Before you start cutting, decide the style you want. There are several popular options:
- Classic tank top: Wide shoulder straps, regular armholes, straight or scoop neck.
- Racerback: Narrow straps that meet between the shoulder blades—great for sports.
- Muscle tee: Very wide armholes, straight sides, sometimes a boxy fit.
- Deep cut: Large, low armholes, sometimes with raw edges for a relaxed look.
- Cropped tank: Shorter length, usually above the waist.
Look at tank tops you already own, or check online photos for inspiration. Sketch your idea if it helps. Beginners often forget to plan the back—remember, the back cut can be different from the front.
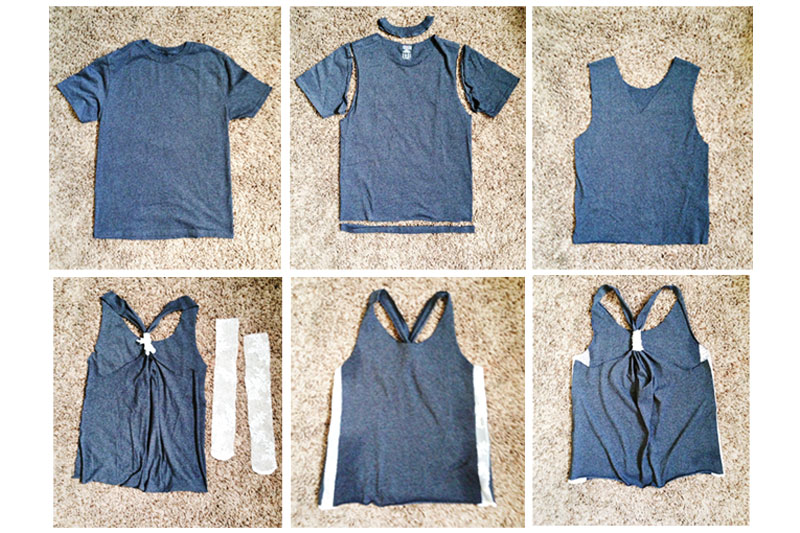
Measuring And Marking The T Shirt
Precise marking is the key to a neat final result. Here’s how to do it:
- Lay the shirt flat: Smooth out wrinkles. Make sure both sides are even.
- Decide strap width: Most tank tops have straps between 1 and 2 inches wide at the shoulder. Mark this width at the top of each shoulder.
- Mark armhole shape: Use a tank top you like as a template if you have one. Lay it over your shirt and trace the armholes lightly. If not, freehand a gentle curve starting about an inch from the collar down to the side seam, just above the bottom of the sleeve.
- Choose your neckline: For a scoop neck, mark a curved line lower than the original collar. For a V-neck, draw a straight line from each shoulder to a point in the center.
- Mark the length: If you want a cropped tank, measure from the shoulder down to where you want the hem. Mark a straight line across.
- Double-check symmetry: Fold the shirt in half vertically and see if the markings line up on both sides. Adjust if needed.
Don’t rush this step. Uneven markings lead to uneven cuts, and fixing mistakes is hard once you’ve cut fabric.
Cutting Techniques For Clean Edges
Cutting fabric neatly is important for a professional look. Here’s how to get clean, even edges:
- Use sharp scissors: Dull scissors make jagged edges. If you only have paper scissors, sharpen them first.
- Cut slowly and steadily: Make long, smooth cuts instead of short snips. This prevents jagged lines.
- Cut through both layers at once: If your shirt is laid flat and lined up, cutting both layers keeps the shape even.
- Start with the sleeves: Cut just outside your marked lines. You can always trim more later.
- Move to the neckline: Cut carefully around the neck. If you want a deeper neck, start conservative—you can always cut more.
- Trim the bottom hem: If cropping, cut straight across. Use a ruler for a guide.
If you make a mistake, don’t panic. You can adjust the shape by trimming more, or use fabric glue or a small patch to fix holes.

Credit: www.youtube.com
Different Styles: How To Cut For Each Tank Top Type
Classic Tank Top
For a classic style, keep the straps about 1. 5 inches wide. The armholes should be just a little lower than the original sleeves. The neckline can be round or slightly scooped. This is a good choice for everyday wear.
Racerback Tank Top
To make a racerback, after cutting the front, flip the shirt over. Draw two diagonal lines from the top of each shoulder towards the center of the upper back. Meet them in a “Y” shape just below the neck. Cut along these lines.
Racerbacks stay in place during movement, so they’re great for sports.
Muscle Tee
The muscle tee is simple: cut the armholes much deeper, almost to the bottom hem. Keep the sides straight. You can leave the neck as-is or cut a wider, more open neck. This style is loose and airy.
Deep Cut Tank
Deep cut tanks have very large armholes, sometimes down to the waist. Mark the armholes first, then cut out large sections. You may want to trim the sides for a slimmer fit, or leave them open and tie them together.
Cropped Tank
For a cropped tank, mark the length before you start cutting. Most cropped tanks are 2-4 inches above the navel, but you can adjust as you like. Make sure the front and back are even.
Here’s a quick comparison of the main styles:
| Style | Strap Width | Armhole Depth | Back Shape | Best For |
|---|---|---|---|---|
| Classic | 1-2 inches | Slightly lower | Straight | Everyday wear |
| Racerback | 1 inch | Medium | Y-shape | Sports |
| Muscle Tee | 2-3 inches | Very deep | Straight | Casual, gym |
| Deep Cut | Varies | Very deep | Straight or open | Layering |
| Cropped | 1-2 inches | Slightly lower | Straight | Summer, style |
Finishing The Edges: To Sew Or Not To Sew?
Once you’ve cut your new tank top, you have a choice: leave the edges raw, or finish them for durability and a neater look.
Raw Edges
Many t-shirt fabrics (like jersey cotton) don’t fray much. You can leave the edges raw for a casual, relaxed style. After washing, the edges will roll up slightly. Some people like this look. However, if you want a cleaner finish or your fabric frays, consider finishing the edges.
Sewn Edges
Finishing the edges with a simple stitch makes your tank top look more professional and last longer.
- Fold and hem: Fold the edge under about 1/4 inch, then sew with a straight or zigzag stitch. Do this for the neckline, armholes, and bottom if cropped.
- Use bias tape: For extra durability, sew bias tape around the edges. This adds color and strength.
- Serge or overlock: If you have a serger, run it around the edges for a fast, stretchy finish.
If you don’t have a sewing machine, you can hand sew. Use small, even stitches to prevent puckering.
No-sew Methods
If you don’t want to sew, try fabric glue or iron-on hem tape. These products bond fabric edges and prevent fraying.
Here’s a comparison of finishing methods:
| Method | Durability | Appearance | Skill Needed | Time |
|---|---|---|---|---|
| Raw Edge | Low | Casual/rolled | None | Fastest |
| Sewn Hem | High | Neat/professional | Beginner | Moderate |
| Bias Tape | Very High | Decorative/strong | Intermediate | Slower |
| No-Sew Tape/Glue | Medium | Clean | Beginner | Fast |
Customizing Your Tank Top
A big advantage of DIY is making your tank top unique. Here are some ideas:
- Add fringe: Cut vertical strips along the bottom for a fun, boho look.
- Tie sides: If the sides are loose, cut ties and knot them for an adjustable fit.
- Add patches or appliqué: Sew or glue patches for decoration or to cover small holes.
- Paint or dye: Use fabric paint or tie-dye to add color and patterns.
- Iron-on transfers: Add graphics, names, or logos.
- Lace or mesh inserts: Sew lace or mesh into the back or sides for texture and breathability.
Remember, less is often more. Too many decorations can make the shirt uncomfortable or hard to wash.
Fitting And Adjusting: How To Get The Perfect Fit
Try on your tank top after the first cuts. Check these areas:
- Armholes: Are they too deep? Too tight? Trim or sew as needed.
- Neckline: Is it even? Comfortable? You can lower or reshape.
- Length: Does it sit where you want? Trim more if it’s too long.
- Straps: Wide enough for comfort? Not slipping off the shoulders?
If you want a slimmer fit, turn the shirt inside out, pin along the sides, and sew a new seam. Trim off the extra fabric. Beginners often overlook this, but shaping the sides can make a big difference in how the tank top looks and feels.
Washing And Caring For Your Diy Tank Top
Homemade tank tops are easy to care for, but a few tips help them last longer:
- Wash in cold water: Hot water can shrink cotton and fade colors.
- Use gentle cycle: Prevents stretching and keeps edges neat.
- Avoid bleach: It weakens fabric and fades prints.
- Air dry: Hanging or laying flat preserves shape. Tumble drying may roll edges more.
- Iron on low: If needed, iron inside out on low heat to avoid damaging prints or decorations.
If you added glue, heat transfers, or painted designs, check the product instructions before washing.
Common Mistakes And How To Avoid Them
Many beginners make the same mistakes when turning a t-shirt into a tank top. Here’s how to avoid them:
- Cutting too much: Always cut less at first. You can always trim more, but you can’t put fabric back.
- Uneven edges: Mark and check your lines carefully. Use a ruler and fold the shirt to compare sides.
- Wrong size shirt: Choose a slightly bigger shirt for better results.
- Forgetting seam allowance: If you plan to sew, leave a little extra fabric at the edges.
- Not washing before cutting: Always wash and dry the shirt before cutting. Cotton shrinks!
- Skipping edge finishing: Raw edges are fine, but some fabrics fray. If unsure, finish the edges.
- Poor quality tools: Dull scissors or a weak marker can ruin clean lines.
One less obvious insight: Not all t-shirts are cut symmetrically at the factory. Folding and trimming both sides can make your tank top look more even.
Advanced Ideas: Taking Your Diy Further
If you enjoy making tank tops, you can try more advanced techniques:
- Add a built-in bra: Sew a soft, stretchy lining inside for extra support.
- Make adjustable straps: Use ribbon or leftover fabric and add buttons or knots.
- Create a high-low hem: Cut the back longer than the front for extra coverage.
- Mix fabrics: Combine two shirts for color blocking or contrast.
- Use a pattern: Download a tank top pattern and use your t-shirt as fabric.
These advanced projects require more sewing skills and patience, but they offer even more ways to customize your clothing.
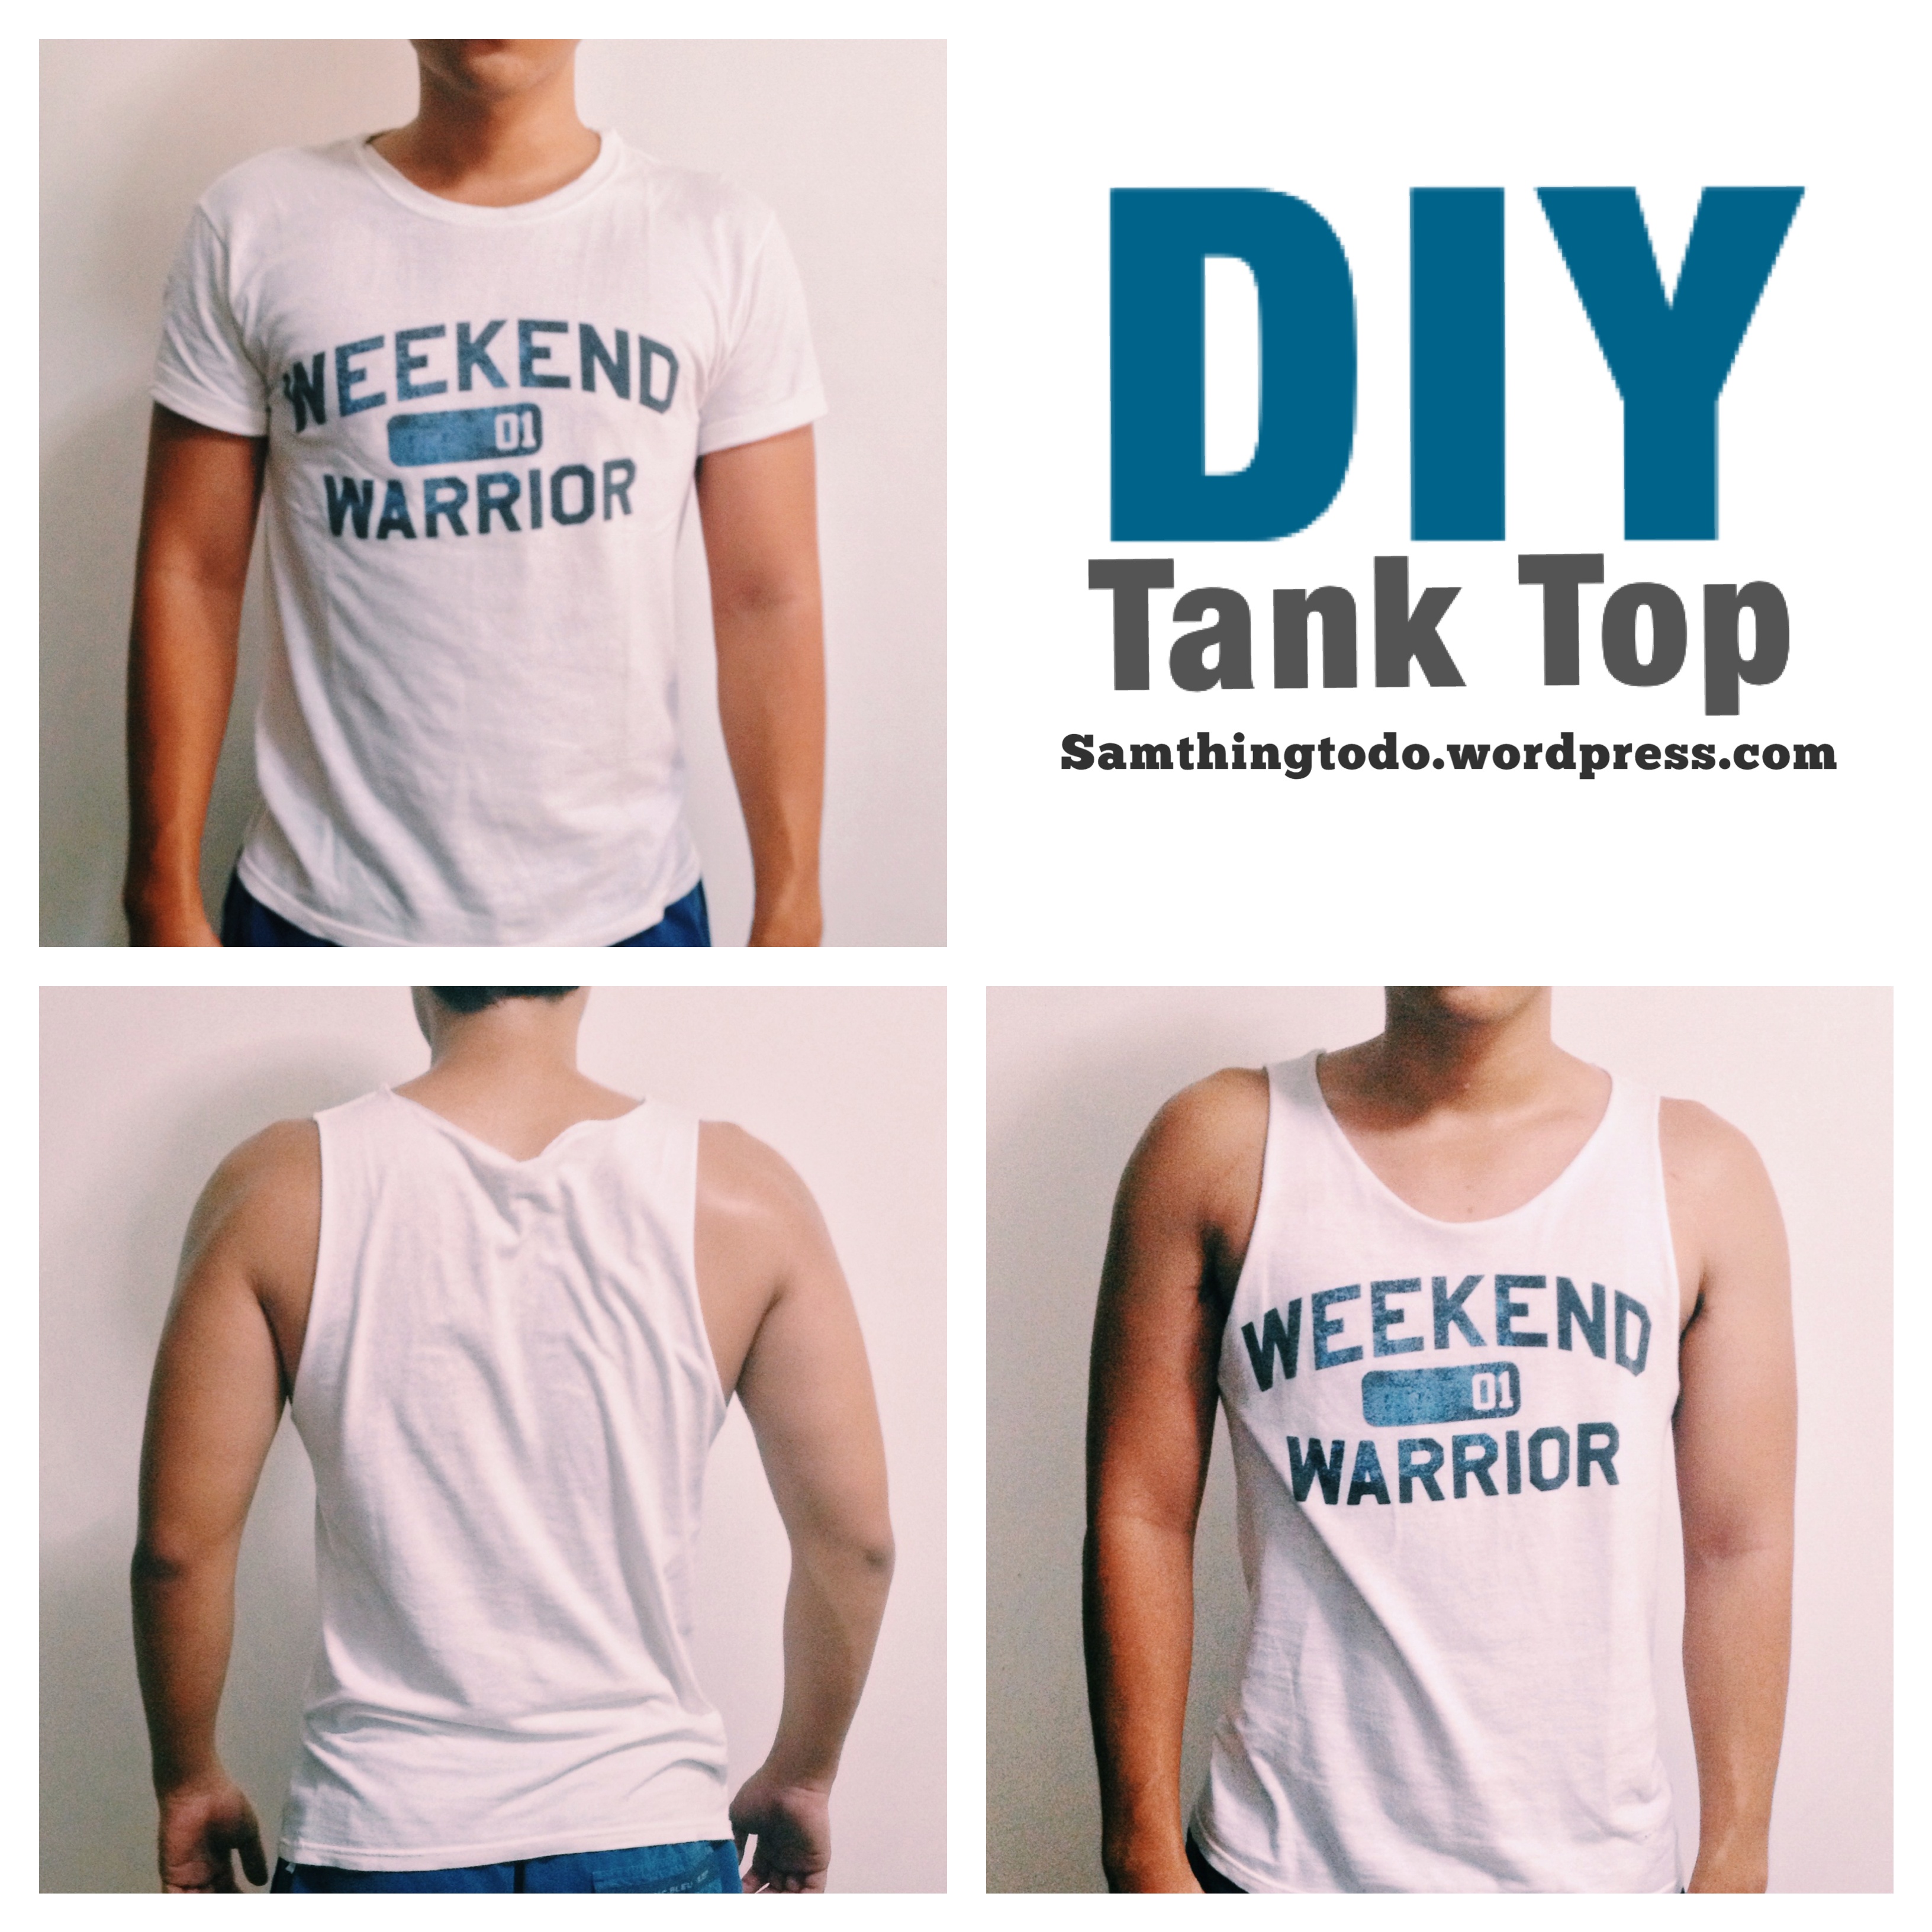
Real-life Example: Transforming A T Shirt Into A Workout Tank
Let’s walk through a practical example. Suppose you have a large cotton t-shirt from a charity run. It’s soft but boxy and you want a stylish workout tank.
- Wash and dry the shirt.
- Lay it flat and smooth out wrinkles.
- Mark 1.5-inch-wide straps at the shoulders.
- Trace armholes from your favorite tank, or draw a deep curve from just under the collar to 1 inch above the bottom hem.
- Mark a scoop neckline, about 2 inches below the original collar.
- Cut sleeves and neck along your marks.
- Try on the shirt. Adjust the armholes if they’re too tight.
- Decide to keep the hem raw for a relaxed look.
- Optionally, add a racerback by shaping the back into a “Y.”
- Wash again to let the edges curl for a sporty effect.
The result is a custom tank top that’s lightweight, fits perfectly, and keeps your favorite event memory alive.
Sustainability: Why Upcycling Matters
Turning t-shirts into tank tops isn’t just about fashion—it’s part of a larger movement. The fashion industry is a major source of pollution. Upcycling helps reduce textile waste. Every time you reuse a shirt, you save water, energy, and reduce landfill waste.
If everyone upcycled just a few shirts a year, it would make a big difference.
For more information about sustainable fashion, see this resource from the Fashion Revolution.
When To Buy Instead Of Diy
Sometimes, making your own tank top isn’t the best option. If you need a very specific fit, special performance fabric, or a professional look for work or events, buying might be better. DIY is best for casual wear, home workouts, or creative projects.
The key is to know your needs and choose accordingly.
Credit: esperanzameanshope.org
Comparing Diy Vs Store-bought Tank Tops
Here’s a quick look at the differences:
| Feature | DIY Tank Top | Store-Bought Tank Top |
|---|---|---|
| Cost | Very Low | Medium to High |
| Customization | Unlimited | Limited |
| Skill Needed | Beginner to Advanced | None |
| Time | 15–60 minutes | Instant |
| Sustainability | Very High | Varies |
| Fit | Custom | Standard sizes |
Frequently Asked Questions
How Do I Stop The Edges From Rolling After Cutting?
Jersey cotton naturally rolls at the edges when cut. You can sew a hem or use iron-on hem tape to keep edges flat. Washing and pressing after cutting helps, but rolling is normal for raw edges.
Can I Make A Tank Top From Any Kind Of T-shirt?
Most t-shirts work, but thick, stiff, or very stretchy shirts are harder to cut neatly. Soft, medium-weight cotton is best. Avoid shirts with heavy graphics near the areas you’ll cut, as they can crack or peel.
Do I Need A Sewing Machine To Finish The Tank Top?
No, you can sew by hand or use no-sew methods like fabric glue or hem tape. However, a sewing machine makes the process faster and the finish stronger, especially for frequent washing.
How Do I Make Sure Both Sides Are Even?
Fold the shirt in half (shoulder to shoulder) and align the seams. Mark and cut both sides at once. This helps keep the shape symmetrical. Always double-check your markings before cutting.
What If I Make A Mistake While Cutting?
If you cut too much, try to even out both sides. You can add fabric ties or sew in a patch if needed. If a strap is too narrow, add a decorative fabric strip for strength. Most mistakes can be fixed creatively!
Transforming a t-shirt into a tank top is a practical, fun way to renew your wardrobe, express your style, and support sustainability. With the right tools, careful measurements, and a little creativity, you can enjoy custom-fit tank tops that feel good and look great—without spending a fortune or harming the planet.