
How to Flare Pants Pattern: Easy Steps for Perfect Fit
How To Flare Pants Pattern
Flared pants never truly go out of style. They flatter many body types, add character to any outfit, and offer a break from straight or skinny silhouettes. Whether you love vintage looks or want to create something modern with a twist, learning how to flare a pants pattern opens up a world of possibilities.
Many people buy flared pants, but making your own means you get the perfect fit and unique style. If you have a basic pants pattern or a pair of jeans you adore, you can easily turn them into flared pants with just a few pattern adjustments.
This guide will walk you through every step, from understanding pants pattern basics to adding the perfect flare. You’ll find practical tips, clear instructions, and detailed advice for beginners and experienced sewists. You’ll also discover common mistakes to avoid and get answers to the questions people often ask.
By the end, you’ll know exactly how to create a flared pants pattern that fits well and looks great.
Understanding Flared Pants Patterns
Before you begin, it helps to know what makes flared pants unique. The flare is the widening of the pant leg below the knee, sometimes starting at the thigh. The amount of flare can be small for a subtle look, or dramatic for a bold statement.
Flared pants styles:
- Bootcut: Slight flare, just enough to fit over boots.
- Classic flare: Noticeable widening below the knee.
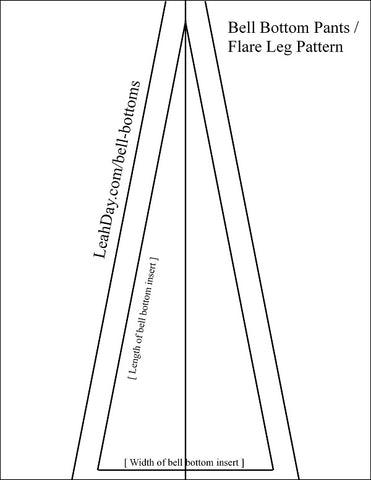
- Bell-bottom: Very wide flare, inspired by vintage fashion.
- Trumpet flare: Starts slim and suddenly widens near the hem.
Different flares suit different body shapes. For example, a gentle flare balances wider hips, while a bold flare draws attention to the legs. When you make your own, you control where the flare starts and how wide it gets.
Tools And Materials You’ll Need
Making a flared pants pattern doesn’t require expensive equipment, but you do need some essentials to work accurately and comfortably. Here’s what you should have ready:
- Basic pants pattern: Use a pattern that fits you well, or trace from a favorite pair of pants.
- Pattern paper: Large enough to trace and adjust your pattern.
- Ruler and measuring tape: For straight lines and accurate flare measurements.
- French curve or hip curve: Helps create smooth curves at the side seams.
- Pencil and eraser: For drawing and making corrections.
- Paper scissors: Keep these separate from your fabric scissors.
- Weights or pins: Hold your pattern pieces in place.
- Tape: For joining pieces of pattern paper.
- Fabric: Choose fabric with the right drape for your flare (e.g., denim, cotton, crepe).
- Chalk or washable marker: For marking fabric.
Non-obvious tip: If you’re testing a new flare, use inexpensive fabric (muslin) to make a test version before cutting your main fabric. This lets you check the shape and fit.
Taking Accurate Body Measurements
To flare a pants pattern, you must start with accurate measurements. Even if you have a good basic pattern, updating your measurements ensures a better fit.
Key measurements:
- Waist: Measure at your natural waistline.
- Hip: Around the fullest part of your hips.
- Thigh: Around the widest part of your upper leg.
- Knee: Around your knee, where you plan the flare to begin.
- Inseam: From the crotch to the ankle.
- Outseam: From the waist to the hem on the outside of your leg.
Insider advice: Take measurements while wearing the kind of shoes you’ll pair with your flared pants. Heels or thick-soled shoes can affect the final length and flare appearance.
Understanding Pattern Flare Methods
There are two main methods to add a flare to your pants pattern:
- Slash and spread: Cut the lower part of the pant leg pattern and spread the pieces apart to create a wider hem.
- Adding at the side seams: Add extra width to the outer and inner seams from the knee or thigh downward.
Each method has its benefits. Slash and spread creates a more dramatic, even flare, while adding at the side seams gives a subtle, gentle flare.
| Method | Best For | Result |
|---|---|---|
| Slash and Spread | Wide, dramatic flares | Symmetrical flare, more volume |
| Adding at Side Seams | Gentle or bootcut flares | Subtle, natural flare |
Preparing Your Basic Pants Pattern
Start with a basic pants pattern that fits you well. If you don’t have one, you can trace around a pair of pants that fit nicely, adding seam allowances. Lay out the pattern on your pattern paper and smooth out any lines or wrinkles.
Make sure all pieces (front and back legs) are clearly marked.
Tip: Double-check that the grainline is marked on each piece, as this affects how the pants hang and how the flare looks.
Deciding Where The Flare Starts
The position where the flare begins has a big impact on the final look. You can start the flare from the:
- Thigh: For a full vintage or bell-bottom look.
- Knee: For most classic flares.
- Lower calf: For a subtle bootcut.
Mark the chosen point on both the inner and outer seams of the front and back pattern pieces. Use a ruler to ensure the marks are level.
Beginner mistake: Starting the flare too high can make the pants look oversized and baggy. Too low, and the flare might look awkward or cramped. Always test your preferred placement with a muslin if possible.
Adding Flare Using The Slash And Spread Method
This technique creates a dramatic and even flare. Here’s how to do it step by step:
- Draw horizontal lines: On your pattern, draw a line across the knee (or where you want the flare to start).
- Draw vertical slashes: From the hem up to the knee line, draw two or more straight lines, spaced evenly. These are your “slash lines.”
- Cut along the lines: Cut from the hem up to, but not through, the knee line. Leave a small “hinge” at the knee so the pieces stay attached.
- Spread the pieces: On a new sheet of pattern paper, spread the slashed pieces apart at the hem. The wider you spread, the more dramatic the flare.
- Fill the gaps: Tape the pieces in place. Fill any gaps between them with pattern paper.
- Smooth the hem: Redraw the hemline so it’s a smooth curve, not jagged.
- Blend the seams: Use a French curve to blend the new side seams smoothly from the knee to the hem.
Repeat for both front and back leg pieces. Keep the flare amount the same on both for balance.
Pro tip: For a very wide flare, use more slashes (3-5 per leg). For a gentle flare, two slashes are usually enough.
Adding Flare At The Side Seams
This method is simpler and works well for subtle flares.
- Mark flare points: On your pattern, mark the point where you want the flare to start (usually the knee).
- Add width: Measure outward from the knee to the hem on both the inner and outer seams. Add the desired flare width at the hem.
- Draw new seam lines: Connect the knee mark to the new hem point with a smooth, straight or slightly curved line.
- Repeat: Do this for both front and back leg pieces.
- Check the flare: Match the side seams of front and back pieces to make sure the flare is even.
Non-obvious insight: If you want the flare to “fan out” more on the outside, add more width to the outer seam than the inner seam. This creates a more stylish, leg-lengthening shape.
Determining The Amount Of Flare
How wide should you make your flare? It depends on your taste and the style you want.
- Bootcut: Add 2-3 cm (about 1 inch) to each side at the hem.
- Classic flare: Add 5-8 cm (2-3 inches) to each side at the hem.
- Bell-bottom: Add 10 cm (4 inches) or more to each side at the hem.
Always measure from the original pattern’s hem outwards. If you add too much, the pants might look costume-like and may be harder to walk in. Too little, and the flare may not be noticeable.
| Flare Style | Hem Width Added (each side) | Total Hem Circumference |
|---|---|---|
| Bootcut | 2-3 cm | +8-12 cm |
| Classic Flare | 5-8 cm | +20-32 cm |
| Bell-bottom | 10 cm or more | +40 cm or more |
Insider tip: For the best results, compare your new hem measurement to similar pants you like. This helps you visualize the finished look.
Adjusting The Length For Flared Pants
Flared pants often look best when they are longer than straight or skinny pants. The extra length helps the flare drape nicely over shoes.
- Add 2-4 cm (1 inch) to the inseam for most flares.
- For dramatic bell-bottoms, add up to 5 cm (2 inches), especially if you wear heels.
Always check the length before hemming, especially if you plan to wear different shoes.
Beginner mistake: Forgetting to adjust the length can make your beautiful flare look short and awkward. Always try on the pants before finishing the hem.
Pattern Notches And Grainlines
When you modify your pants pattern, you might lose some notches or grainline markings. These are important for matching up pieces and making sure your fabric hangs correctly.
- Redraw the grainline after adding flare, especially if you use the slash and spread method.
- Replace notches at the knee, hem, and side seams, so you can line up front and back legs easily.
Non-obvious insight: If you change the flare a lot, the original grainline might shift. Always check that the grainline is parallel to the center front or center back.
Making A Muslin (test Garment)
Before cutting your final fabric, it’s smart to sew a test version from muslin or other inexpensive fabric. This step helps you check the fit, flare, and length.
- Cut out your adjusted pattern from muslin.
- Sew the pieces together with a long basting stitch. No need for pockets or a finished waistband yet.
- Try on the pants and check the flare in a mirror.
- Adjust as needed: If the flare is too wide or too narrow, mark changes directly on the muslin and update your paper pattern.
Pro tip: Walk around in your muslin. Make sure the flare moves well and doesn’t catch on your shoes.
Cutting And Marking Your Fabric
Once you’re happy with your pattern, you’re ready to cut your final fabric.
- Lay out your fabric on a flat surface. Fold it if needed, following the pattern instructions.
- Pin or weigh down your pattern pieces.
- Mark the grainline and any notches or darts.
- Cut carefully, especially around curved hems and flared sections.
If your fabric has a nap or a directional print, make sure all pieces face the same way.
Non-obvious tip: For very wide flares, you may need extra fabric. Always check your pattern layout before buying fabric.
Sewing Flared Pants
Sewing flared pants is similar to regular pants, but you’ll need to pay attention to the wider hems and side seams.
- Sew the inner and outer leg seams as usual.
- Join the crotch seams.
- Attach the waistband or facing.
- Finish the hem: For wide flares, a narrow hem usually looks best and doesn’t add bulk.
- Press seams well for a crisp, professional look.
Pro tip: Use a walking foot or reduce pressure on your sewing machine for thick seams, especially with heavy fabrics like denim.
Fitting And Adjustments
Try on your nearly finished pants before doing the final hem. Check:
- Waist and hip fit: Should feel comfortable but not loose.
- Flare movement: Walk and sit to test the flare.
- Length: Check with your shoes on.
If needed, take in or let out seams for a better fit. Always adjust both front and back pieces evenly.
Beginner mistake: Ignoring small fitting issues now can lead to pants you won’t wear. Take your time to adjust for a perfect fit.
Customizing Your Flare
Flared pants are versatile. You can make them unique by adjusting:
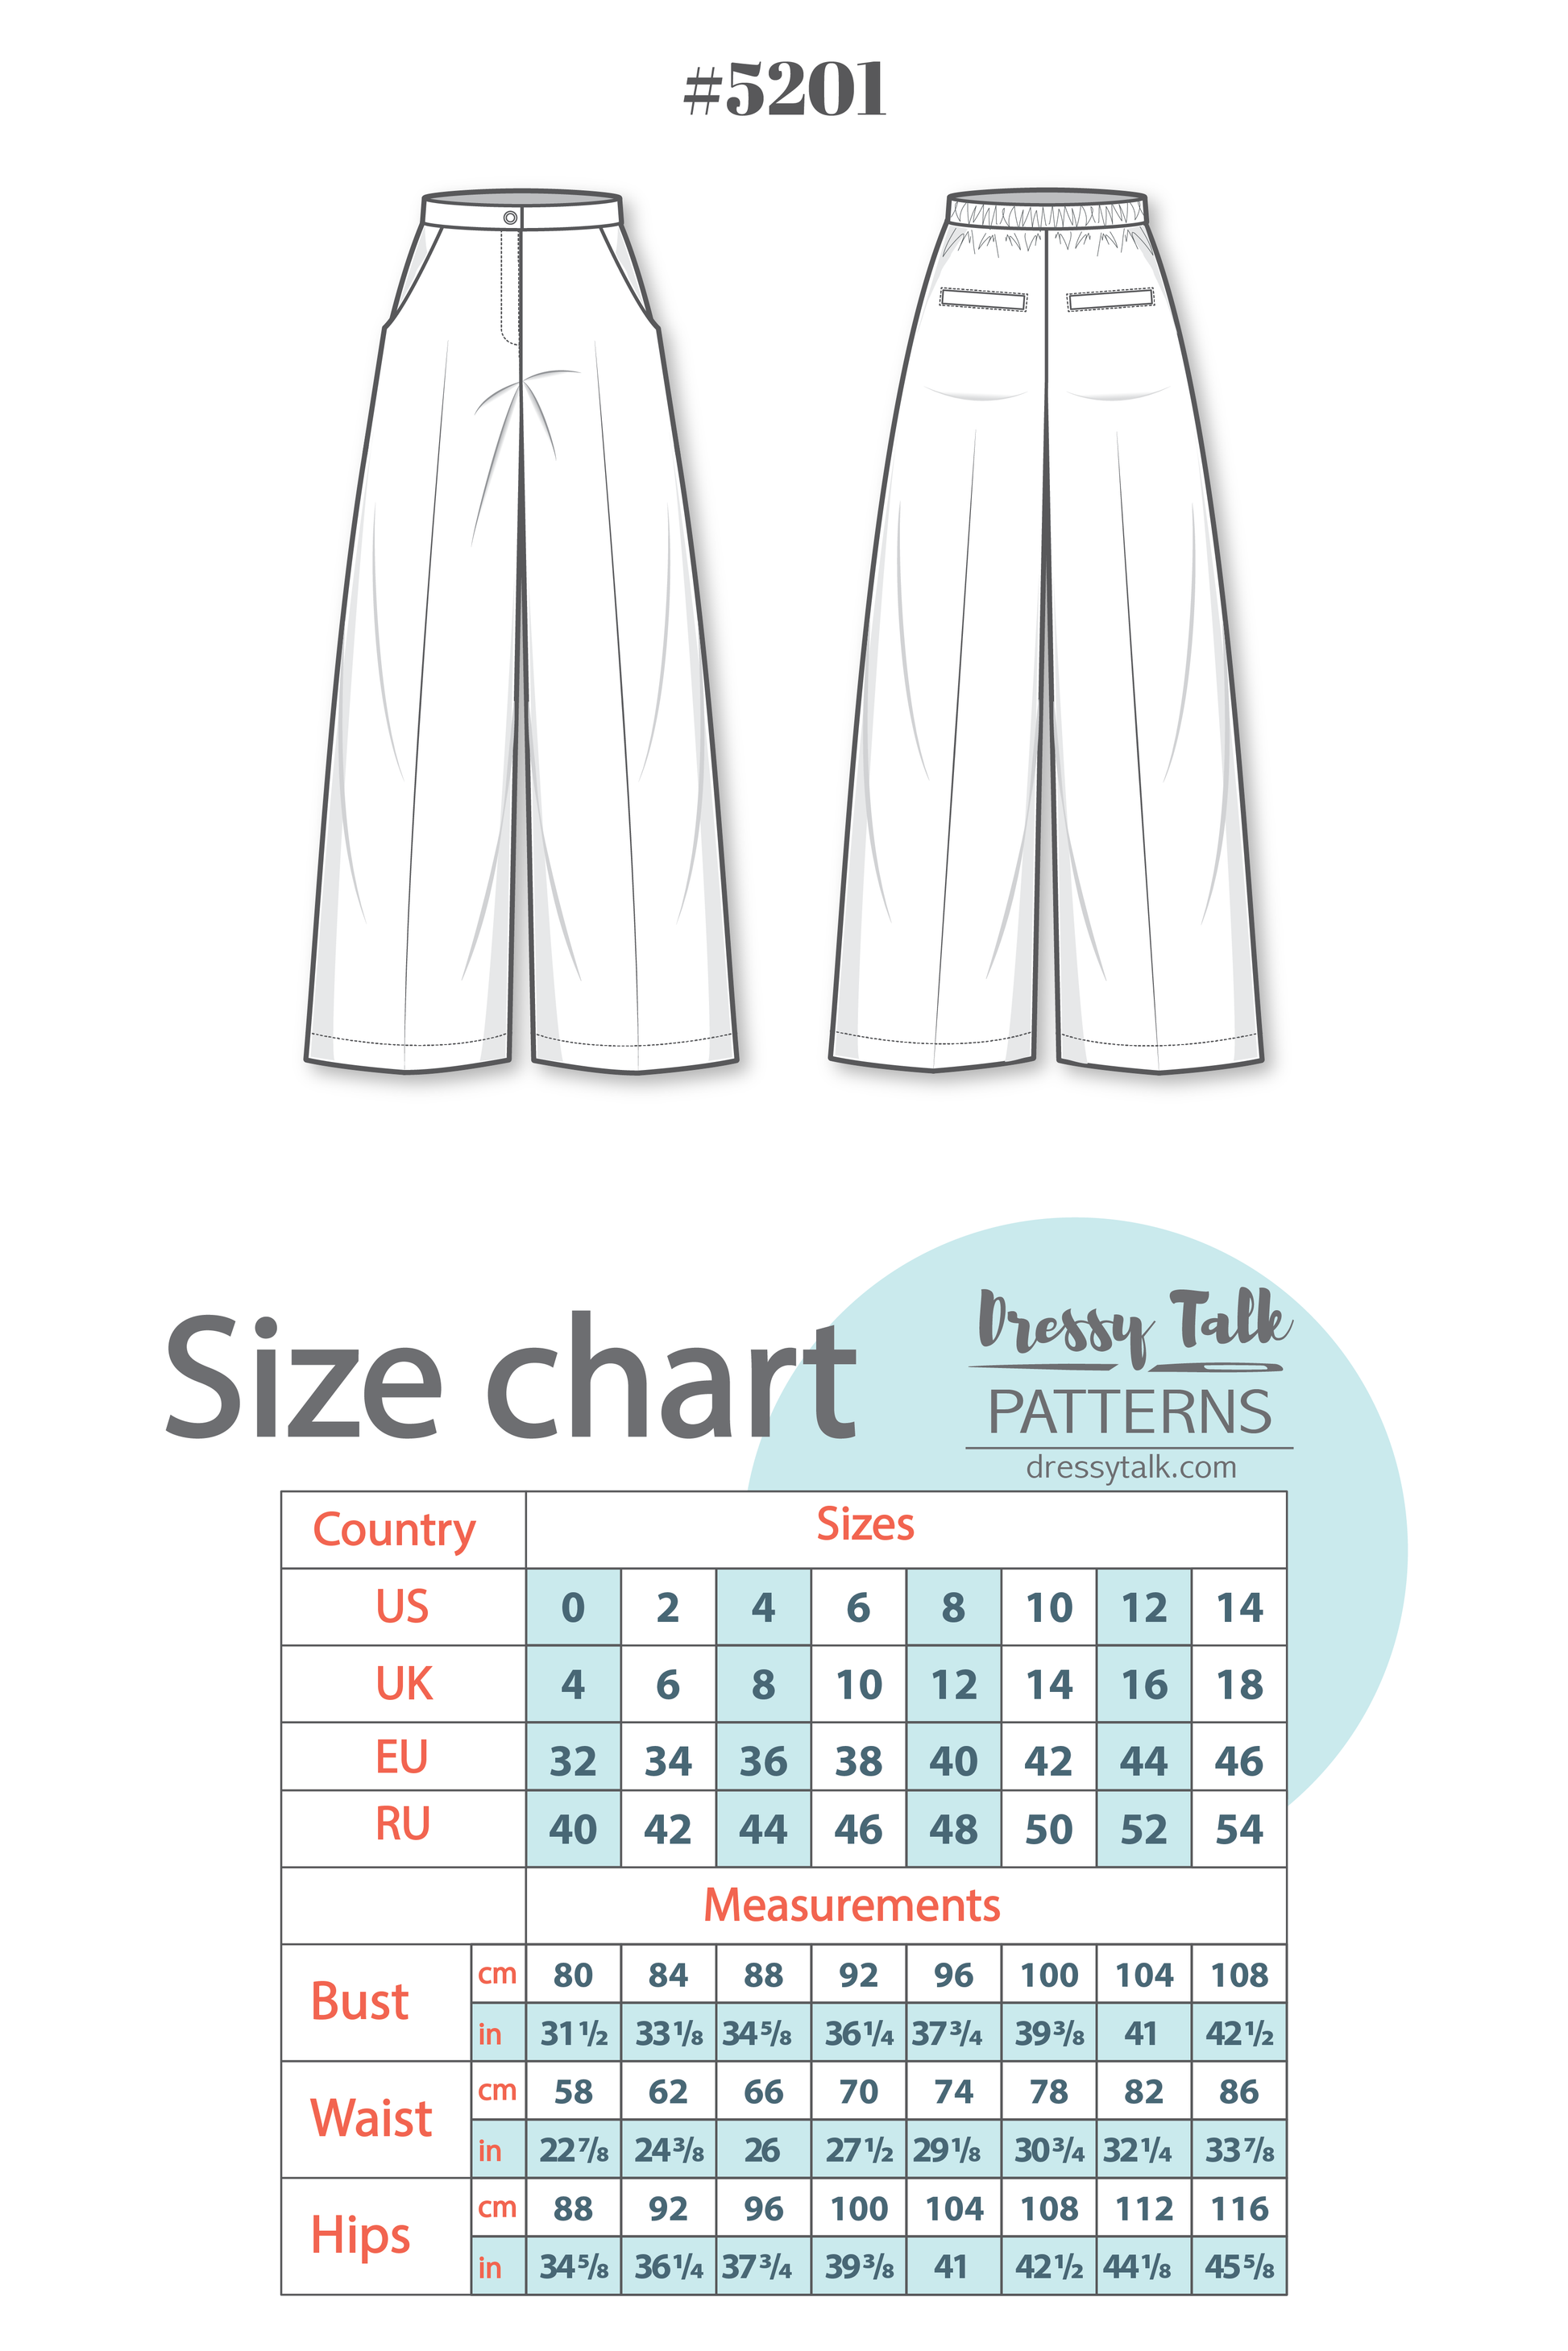
- Pocket style: Try patch pockets for a vintage look, or slanted pockets for a modern style.
- Waist height: High-waist flares are classic, while mid-rise is more casual.
- Front seam: Add a center front seam for extra detail.
- Contrast stitching: Use a bold thread color to highlight the flare.
Style tip: Pair dramatic flares with simple tops to keep your outfit balanced.

Credit: www.youtube.com
Common Mistakes And How To Avoid Them
Even experienced sewists make mistakes when flaring pants patterns. Here are the most common ones and how to fix them:
- Flare starts too high or low: Always mark the knee or thigh accurately on the pattern.
- Uneven flare: Check that the flare width is the same on both legs and sides.
- Wavy or jagged hem: Use a French curve to smooth the hemline after adding flare.
- Not enough fabric: Wide flares use much more fabric. Plan your layout before buying.
- Losing original markings: Redraw grainlines and notches after adjusting the pattern.
Pro tip: Take photos of your muslin from all angles to spot problems you might miss in the mirror.
Examples And Style Ideas
Flared pants can look completely different depending on the flare style, fabric, and fit.
- Lightweight crepe: Makes a soft, flowy flare for summer pants.
- Denim: Classic for retro bell-bottoms or modern bootcut jeans.
- Corduroy: Adds texture and warmth for colder weather.
Try adding side slits at the hem for extra movement, or topstitching for a bold look.
Credit: dressytalk.com
Comparing Flare Styles
To help you visualize the differences, here’s a comparison of three common flare styles:
| Style | Flare Start | Hem Width Added | Best For |
|---|---|---|---|
| Bootcut | Lower calf | 2-3 cm each side | Everyday wear, subtle look |
| Classic Flare | Knee | 5-8 cm each side | Retro, casual, or dressy pants |
| Bell-bottom | Thigh | 10 cm or more each side | Statement fashion, costume |
Non-obvious insight: A flare that starts at the thigh lengthens the leg visually, while a flare that starts at the knee looks more balanced on shorter frames.
Caring For Flared Pants
Flared pants need a little extra care, especially at the hem. The wider hem can drag on the ground or catch on shoes.
- Wash gently: Use a gentle cycle or hand wash to avoid fraying.
- Press carefully: Use a steam iron and press cloth to keep seams crisp.
- Check hems: Reinforce with a second row of stitching if they start to wear.
For more on fabric care, check guides on reputable sewing sites like Craftsy.
Credit: leahday.com
Troubleshooting Fit And Flare Issues
Even with careful planning, you might run into challenges. Here’s how to fix the most common problems:
- Flare feels stiff: Use a lighter fabric or make the flare more gradual.
- Flare collapses: Try a fabric with more body, or add interfacing at the hem.
- Pattern pieces don’t match: Double-check your seam allowances and flare measurements.
Pro tip: If your flare isn’t dramatic enough, you can add more width at the side seams next time without starting over from scratch.
Making Flared Pants For Different Body Types
Flared pants can flatter everyone, but a few adjustments make a big difference.
- Tall frames: Try a higher-waist and a flare starting at the knee or thigh.
- Petite frames: A gentle flare starting just below the knee avoids overwhelming your shape.
- Curvy shapes: Balance hips with a flare that’s wider at the hem than the knee.
Expert advice: Always adjust the rise and inseam for your proportions before adding a flare. This keeps the overall look balanced.
Final Thoughts
Learning how to flare a pants pattern is a valuable skill for anyone who loves fashion and sewing. You get total control over the style, fit, and fabric, and can create pants that are truly your own. The process takes patience and careful measuring, but the results are worth it.
Remember to test your flare with a muslin first and always adjust your pattern markings for accuracy. With practice, you’ll find the perfect flare for your body and your style. Let your creativity lead the way, and soon you’ll have flared pants that turn heads and fit like a dream.
Frequently Asked Questions
How Much Flare Should I Add To My Pants Pattern?
The amount of flare depends on your style and comfort. For a subtle look, add about 2-3 cm (1 inch) to each side at the hem. For classic flares, 5-8 cm (2-3 inches) works well. For dramatic bell-bottoms, add 10 cm (4 inches) or more to each side.
Can I Add A Flare To Any Pants Pattern?
Yes, you can flare almost any basic pants pattern. Make sure the pattern fits you well at the waist, hips, and thighs first. Then add the flare starting from your preferred point (knee, thigh, or calf).
What Fabric Is Best For Flared Pants?
Medium-weight fabrics with good drape, such as denim, cotton twill, or crepe, work well. Lighter fabrics create a soft, flowing flare, while heavier fabrics give structure and shape.
Do I Need To Adjust The Length When Making Flared Pants?
Usually yes. Flared pants often look better when they are slightly longer than straight-leg pants. Add 2-5 cm (1-2 inches) to the inseam, especially if you plan to wear heels.
How Do I Keep The Flare Even On Both Legs?
Always adjust both front and back pattern pieces the same way. Use a ruler and measuring tape for accuracy. After making changes, lay the pieces together and check that the flare is symmetrical before cutting your fabric.