
How to Fix Long Flare Leggings: Easy Alteration Tips
Long flare leggings are a trendy choice for both casual and workout wear, but sometimes they just don’t fit quite right. Maybe you ordered online and the inseam is too long, or perhaps you’re shorter than average and every pair seems to pool at your ankles. The good news is: you don’t need to give up on your favorite leggings just because they’re too long. With the right approach, you can adjust them for a perfect fit, whether you want a professional finish or a quick DIY fix. This guide will walk you through everything you need to know about fixing long flare leggings—no sewing experience required.
Why Do Flare Leggings Run Long?
Flare leggings are designed to create a dramatic, elongated silhouette. Brands often make them longer so they drape over shoes or touch the floor for taller individuals. This style looks fantastic in photos and on the runway, but for everyday life, extra length can mean tripping, fraying, or just looking sloppy.
If you’re under average height or prefer a clean look, you’ll probably need to adjust them.
It’s not just about style—comfort and safety matter too. Leggings that are too long can catch under your feet, cause you to slip, or get dirty quickly. Fixing the length is not just a fashion upgrade, but also a practical one.
Assessing Your Flare Leggings
Before you start cutting or sewing, take time to evaluate your leggings. Different fabrics, seam types, and flare shapes need different approaches. Here’s what to check:
- Fabric Material: Most flare leggings are made of polyester, spandex, cotton blends, or nylon. Some fabrics are easy to hem, while others might fray or lose stretch.
- Seam Construction: Look at the bottom hem. Is there a visible seam or a raw edge? Some leggings have a double-stitched hem, others are glued, and some (like seamless leggings) may not have a traditional hem at all.
- Flare Size: Is it a slight bootcut or a dramatic bell-bottom? The larger the flare, the more careful you need to be to keep the shape even.
- Pattern or Print: If your leggings have a print that ends at the hem, shortening them could cut off the design and affect the look.
A little planning now can prevent disappointment later. For example, if your leggings have a lot of stretch, using a regular straight stitch might make the hem too tight. These small details are easy to overlook but make a big difference in the final result.
Measuring And Marking The Ideal Length
Precision is key. Here’s how to measure for the best result:
- Put on the Leggings: Wear the shoes you plan to use most often with these leggings.
- Stand Straight: Let the fabric fall naturally. Don’t tug or pull up.
- Ask for Help or Use a Mirror: It’s easier if someone marks the spot where you want the leggings to end. If alone, use a full-length mirror.
- Mark Both Legs: Use tailor’s chalk or a fabric-safe marker. Don’t use a regular pen—it may bleed or not wash out.
- Add Hem Allowance: If you’re hemming, add about 1 inch (2.5 cm) below your mark for the new hem.
Pro tip: Mark both legs separately. Sometimes your legs are slightly different lengths, and this avoids a crooked hem.
Methods To Fix Long Flare Leggings
There are several ways to shorten flare leggings. The best method depends on your comfort level, the tools you have, and how permanent you want the fix to be. Let’s explore the most effective options.
1. Professional Tailoring
If you want a flawless finish, a professional tailor is the gold standard. They have the tools and experience to work with stretchy fabrics and can match the original hem style.
- Cost Range: Tailoring leggings usually costs less than hemming jeans, typically between $10–$20 per pair.
- Turnaround Time: Most tailors return items within a few days.
- Quality: Near-perfect, with matching thread and stretch maintained.
This is the best choice for expensive leggings or if you lack confidence in your DIY skills. However, it’s not always necessary for simple adjustments.
2. No-sew Hemming Tape
For a quick, no-needle solution, hemming tape is a lifesaver. It’s a double-sided adhesive strip that bonds fabric when pressed with an iron.
How To Use Hemming Tape:
- Wash and Dry: Pre-wash the leggings to avoid future shrinkage.
- Cut to Length: Trim the excess fabric, leaving enough for the hem.
- Place Tape: Fold the edge inside, sandwich the tape between layers.
- Iron Carefully: Use a low heat setting to avoid damaging synthetic fibers.
- Let Cool: Allow the adhesive to set before wearing.
Pros: Fast, easy, and reversible.
Cons: May not last through many washes. Some tapes leave residue.
3. Hand Sewing
Even if you don’t own a sewing machine, you can create a strong hem by hand.
Steps For Hand Sewing:
- Thread a Needle: Use polyester or stretch thread to match your leggings.
- Fold and Pin: Double-fold the hem for a clean edge.
- Use a Stretch Stitch: Try the herringbone or catch stitch. These allow the fabric to stretch.
- Even Stitches: Keep stitch length consistent for a neater look.
This method is cheap, requires minimal tools, and can be done in under an hour. For best results, stretch the fabric gently as you sew so the hem won’t pop when worn.
4. Using A Sewing Machine
A sewing machine gives you the cleanest, strongest hem. You’ll need a stretch needle and polyester thread.
Machine Hemming Steps:
- Set Up: Use a zigzag or stretch stitch, not a straight stitch.
- Pin and Fold: Fold the hem twice and pin in place.
- Sew Slowly: Guide the fabric without pulling.
- Press the Hem: Use a warm iron to flatten the seam.
If you’re new to sewing, practice on scrap fabric first. Always use the right needle—universal needles can skip stitches on stretchy material.
5. Fabric Glue
For those who want a truly fast fix, fabric glue is a temporary but effective option. Great for last-minute events or travel.
Applying Fabric Glue:
- Trim Excess Fabric: Measure and cut evenly.
- Apply Glue: Place a thin bead of glue along the inside edge.
- Fold and Press: Hold the hem in place until set.
- Dry Time: Most glues need at least 30 minutes to dry fully.
Remember, fabric glue is not ideal for heavy use or frequent washing. But it’s a handy trick for emergencies.
6. Creating A Raw Edge
Some leggings have a raw, unhemmed edge that doesn’t fray, especially if made from synthetic knits. If your leggings are made of this kind of fabric, you can simply cut to length and leave them unhemmed.
How To Cut For A Raw Edge:
- Use Sharp Scissors: Fabric scissors work best.
- Cut in One Smooth Motion: Avoid jagged lines.
- Try On: Check the length before making final adjustments.
This minimalist method works best for thick, high-quality fabrics. Thinner fabrics may curl or look unfinished.
7. Temporary Folding (no Cutting)
If you’re not ready to commit, fold the extra length inside and use fashion tape or safety pins to hold it in place. This works if you want to switch between wearing the leggings with sneakers or platform shoes.
Temporary Folding Steps:
- Fold Hem Up: Tuck the excess inside.
- Secure: Use double-sided tape or small pins.
- Adjust as Needed: Remove when washing.
While not as durable, this is a flexible solution for growing teens or people who share leggings.

Credit: americantall.com
Comparison Of Fixing Methods
To help you choose, here’s a side-by-side look at the most popular approaches:
| Method | Difficulty | Durability | Tools Needed | Best For |
|---|---|---|---|---|
| Professional Tailor | Easy | High | None (outsourced) | Expensive/valued leggings |
| No-Sew Hemming Tape | Easy | Medium | Iron, tape, scissors | Quick fix, beginners |
| Hand Sewing | Medium | High | Needle, thread, pins | Personal touch, custom fit |
| Sewing Machine | Medium | High | Machine, thread, pins | Frequent adjustments |
| Fabric Glue | Easy | Low | Glue, scissors | Temporary fix |
| Raw Edge Cut | Easy | Medium | Scissors | Thick, no-fray fabric |
| Temporary Folding | Easy | Low | Tape/pins | Non-permanent, versatile |
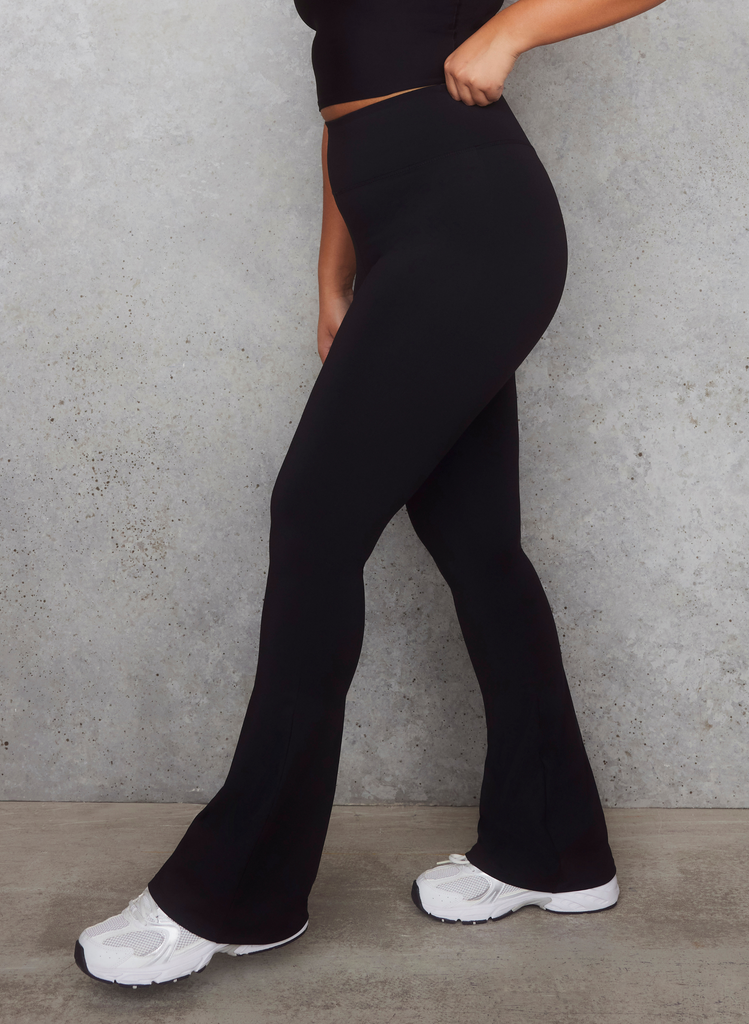
How To Keep The Flare Shape
It’s easy to lose the original flare if you just cut straight across. To keep the stylish bell or bootcut look, follow these steps:
- Trace the Original Hem: Before cutting, fold the leggings in half lengthwise. Use the bottom hem as a guide for your new cut.
- Cut in a Gentle Curve: The outside edge should be slightly longer than the inside to match the flare.
- Double-Check Both Legs: Small differences can be obvious once worn.
If you’re unsure, cut a little less first. You can always trim more, but you can’t add fabric back.
Common Mistakes And How To Avoid Them
Even experienced DIYers make errors. Here are common pitfalls and how to avoid them:
- Cutting Both Legs at Once: It’s tempting to save time, but fabric can slip. Cut one leg, then use it as a template for the other.
- Using the Wrong Thread: Stretch thread is best. Regular thread can snap when the leggings stretch.
- Forgetting Shrinkage: Always wash and dry leggings before altering. Otherwise, the final length may be too short.
- Ignoring Flare Symmetry: If the flare shape is lost, the leggings will look odd and may not fit over shoes the same way.
- Too High Heat: Hot irons can melt or scorch synthetic fabrics. Always check the care label.
Special Tips For Different Fabrics
Every fabric behaves differently. Here’s a quick guide:
| Fabric | Best Method | Extra Tips |
|---|---|---|
| Polyester/Spandex | Sewing machine or hand sewing | Use stretch needle and thread |
| Cotton Blend | Hemming tape or hand sewing | Pre-wash to shrink before altering |
| Nylon | Fabric glue or sewing machine | Low-heat iron, avoid melting |
| Thick Knit | Raw edge cut or sewing machine | Check for fraying before choosing raw edge |
Some advanced leggings use seamless technology or laser-cut edges. These can often be cut without hemming, but always test on a small area first.

Credit: www.youtube.com
Diy Step-by-step Example: Shortening Flare Leggings At Home
Let’s walk through a practical example using the sewing machine method:
- Try on the leggings with your usual shoes. Mark the new desired length on both legs.
- Remove leggings and lay flat. Add 1 inch below your mark for the hem.
- Cut off excess fabric with sharp scissors.
- Fold up the hem twice (½ inch each), pinning as you go.
- Thread the machine with stretch needle and matching thread.
- Select zigzag or stretch stitch.
- Sew along the folded edge, gently stretching the fabric as you sew.
- Press with a warm iron to flatten the hem.
Non-obvious insight: Many people forget that leggings stretch more horizontally than vertically. When you pin and sew, check that the flare still opens up easily and the fabric isn’t pulled too tight.
Caring For Your Altered Leggings
After fixing your leggings, proper care will help them last longer:
- Wash in cold water to protect seams and adhesives.
- Avoid high heat in the dryer.
- Turn inside out before washing to prevent pilling and snags.
- Hand wash if you used glue or tape.
If you used hemming tape or fabric glue, check the hem before each wash, as adhesives can loosen over time.
Credit: lovall.com
When To Replace Instead Of Repair
Sometimes, fixing long flare leggings is not worth the effort. If the fabric is thin, worn, or pilled, or if the seams are stretched out, it may be time to invest in a new pair. Look for brands that offer multiple inseam options so you can get a better fit from the start.
Many brands now offer petite, regular, and tall lengths. According to Wirecutter, choosing the right inseam is the easiest way to get leggings that fit perfectly with no adjustments needed.
Smart Shopping Tips To Avoid Long Flare Leggings
If you are tired of always needing to alter your pants, here are some shopping strategies:
- Check the inseam length in the product description before buying.
- Read reviews from buyers of similar height.
- Look for brands with petite or short options.
- Try before you buy if possible.
Hidden tip: Some brands offer free hemming services, especially for premium activewear. Ask at the store or check the brand’s website.
Common Questions About Fixing Flare Leggings
People often have extra questions when it comes to altering their leggings. Here are some of the most frequent, with clear answers.
Frequently Asked Questions
How Short Should Flare Leggings Be?
Flare leggings look best when they graze the top of your shoes without dragging on the ground. For most people, this means the back hem should be about ¼ to ½ inch above the floor when wearing your favorite shoes.
If you plan to wear them with both flats and heels, choose a length that works for the pair you use most.
Can I Use Hemming Tape On Stretchy Leggings?
Yes, but choose a tape designed for stretch fabrics. Some regular hemming tapes become stiff or peel off after washing. Always follow the tape instructions and test on a small area first.
Is It Possible To Undo A Hem If I Make A Mistake?
If you sew by hand or machine, you can carefully remove stitches with a seam ripper. If you use fabric glue or tape, it’s harder to undo, and some adhesives may leave marks. Always measure twice and cut once to minimize errors.
Will Cutting Flare Leggings Make Them Fray?
Most synthetic leggings (like polyester or nylon) will not fray if cut, especially if they have a tight knit. Cotton blends may fray a little, so hemming is recommended. Check the fabric before deciding.
How Do I Keep The Flare Shape After Shortening?
Lay the leggings flat and trace the original flare curve before cutting. Avoid cutting straight across, as this can change the silhouette. If you’re unsure, cut off less fabric and adjust as needed for a natural flare.
Fixing long flare leggings is easier than you might think, and you don’t need expensive equipment or advanced sewing skills. With the right method, you can customize the fit to your height and style. Whether you want a temporary fix or a permanent hem, the steps above will help you get results you’re proud of—and maybe even inspire you to alter other pieces in your wardrobe.
Remember, a great fit isn’t just about how you look, but how confident and comfortable you feel.