
How to Adjust Oversized Shirt: Easy DIY Tips for a Perfect Fit
How To Adjust Oversized Shirt
An oversized shirt can feel overwhelming and sloppy if not styled or altered correctly. But it doesn’t have to stay that way. With a few smart techniques, you can turn a baggy shirt into a stylish, flattering piece that fits your body and your fashion sense.
Whether you want a quick no-sew fix, a clever styling trick, or a permanent alteration, there are many ways to make that big shirt work for you.
Let’s explore practical ways to adjust an oversized shirt so you look sharp and feel comfortable. You’ll learn easy styling tricks, basic sewing methods, and creative ideas—plus common mistakes to avoid and how to pick the right approach for your needs.
By the end, you’ll be ready to transform that loose shirt into one of your favorite wardrobe items.
Understanding Why Shirts Get Oversized
Before you start adjusting, it helps to know why shirts end up too big. Sometimes, you buy a shirt online and the fit is off. Other times, you might have lost weight, borrowed from a friend, or bought a men’s shirt for a relaxed look.
Cotton shirts can also stretch after many washes. Oversized shirts are sometimes chosen on purpose for comfort or style. But when the fit is wrong, it can make your outfit look unbalanced.
Knowing the reason can help you decide what adjustment is best. For example, if you plan to wear the shirt for layering, you may not want a permanent fix. If it’s a classic piece you want to keep for years, sewing or tailoring might be worth the effort.
Quick Styling Tricks For An Oversized Shirt
Sometimes you don’t need scissors or a needle. You can use creative styling to adjust the look and feel of a large shirt. These tricks are fast, safe, and can make a big difference.
1. The Classic Tuck
Tucking in your shirt is the fastest way to create a neater silhouette.
- Full tuck: Tuck the entire shirt into your pants or skirt for a clean, put-together look.
- French tuck: Tuck just the front of the shirt, leaving the back loose. This gives a relaxed but intentional shape.
- Side tuck: Tuck one side of the shirt for an asymmetrical, fashion-forward style.
Each tuck changes the way fabric falls on your body. The French tuck, for example, highlights your waist but keeps things casual. Try each style in front of a mirror to see what works best for your outfit.
2. Belt It
Adding a belt over an oversized shirt helps define your waist. Use a thin or wide belt, depending on your style. Position the belt at your natural waist or just above your hips. This technique works especially well with long shirts or shirtdresses.
3. Knotting The Shirt
Tying a knot at the hem of the shirt is a playful and effective way to reduce bulk.
- Gather the extra fabric at the front, side, or back.
- Twist and tie into a knot.
- Adjust the knot for comfort.
This trick works best with shirts made from soft, flexible fabric. It adds shape and draws attention to your waist.
4. Layering
Layering helps control the volume of an oversized shirt.
- Wear it over a fitted top or tank for contrast.
- Add a structured jacket or blazer to balance the loose fit.
- For colder days, layer under a sweater and let the collar or hem peek out.
Layering lets you enjoy the comfort of a big shirt without looking shapeless.
5. Rolling The Sleeves
Big, floppy sleeves can make you look sloppy. Rolling or cuffing the sleeves instantly makes the shirt look more fitted.
- Fold the cuffs up once or twice for a relaxed look.
- Try a “master roll” by folding the cuff up to the elbow, then tucking the edge under for a neat finish.
This technique also draws attention to your forearms, adding balance to your overall look.
6. Add A Vest Or Sweater
Wearing a fitted vest or cropped sweater over your shirt creates a layered, trendy look. It shortens the visible length of the shirt and keeps the bulk in check.
7. Use Shirt Clips Or Ties
Shirt clips, rubber bands, or hair ties can be used to gather and secure excess fabric at the back, inside, or at the sides of your shirt. This keeps the front smooth and creates a custom fit without permanent changes.
8. Shrinking The Shirt (carefully)
If your shirt is cotton, sometimes a hot wash and dry can shrink it a little. But this method is risky—especially if you want a specific fit. Only try this with shirts you’re willing to experiment on.
Quick styling tricks are best for days when you don’t want to cut or sew your shirt. They’re reversible and let you try different looks with the same piece.

Credit: sewguide.com
Simple No-sew Alterations
If you want a more lasting fix without sewing, there are clever options. No-sew methods are ideal for beginners, people without sewing tools, or those who want to change their shirt temporarily.
1. Fashion Tape Or Double-sided Tape
Fashion tape can hold extra fabric in place. For example, fold the shirt at the sides or back and use tape to secure. This works best for events or short-term use.
2. Iron-on Hem Tape
Iron-on hem tape is a special adhesive you can use to shorten sleeves or the hem. Place the tape where you want the new hem, fold the fabric, and iron to bond. It’s simple and works well for cotton or blends.
3. Safety Pins
Safety pins are a classic quick fix. Use them inside seams, under the arms, or at the back to pull in excess fabric. This is great for costumes, photo shoots, or last-minute changes.
4. Elastic Bands
You can use elastic bands to cinch the shirt at the waist, sleeves, or back. For example, gather fabric at the back, secure with a band, and tuck the rest under the shirt. This is invisible from the front and gives a fitted look.
5. Clip-on Shirt Garters
Shirt garters or keepers are designed to hold your shirt in place, especially if you want to tuck it in and keep it smooth. Attach the garter from your shirt hem to your socks or thighs. This works best for dress shirts and is popular among those who need a crisp, professional look.
No-sew options are not as durable as tailoring, but they’re perfect for experimenting or when you’re in a hurry.
Basic Sewing Alterations For A Better Fit
If you want a permanent and polished solution, sewing is the way to go. You don’t need to be a professional tailor to make a big difference. With a few basic tools—a needle, thread, pins, scissors, and an iron—you can adjust an oversized shirt at home.
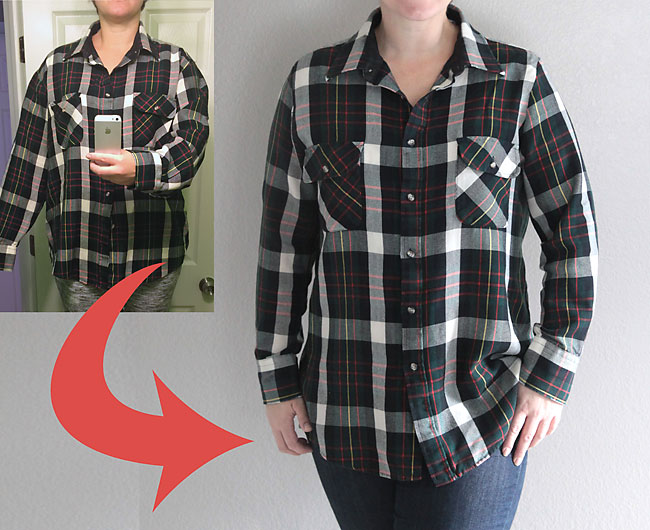
1. Taking In The Side Seams
One of the most effective ways to make a shirt smaller is to take in the side seams.
Steps:
- Turn the shirt inside out and put it on.
- Pin along the sides where you want the new fit.
- Take the shirt off and sew along the pinned line.
- Trim away the extra fabric and finish the edges to prevent fraying.
This method is great for reducing the width of the shirt without changing its style.
2. Darts For A Shaped Fit
Adding darts creates a more fitted shape, especially for women’s shirts. Darts are folds sewn into the fabric to remove excess material at the waist or bust.
Steps:
- Mark where you want the dart with chalk or pins.
- Sew along the marked line, tapering at the ends.
- Press with an iron for a smooth finish.
Darts work best for shirts with enough fabric and are a subtle way to add shape.
3. Shortening The Hem
Oversized shirts are often too long. Shortening the hem makes the shirt look more proportional.
Steps:
- Decide how much length to remove.
- Mark the new hemline.
- Cut and fold the fabric, then sew a straight line.
- Press the hem for a clean look.
A shorter hem can turn a bulky shirt into a chic, cropped top or a regular-length shirt.
4. Slimming The Sleeves
Baggy sleeves can make your arms look lost. Slimming them gives a more tailored look.
Steps:
- Turn the shirt inside out and try it on.
- Pin along the sleeve where you want it to be slimmer.
- Sew along the pinned line, tapering as needed.
- Trim the extra fabric and finish the edge.
Slimmer sleeves balance the shape of your shirt and make it more modern.
5. Adjusting The Shoulders
Oversized shirts often have dropped shoulders that can look sloppy. Adjusting the shoulders is more advanced but makes a big difference.
Steps:
- Remove the sleeves by unpicking the seam.
- Trim the shoulder area.
- Reattach the sleeves, aligning them with the new shoulder seam.
This change requires some skill but gives the most natural, fitted look.
6. Adding A Drawstring
Sew a casing along the waist or hem and insert a drawstring. Pull the string to gather the fabric for a custom fit. This adds a sporty or casual vibe and works well on shirts with enough length.
7. Turning It Into A New Item
If you’re feeling creative, turn the shirt into something else:
- Crop top: Cut and hem to create a trendy cropped shirt.
- Off-shoulder: Remove the collar and adjust the neckline.
- Sleeveless: Remove the sleeves and finish the armholes.
Sewing lets you create a shirt that’s truly yours.
Professional Tailoring Vs. Diy
Sometimes, a shirt is worth the investment of professional tailoring. If the fabric is expensive, the shirt has sentimental value, or you want a perfect fit, a tailor can deliver results that are hard to match at home.
Diy Benefits
- Low cost
- Full control
- Great for practice or casual shirts
Tailoring Benefits
- Clean, professional finish
- Access to advanced techniques
- Ideal for dress shirts or important events
Comparing Diy And Tailoring
Here’s a quick comparison of what you get from each approach:
| Aspect | DIY | Professional Tailor |
|---|---|---|
| Cost | Low | Higher |
| Time | Immediate or short | Several days to a week |
| Skill Needed | Beginner to intermediate | Expert |
| Finish Quality | Varies | Professional |
| Best For | Casual, practice, low-risk shirts | Dress shirts, workwear, valuable items |
If you’re unsure, start with a DIY adjustment on a shirt you don’t mind experimenting with. For high-value pieces, consult a tailor.
Choosing The Right Method For Your Shirt
Not every shirt or situation calls for the same fix. Here’s how to choose the best way to adjust an oversized shirt:
Consider Fabric Type
- Cotton: Easy to sew, shrink, or tape.
- Linen: Wrinkles easily but easy to alter.
- Polyester: Resists shrinking; best for styling or sewing.
- Denim: Harder to sew; may need a tailor.
- Silk: Delicate; best left to professionals.
Think About The Shirt’s Purpose
- For casual wear, you can try bold DIY changes or styling tricks.
- For work or events, choose subtle, clean alterations.
- For layering, you may want to keep the oversized look but adjust the sleeves or hem.
Evaluate Your Skills And Tools
If you have basic sewing tools and skills, try simple alterations. If not, use no-sew options or take the shirt to a tailor.
Frequency Of Use
If you wear the shirt often, invest time in a permanent fix. For one-time use, temporary tricks are fine.
Shirt Structure Comparison
Below is a table comparing how different shirt structures respond to common adjustment methods:
| Shirt Structure | Best Adjustment | Not Recommended |
|---|---|---|
| Button-down Shirt | Take in sides, shorten hem, add darts | Knotting (can look bulky) |
| T-shirt | Knotting, tucking, sleeve rolling | Darts (not effective) |
| Shirtdress | Belt, add drawstring, shorten hem | Side tuck (can shift dress shape) |
| Polo Shirt | Side seam adjustment, tucking | Sleeve rolling (thick cuffs) |
This helps you match the right technique to your shirt style.
Common Mistakes And How To Avoid Them
Adjusting an oversized shirt isn’t hard, but a few mistakes can lead to poor results. Here’s what to watch out for:
1. Cutting Without Measuring
Never cut fabric before measuring and marking. Use pins and try the shirt on before making permanent changes.
2. Over-shrinking
Trying to shrink a shirt in a hot wash can make it too small or uneven. Always test with a similar fabric first or shrink a little at a time.
3. Using Permanent Fixes On Borrowed Or Expensive Shirts
If the shirt isn’t yours or is valuable, avoid cutting or sewing until you’re sure. Try styling tricks first.
4. Ignoring Fabric Type
Not all fabrics react the same way. For example, polyester won’t shrink much, and silk can be ruined by tape or heat.
5. Skipping The Iron
Pressing seams and hems makes the final result look professional. Don’t skip this step.
6. Not Finishing Edges
If you cut fabric, finish the raw edges with a zigzag stitch or fabric glue to prevent fraying.
7. Over-tightening
Pulling the shirt too tight with bands, ties, or sewing can cause discomfort and restrict movement. Leave enough room for comfort.
8. Neglecting Proportions
Adjust the shirt so it matches your body shape. For example, if you take in the sides, consider slimming the sleeves too for balance.
Creative Ways To Transform Oversized Shirts
Sometimes, you want to do more than just make a shirt fit—you want to give it a new life. Here are some creative ideas for transforming oversized shirts:
1. Make A Shirt Dress
If your shirt is long enough, wear it as a dress. Add a belt, tights, or boots for a stylish outfit. You can also add pockets or a contrasting collar.
2. Turn It Into A Crop Top
Cut the shirt to your desired length and hem the edge. Pair with high-waisted jeans or skirts for a trendy look.
3. Create A Kimono Or Cardigan
Remove buttons and add a trim to turn a button-down shirt into a lightweight kimono or open cardigan.
4. Make A Tank Top
Cut off the sleeves and finish the armholes to create a casual tank.
5. Upcycle Into Accessories
Use leftover fabric for headbands, scrunchies, or patches. This is a fun way to reduce waste.
6. Make A Pajama Top
Loose shirts are perfect for sleepwear. Shorten the sleeves or hem for comfort.
7. Use As A Cover-up
Oversized shirts work well as beach cover-ups or for lounging at home.
These creative transformations add variety to your wardrobe and let you experiment with fashion.
Credit: www.itsalwaysautumn.com
Real-world Examples
Seeing how others adjust oversized shirts can give you ideas and confidence. Here are a few real-life examples:
- A college student uses elastic bands at the back of her shirt before class for a fitted look, then removes them for lounging at home.
- A business professional has a tailor take in the sides and slim the sleeves of his dress shirts for a sharp, office-ready fit.
- A fashion blogger knots her oversized T-shirts at the side for a casual weekend look, pairing with jeans and sneakers.
- A parent upcycles old button-downs into summer dresses for her children, adding fun trims and pockets.
- A musician wears an oversized shirt as a kimono jacket on stage for a relaxed, creative vibe.
Each approach is chosen based on the shirt’s purpose, fabric, and the wearer’s style.
Practical Tips For Success
Here are a few extra insights that beginners often miss:
- When using pins, place them perpendicular to the seam so they’re easy to remove as you sew.
- Test any tape or adhesive on a small area first to check for residue or damage.
- If using a sewing machine, choose a thread color that matches the shirt for a professional finish.
- Keep leftover fabric for repairs or adjustments later.
- Try your shirt on after every step, not just at the end. Small changes can have a big impact.
Patience and careful planning lead to the best results.

Credit: www.youtube.com
Sustainable Fashion: Why Adjust Instead Of Tossing?
Adjusting oversized shirts isn’t just about style or comfort—it’s also good for the environment. Every year, millions of clothing items end up in landfills. By learning to adjust or upcycle your shirts, you reduce waste and support sustainable fashion.
Many brands and experts encourage reusing and repurposing clothing. Adjusting your own shirts saves money and helps you develop valuable DIY skills. You may even inspire friends or family to do the same.
For more about sustainable fashion, visit Fashion Revolution.
Frequently Asked Questions
How Do I Know If My Shirt Is Too Oversized?
If the shoulder seams hang far off your shoulders, the sleeves cover your hands, or the shirt’s body is much wider than your torso, it’s likely too big. Try on the shirt and move around—if it feels bulky or keeps slipping, it’s oversized.
Can I Adjust A Shirt Without Sewing?
Yes! You can use tucking, knotting, belts, elastic bands, fashion tape, or safety pins. These methods are quick and do not damage the shirt.
What Is The Best Way To Make A Dress Shirt Fit Better?
The best way is to take in the side seams and slim the sleeves. For a professional finish, use a sewing machine or visit a tailor. Always try the shirt on and pin the changes before sewing.
Will Hot Water Shrink My Shirt?
Hot water can shrink cotton shirts slightly, but results vary based on fabric. Polyester and blends may not shrink much. Always check the care label and test carefully, as over-shrinking is hard to reverse.
Should I Tailor Every Oversized Shirt?
Not always. For casual shirts, styling tricks or no-sew methods are enough. Reserve tailoring for shirts you wear often or that are important to you. For expensive or delicate fabrics, professional tailoring is best.
Adjusting an oversized shirt opens up many style possibilities and helps you get more value from your wardrobe. With these tips and techniques, you can turn any loose shirt into a piece that feels made just for you.