
How to Make Affirmation Stones: A Simple DIY Guide for Positivity
How To Make Affirmation Stones
Looking for a creative way to boost your confidence, calm anxiety, or stay motivated every day? Making affirmation stones is a powerful, hands-on project that brings positive messages right to your fingertips. These small stones, decorated with uplifting words or phrases, fit easily in your pocket, desk, or nightstand. Whenever you feel stressed or need encouragement, holding or seeing your affirmation stone can help center your thoughts and lift your mood.
Unlike reading affirmations from a book or app, crafting your own stones adds a unique, personal touch. You choose the words, colors, and designs that mean the most to you. And as you paint or draw your affirmations, you connect deeply with their meaning.
Many people find the process relaxing and therapeutic, almost like a gentle meditation.
Whether you’re making affirmation stones for yourself, as gifts, or for group activities, this project is simple, affordable, and endlessly customizable. You don’t need any art experience—just a willingness to experiment and have fun. Let’s explore each step in detail, from choosing your stones to adding the final creative touches, so you can start enjoying the benefits of affirmation stones right away.
What Are Affirmation Stones?
Affirmation stones are small rocks or pebbles decorated with positive words, phrases, or designs. Their main purpose is to remind you of a helpful belief or intention. For example, a stone might say “I am strong,” “Peace,” or “Gratitude.” Some people keep a single stone for daily use; others make a collection and pick a new one when they need inspiration.
Affirmation stones have roots in mindfulness and self-help practices. They’re used in therapy, classrooms, and homes to encourage positive self-talk and to help manage stress. Some people hold a stone during meditation, while others use them as visual reminders on their desk or bedside table.
Because the stones are small and easy to carry, they fit any lifestyle. Their tactile feel adds comfort—just rubbing your thumb over a word can help calm nerves during tough moments.
Why Use Affirmation Stones?
There’s science behind why affirmations work. Repeating positive statements can change thought patterns, reduce stress, and even support physical health. When you combine affirmations with something you can touch and see—like a decorated stone—your brain forms a stronger connection to the message.
Studies suggest that visual and tactile cues help anchor new habits. If you see your affirmation stone often, it’s easier to remember your intention. If you touch it during stressful times, your brain links the calming message to the act of holding the stone.
Affirmation stones are also:
- Affordable: Most supplies are inexpensive or free.
- Personal: You choose words and designs that mean something to you.
- Portable: Stones fit in pockets, bags, or on desks.
- Giftable: They make unique, meaningful presents.
People use affirmation stones for many reasons: calming nerves before a presentation, supporting recovery, building self-esteem, or simply inviting more joy into everyday life.
Choosing The Right Stones
The first step is picking your base stones. While you can use almost any stone, some types work better than others for this project.
What Kind Of Stones Work Best?
Look for stones that are:
- Smooth and flat: Easier to write or paint on.
- Palm-sized: Big enough for a short phrase, but small enough to hold.
- Light-colored: Words and designs show up better.
You can find suitable stones in nature (rivers, beaches, gardens) or buy them at craft stores. River rocks and landscaping pebbles are popular choices. Avoid stones with rough, pitted surfaces—paint and markers won’t stick well.
Natural Vs. Store-bought Stones
Here’s a quick comparison to help you decide:
| Feature | Natural Stones | Store-Bought Stones |
|---|---|---|
| Availability | Free if you collect them | Available in many sizes and packs |
| Surface Texture | Often irregular | Usually smooth and flat |
| Appearance | Unique and organic | Uniform and consistent |
| Preparation Needed | Must wash and dry thoroughly | Ready to use |
Cleaning And Preparing Your Stones
Before decorating, always clean your stones:
- Wash: Scrub with warm soapy water and a brush.
- Rinse: Remove all soap and dirt.
- Dry: Let them air dry completely. Damp stones can ruin paint or markers.
If you want extra smoothness, you can lightly sand rough spots with fine sandpaper.
Gathering Supplies
Besides the stones, you’ll need a few basic materials. Here’s what works best for affirmation stones:
Essential Supplies
- Acrylic paint: Covers the stone surface well; dries quickly.
- Paint pens or permanent markers: For writing words and adding details.
- Clear sealant (spray or brush-on): Protects your design from smudging and water.
- Paintbrushes: For backgrounds and larger designs.
- Paper towels/newspaper: To protect your workspace.
Optional Extras
- Stencils: For neat letters or shapes.
- Glitter or metallic paint: Adds sparkle and interest.
- Gem stickers or small embellishments: For a 3D effect.
- Mod Podge: Works as a glue or extra sealant.
Comparing Paint Pens Vs. Markers
To help you choose your writing tool, here’s a quick look:
| Feature | Paint Pens | Permanent Markers |
|---|---|---|
| Color Brightness | Very vibrant | Good, but less bold |
| Water Resistance | High (if sealed) | Moderate (can fade) |
| Line Control | Excellent for details | Good for simple writing |
| Cost | More expensive | Affordable |
If you’re on a budget, permanent markers work well, especially for dark colors. For best results, use a sealant after decorating.
Choosing Your Affirmations
Picking the right affirmation is the heart of this project. The words should feel personal and meaningful to you. Keep them short—most stones only fit a few words.
Examples Of Affirmation Phrases
Here are some ideas to spark your creativity:
- “I am enough”
- “Courage”
- “Breathe”
- “Joy”
- “I choose peace”
- “Strength”
- “I am loved”
- “Hope”
- “Gratitude”
- “Let go”
- “Believe”
- “Shine”
- “I am calm”
- “Trust”
- “Grow”
You can also use symbols (hearts, stars, spirals) or short quotes. For children, try phrases like “I am brave” or “Kindness matters. ”
How To Pick The Right Words
- Personal relevance: Choose words that fit your current goals or struggles.
- Clarity: Simple, positive language is best.
- Emotional impact: Pick phrases that make you feel good when you read them.
Don’t worry if you change your mind later. Many people make new stones as their needs or intentions shift.
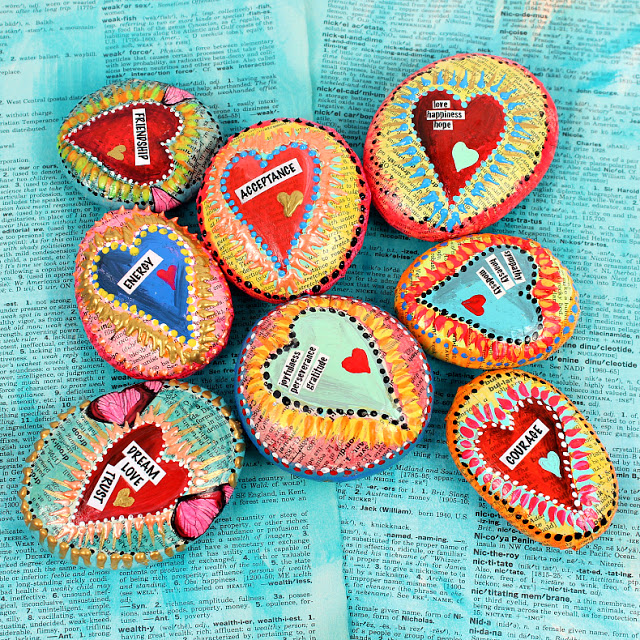
Decorating Your Affirmation Stones
Now comes the creative part! There are many ways to decorate your stones. Even if you’re not “artistic,” you can make something beautiful and meaningful.
Painting A Background
If you want a colored stone, paint a background first:
- Choose a color that matches your mood or intention. Blue is calming, yellow is cheerful, green is balancing.
- Use a small brush to cover the whole surface. Let it dry completely.
- For a smoother look, add a second coat.
You can also blend colors for a tie-dye or ombre effect, or paint simple patterns like dots or stripes.
Adding Your Affirmation
Once the background is dry:
- Use a pencil to lightly write your word or phrase. This helps with spacing.
- Trace over your pencil with a paint pen or marker.
- Let the writing dry before touching.
If you want perfect letters, stencils work well. For a more personal look, use your own handwriting.
Decorating The Edges And Back
Many people like to add small designs around the word or on the back of the stone:
- Doodles: Swirls, hearts, stars, or sunbursts.
- Borders: Dotted or solid lines.
- Symbols: Small images that match your affirmation (like a tree for “grow”).
- Dates or Names: For special occasions or gifts.
Using Embellishments
If you enjoy a little sparkle, add:
- Glitter glue: Outline your word or add sparkle to designs.
- Gem stickers: Press onto dry paint for a 3D look.
- Metallic pens: Add shimmer without mess.
Just remember to seal the stone well if you add extras.
Sealing Your Stone
A clear sealant is important. It keeps your design from rubbing off and protects against water or dirt.
- Spray sealant: Hold can 6–8 inches away, spray lightly, let dry. Add a second coat if needed.
- Brush-on sealant: Apply thin layers, let each dry before adding more.
Sealant is especially important if you’ll carry the stone in your pocket or use it outdoors.
Creative Ways To Use Affirmation Stones
Affirmation stones are flexible tools—you can use them in many ways. Here are some ideas for daily life:
- Morning Ritual: Pick a stone each morning and repeat the affirmation out loud.
- Pocket Reminder: Carry a stone in your pocket. Touch it when you need reassurance.
- Work Desk: Place a stone on your desk for a visual boost during stressful days.
- Bedside Table: See your affirmation before sleep and upon waking.
- Meditation: Hold a stone while you meditate or breathe deeply.
- Gift Giving: Share a set of stones with friends or family for special occasions.
- Group Activities: Use in classrooms, therapy groups, or team-building workshops.
- Journaling Prompt: Pick a stone, then write about what the affirmation means to you.
Some people even create “affirmation stone jars”—fill a jar with stones, and pick one at random when you need inspiration.
Making Affirmation Stones With Children
This project is wonderful for kids. It builds creativity, confidence, and emotional awareness.
Tips For Working With Children
- Choose larger stones for easier handling.
- Use washable paint and markers.
- Let kids pick their own words or draw pictures.
- Talk about the meaning of each affirmation.
- Encourage sharing: Give stones to friends or family.
Making affirmation stones together can help children express feelings and build positive self-talk early in life.
Group And Community Projects
Affirmation stones shine in group settings. Schools, therapy groups, support circles, and workplaces use them to build community and encourage sharing.
Organizing A Group Activity
- Gather supplies and pre-cleaned stones.
- Set up a comfortable, well-lit space.
- Invite participants to choose words that matter to them.
- Share finished stones in a “stone circle” or display.
- Encourage discussion about each person’s chosen affirmation.
Group projects help people learn from each other and create a positive, supportive environment.
Example: Affirmation Stone Garden
Some schools and organizations create public “affirmation stone gardens. ” Each person adds a stone with their affirmation, building a colorful display of hope and encouragement for everyone to see.
Storing And Displaying Your Stones
How you display or store your stones can affect how often you use them. Here are some popular ideas:
- Small bowl or dish: Place on your desk or coffee table.
- Glass jar: Fill with stones, draw one when needed.
- Fabric pouch: Carry a few stones in your bag.
- Shadow box: Mount finished stones for wall art.
- Plant pot: Tuck stones around a favorite plant.
Displaying your stones in a visible place increases the chance you’ll use and benefit from them.

Credit: www.shescraftycrafty.com
Troubleshooting And Common Mistakes
Even simple projects have challenges. Here’s how to avoid common mistakes:
Stone Surface Problems
- Paint won’t stick: Stone is too smooth or oily. Lightly sand, then wash and dry again.
- Design smears: Paint or marker isn’t fully dry. Wait longer before sealing or handling.
Lettering Issues
- Words too big or small: Test your phrase on paper first. Adjust size before writing on the stone.
- Handwriting smudges: Use quick-drying paint pens or markers. Seal promptly.
Sealant Problems
- Cloudy finish: Spray too close or too thick. Apply light, even coats.
- Sticky stones: Not enough drying time. Let stones dry overnight if possible.
Affirmation Overload
- Too many words: Shorter phrases are easier to read and remember.
- Too many stones: Focus on a few meaningful affirmations, rather than quantity.
Remember, mistakes are part of the process. Each stone is unique, and imperfections can add character.
Advanced Techniques And Creative Variations
If you want to take your affirmation stones to the next level, try these ideas:
Layered Painting
Paint a background, let it dry, then add layers of patterns or images. For example, paint a sunrise, then write “Hope” on top.
Mixed Media
Use decoupage glue (like Mod Podge) to attach paper words, pressed flowers, or small photos.
Mandala Designs
Draw simple mandala patterns around your affirmation. Mandalas are circular designs that promote focus and relaxation.
Glow-in-the-dark Stones
Use special paint to make stones that glow at night—great for children or nighttime encouragement.
Themed Sets
Create sets of stones for different purposes:
- Calmness: “Breathe,” “Peace,” “Let go”
- Motivation: “Yes you can,” “Keep going,” “Dream big”
- Self-love: “I am enough,” “Worthy,” “Loved”
Themed sets make wonderful gifts or group activity projects.
Credit: funfamilycrafts.com
The Science And Psychology Behind Affirmation Stones
Why do affirmation stones have such a powerful effect? The secret is in how your brain processes positive messages, especially when combined with touch and sight.
Multi-sensory Anchoring
When you see, touch, and read your affirmation, your brain forms stronger neural pathways. This is called multi-sensory anchoring. The more senses involved, the more memorable the experience.
Repetition Builds Belief
Repeating positive messages helps replace negative self-talk. Studies show that affirmations can reduce stress, boost confidence, and even improve performance in school or work.
The Power Of Ritual
Using your stone daily—whether in meditation, before sleep, or during stressful moments—creates a ritual. Rituals give your brain a sense of safety and predictability, which helps manage anxiety.
You can read more about the science of affirmations on Wikipedia.
Making Your Affirmation Practice Last
Affirmation stones are most powerful when used regularly. Here are tips to keep your practice alive:
- Change stones as your needs change: Don’t be afraid to make new stones as you grow.
- Share with others: Teaching or gifting affirmation stones multiplies their effect.
- Combine with other habits: Use your stone with journaling, meditation, or gratitude lists.
- Reflect on progress: Notice how you feel after a few weeks. Many people report less stress and more positive thinking.

Credit: lifeforceglass.com
Frequently Asked Questions
What Kind Of Paint Is Best For Affirmation Stones?
Acrylic paint is the top choice for affirmation stones. It dries fast, gives strong color, and sticks well to stone surfaces. For small details or writing, paint pens or permanent markers work very well. Always add a clear sealant after painting to protect your design.
Can I Use Found Stones From Nature?
Yes, you can use stones you find in nature—river rocks, beach pebbles, or garden stones are all good choices. Just make sure to clean and dry them well before decorating. Flat, smooth stones are easiest to work with.
How Do I Make Affirmation Stones Last Longer?
To make your stones last, always seal them with a clear spray or brush-on sealant after painting. This protects against water, dirt, and daily handling. Store stones in a dry place and avoid dropping them on hard surfaces.
Are Affirmation Stones Suitable For Group Therapy Or Classrooms?
Affirmation stones are excellent for group therapy, classrooms, or support circles. They encourage self-expression, positive thinking, and sharing. Many teachers and therapists use them as part of mindfulness or emotional learning activities.
What Should I Do If My Affirmation Stone Design Gets Smudged?
If your design smudges, wait until everything is fully dry, then gently repaint or redraw the smudged area. Make sure to let each layer dry before handling. Applying a clear sealant helps prevent future smudging.
Creating affirmation stones is a simple, joyful way to bring positivity into your daily life. With just a few supplies and a little creativity, you can make a tool that supports your mental well-being for years to come. Whether you keep one stone or a whole collection, the affirmations you choose can truly make a difference—one small stone at a time.