
How to Repair Gym Leggings: Easy Fixes for Rips and Tears
How To Repair Gym Leggings
Everyone has a favorite pair of gym leggings. They fit just right, move with you, and feel like a second skin. But even high-quality leggings can rip, snag, or lose their stretch over time. If you notice a hole, a tear, or thinning fabric, don’t throw your leggings away just yet.
With some easy repairs, you can make them almost as good as new—and save money at the same time.
Repairing gym leggings at home is practical, budget-friendly, and better for the environment. You don’t need to be a sewing expert or own fancy equipment. Most fixes require simple tools and a little patience. In this guide, you’ll learn how to repair different types of damage, which methods work best, and how to avoid common mistakes.
You’ll also find tips for keeping your leggings in great shape for longer.
Why Repair Gym Leggings?
Gym leggings are often made from stretchy fabrics like nylon, polyester, or spandex. These materials offer comfort and flexibility, but they’re not indestructible. Rips, holes, and worn seams are common, especially if you wear them often for tough workouts. Repairing them has several benefits:
- Save money: Good leggings can be expensive. Repairs often cost less than buying new ones.
- Reduce waste: Textile waste is a big problem. Fixing your clothes helps the environment.
- Keep your favorites: Well-fitting leggings can be hard to replace.
- Learn a new skill: Simple sewing or mending is useful beyond just leggings.
Common Damage In Gym Leggings
Understanding the type of damage helps you choose the right repair method. The most frequent issues include:
- Small holes or snags: Often appear near the thighs or knees.
- Seam splits: Seams can come undone, especially in high-stress areas.
- Large tears: Bigger rips, sometimes from sharp objects or heavy stretching.
- Worn fabric: Thinning or pilling, usually from friction.
- Loose waistband: Elastic loses stretch or detaches.
Knowing what you’re dealing with is half the battle. Each problem has its own best repair.
Essential Tools And Materials
You don’t need a full sewing kit to fix your leggings, but a few basics make repairs easier:
- Needle: Choose a sharp, fine needle for stretchy fabrics.
- Thread: Polyester or nylon thread is strong and stretches a bit.
- Scissors: Sharp fabric scissors prevent fraying.
- Iron-on patches: Good for holes or thin spots.
- Fabric glue: Quick fix for small holes or fraying.
- Pins or clips: Hold fabric in place while you work.
- Seam ripper: Helpful for undoing stitches if you make a mistake.
- Stretch fabric scraps: For patching larger holes.
Some people also use a sewing machine with a stretch or zigzag stitch, but hand sewing works for most repairs.
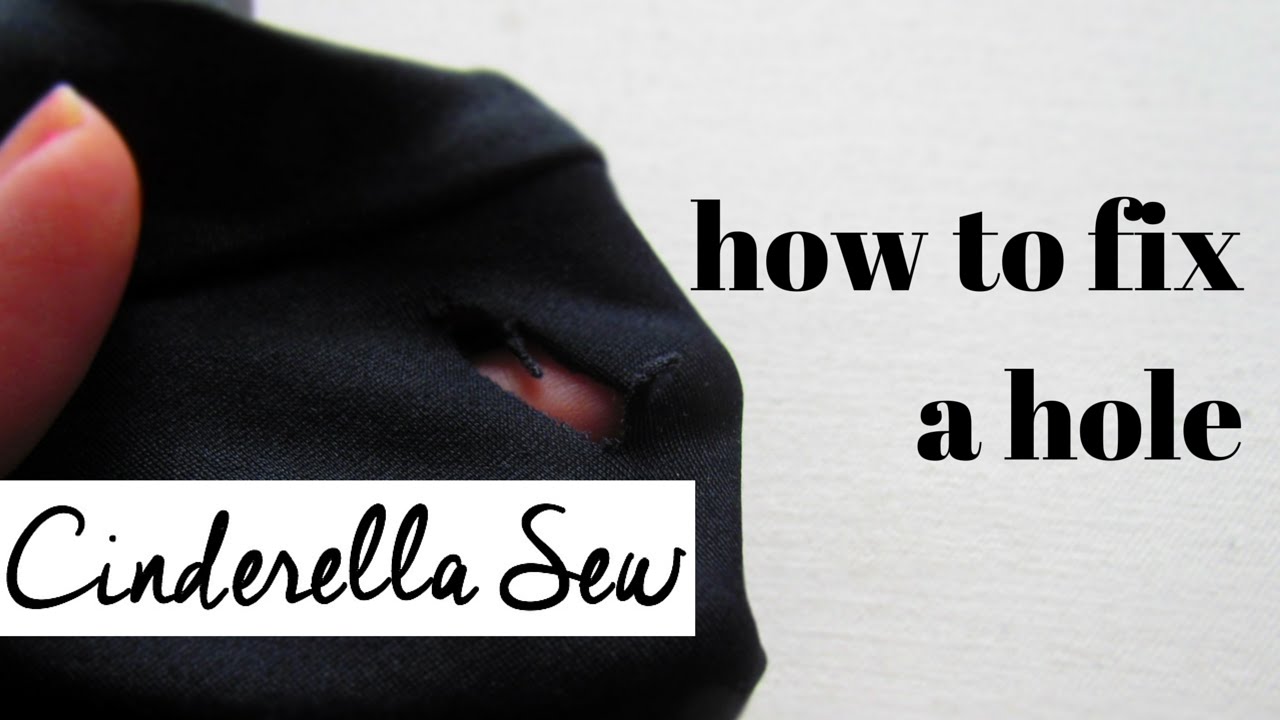
Step-by-step: How To Repair Small Holes
Small holes are the most common problem in gym leggings. They often appear near the inner thighs or knees. Repairing them quickly stops the hole from growing.
Hand Sewing A Small Hole
- Turn leggings inside out: This hides your stitches.
- Thread the needle: Use a thread color close to your leggings.
- Pinch hole closed: Bring the edges together.
- Sew with a whipstitch: Insert needle from one side to the other, looping around the edge. Keep stitches close and tight.
- Tie a knot: Secure thread at the end. Trim excess.
- Turn leggings right side out: Check your work.
A whipstitch is easy and works well for small holes. For better stretch, use a stretch stitch if your machine has one.
Using Fabric Glue
If you don’t want to sew:
- Clean the area: Remove loose threads.
- Apply a small amount of fabric glue: Squeeze glue around the hole.
- Press edges together: Hold for a minute.
- Let dry: Follow glue instructions (usually a few hours).
Fabric glue is fast, but it’s less durable than sewing. It works best for tiny holes or as a temporary fix.
Iron-on Patch For Small Holes
Iron-on patches are great for covering small holes, especially in thicker leggings.
- Cut patch: Slightly larger than the hole.
- Place inside leggings: Position so patch covers the hole from the inside.
- Iron carefully: Use a low setting and a cloth barrier.
- Let cool: Check if patch is secure.
Iron-on patches add a bit of bulk, but they’re quick and strong.
Fixing Split Seams
Seams take a lot of stress in gym leggings, especially at the crotch or inner thighs. When they split, you need to sew them back together for a lasting fix.
How To Sew A Split Seam
- Turn inside out: Expose the seam.
- Align edges: Pin or clip fabric together.
- Thread needle: Use a strong, matching thread.
- Sew with a stretch stitch: If using a machine, select a zigzag or stretch stitch. By hand, use a backstitch for strength.
- Sew along the seam line: Follow the original stitching.
- Tie off and trim: Secure and cut extra thread.
- Test stretch: Gently pull to check seam strength.
A stretch stitch lets the seam move with your body, so it won’t pop open again.
Hand Backstitch For Seams
If you don’t have a machine, use a backstitch:
- Insert needle: About 1/8 inch from the edge.
- Go back slightly: Each stitch overlaps the last.
- Continue: This creates a strong, flexible seam.
Backstitching is slower but very strong.
Repairing Large Tears
Big tears need more support than a simple stitch. For these, patching is often the best option.
Choosing The Right Patch
Use a patch made from stretch fabric similar to your leggings. Avoid stiff fabrics—they’ll feel uncomfortable and may rip again. If you have old leggings you can’t fix, cut them up for patches.
Sewing On A Patch
- Cut patch: At least ½ inch larger than the tear on all sides.
- Round the corners: This stops peeling and curling.
- Pin patch over tear: From the inside for a cleaner look.
- Sew around edge: Use a zigzag or stretch stitch, by hand or machine.
- Test the area: Make sure patch stretches and lies flat.
If the tear is in a high-movement area, double-stitch for extra strength.
Iron-on Patch For Large Tears
Iron-on patches work for larger tears but may not stretch as well. Follow the same steps as for small holes, but be sure the patch can move with the fabric.
No-sew Patch Option
Fabric glue can attach a patch, but this is best for less-stressed areas. Always let it dry completely before wearing.
Fixing Worn Fabric And Pilling
Over time, leggings can show pilling (small balls of fiber) or thin spots, especially where thighs rub together. While you can’t make fabric new again, you can improve its look and prevent holes.
Removing Pilling
- Use a fabric shaver: This gently removes pills.
- Try a disposable razor: Lightly shave the surface (be careful not to cut the fabric).
- Use sticky tape: Press and lift to pull off loose fibers.
Don’t pull pills by hand; this can damage the fabric.
Reinforcing Thin Areas
If a spot is getting thin:
- Apply a small patch inside: Iron-on or sewn, for extra strength.
- Use fabric glue: For very thin spots, glue can stop fraying.
- Avoid further wear: Rotate leggings to reduce stress.
Dealing With Loose Waistbands
A loose waistband can make leggings slip down or feel uncomfortable. The fix depends on the cause.
If Elastic Is Stretched Out
- Open waistband seam: Use a seam ripper on a small section inside.
- Remove old elastic: If possible.
- Measure new elastic: Slightly smaller than your waist for a snug fit.
- Insert new elastic: Attach a safety pin to guide it through.
- Sew ends of elastic: Overlap and stitch securely.
- Close seam: Sew up opening.
If Waistband Is Coming Detached
- Pin waistband back in place: Align with leggings body.
- Sew with stretch stitch: By hand or machine.
- Secure ends: Tie off and trim.
A well-fixed waistband can make old leggings feel new again.

Credit: happiestcamper.com
When To Use A Sewing Machine Vs. Hand Sewing
Both hand sewing and machine sewing can repair leggings. Here’s a quick comparison:
| Method | Best For | Pros | Cons |
|---|---|---|---|
| Hand Sewing | Small holes, quick fixes | Cheap, portable, easy | Slower, less neat on large repairs |
| Sewing Machine | Large tears, seam repairs | Strong, neat, fast | Needs machine, setup time |
If you plan to repair leggings often, a basic sewing machine with a zigzag stitch is a good investment.
Choosing The Right Thread And Needle
Using the right materials makes a big difference in repair quality.
| Thread Type | Stretch | Best For |
|---|---|---|
| Polyester | Some stretch | General repairs |
| Nylon | Good stretch | Activewear, leggings |
| Cotton | No stretch | Not recommended for leggings |
For needles, choose a ballpoint needle if you use a machine. It slides between fibers instead of piercing, which prevents snags.
Preventing Damage Before It Starts
The best way to avoid repairs is to care for your leggings properly. Here are some effective tips:
- Wash in cold water: Hot water breaks down fibers.
- Avoid fabric softeners: These coat fibers and reduce stretch.
- Air dry: Heat from dryers damages elastic.
- Wash inside out: Reduces friction and pilling.
- Use a laundry bag: Protects fabric from snags.
If you notice a small hole or loose seam, fix it immediately. Waiting allows damage to get worse, making repairs harder.
Advanced Repair Techniques
Some repairs need a bit more skill, but they’re still possible at home with some practice.
Invisible Mending
If you want a repair that’s hard to see:
- Match thread color: As close as possible to the original.
- Use tiny stitches: Keep them close to the edge.
- Stitch from inside: Hides your work.
- Press gently: Use a low iron (if safe for fabric).
Invisible mending is perfect for leggings you wear outside the gym, where looks matter more.
Darning Thin Areas
Darning is weaving new thread into the fabric to fill thin spots.
- Stretch fabric over a small bowl: This makes it easier to work.
- Sew rows of thread: Across the thin area.
- Weave back and forth: Perpendicular to first rows.
- Knot ends: For security.
Darning is a bit slow but saves leggings that would otherwise get holes.
Replacing Panels
If a large section is damaged, you can replace the panel.
- Cut out damaged area: Along seam lines.
- Use a matching fabric: Cut to the same shape.
- Pin and sew new panel: Use a stretch stitch.
- Test fit: Adjust if needed.
This is advanced but extends the life of very expensive or loved leggings.
Mistakes To Avoid When Repairing Leggings
Even simple repairs can go wrong. Here are some common mistakes and how to avoid them:
- Using the wrong thread: Cotton thread breaks easily. Use polyester or nylon.
- Sewing too tightly: Tight stitches can cause fabric to pucker or snap.
- Skipping patching: Don’t try to sew a large tear closed without a patch.
- Not matching fabric stretch: Use only stretch fabric for patches.
- Overheating with iron: Too much heat melts synthetic fabrics.
- Waiting too long: Small holes grow quickly if you don’t repair them.
Always check the care label and test your repair on a hidden area if you’re unsure.
When To Replace Instead Of Repair
Some damage is beyond repair. Replace your leggings if:
- There are multiple large tears.
- Fabric is see-through in several spots.
- The elastic is completely worn out.
- Repairs don’t hold after several tries.
But before you throw them away, consider turning them into cleaning rags or patches for other repairs.
How Long Do Repaired Leggings Last?
A well-done repair can make leggings last for months or even years longer. But the life of your repair depends on:
- Quality of repair: Strong stitches and proper materials last longer.
- Location of damage: Repairs in low-stress areas last longer than at the crotch or knees.
- How often you wear them: Daily wear means more stress.
- Care after repair: Gentle washing and drying keeps repairs intact.
Most simple repairs hold up for dozens of wears, especially if you rotate your leggings and avoid repeated heavy workouts in the same pair.
Sustainability And The Benefits Of Repair
Repairing gym leggings is a small but important way to support sustainable fashion. Every year, millions of tons of clothing end up in landfills. Stretchy synthetic fabrics take a long time to break down, and making new clothes uses a lot of energy and water.
By repairing and reusing your leggings:
- You reduce your carbon footprint
- You save money in the long run
- You avoid the frustration of searching for the perfect replacement
If you want to learn more about sustainable fashion, check out Fashion Revolution.
Real Examples: Repair Scenarios
Sometimes, seeing real-life repair situations helps. Here are three common scenarios and how to handle them.
Example 1: Small Hole At Inner Thigh
Maria noticed a small hole forming at the inner thigh seam after several months of running. She turned the leggings inside out, pinched the hole closed, and used a whipstitch with matching thread. It took only 10 minutes. She’s worn them many times since with no new holes.
Example 2: Large Tear From A Bench
James snagged his leggings on a sharp bench edge, leaving a 2-inch rip near the knee. He cut a patch from an old pair of leggings, rounded the corners, and sewed it over the tear with a zigzag stitch. The patch is visible but blends in well, and the leggings are back in rotation.
Example 3: Loose Waistband After Washing
After several washes, Priya’s leggings started slipping during yoga. She found the waistband elastic had lost its stretch. She opened the inner seam, replaced the elastic with a new piece, and sewed it shut. The leggings fit snugly again.
These examples show that most repairs are straightforward and worth the effort.
Comparing Repair Methods: Durability And Appearance
Not all repairs look or last the same. Here’s a quick comparison:
| Repair Method | Durability | Appearance | Best Use |
|---|---|---|---|
| Hand Whipstitch | Good for small holes | Visible if thread doesn’t match | Quick fixes |
| Zigzag Machine Stitch | Very strong | Neat, nearly invisible | Seams, large tears |
| Iron-On Patch | Strong, but less stretchy | Patch may be noticeable | Holes, thin spots |
| Fabric Glue | Temporary | Invisible if used carefully | Small snags, emergencies |
| Darning | Moderate | Visible weaving pattern | Thin fabric, heel areas |
Choose the method that fits your needs: quick vs. strong, visible vs. hidden.
Credit: www.youtube.com
Tips For Making Repairs Last Longer
After repairing, you want your efforts to last. Here’s how to get the most from your fixed leggings:
- Let glue or patches cure fully before wearing.
- Wash on gentle cycle or by hand.
- Avoid hot dryers—air dry instead.
- Don’t over-stretch repaired areas.
- Rotate leggings: Give each pair a break between uses.
With care, a good repair can extend your leggings’ life by months or more.
Frequently Asked Questions
How Can I Fix Leggings If I Don’t Have A Sewing Kit?
If you don’t have a sewing kit, use fabric glue for small holes. For bigger holes, iron-on patches work well. In an emergency, even clear nail polish can stop a run from spreading, but it’s only temporary.
Will Repairing Leggings Affect How They Stretch?
Proper repairs using stretchy thread and fabric shouldn’t affect stretch much. Avoid tight stitches and use zigzag or stretch stitches if possible. Non-stretch patches or threads can make the fabric stiff and uncomfortable.
Is It Worth Repairing Cheap Leggings?
If the leggings fit well and you love them, repairs are often worth it. For very cheap, thin leggings, repairs might not last long. Try a quick fix first to see if it’s comfortable before investing more time.
Can I Repair Leggings With Visible Logos Or Prints?
Yes, but it’s best to use invisible mending and match the patch or thread as closely as possible. For printed leggings, repair from the inside, and avoid covering logos if possible. Some small repairs may be slightly visible.

Credit: drglennlyle.com
Where Can I Learn More About Clothing Repairs?
Great resources are available online, including video tutorials and sewing blogs. The Sewing Mastery YouTube Channel has many step-by-step guides for beginners.
Taking care of your gym leggings with simple repairs is easy, practical, and rewarding. With these tips, you can keep your favorite pairs looking and feeling great—workout after workout.