
How to Make Tank Tops Out of T Shirts: Easy DIY Guide
Turning an old t-shirt into a stylish tank top is a creative way to refresh your wardrobe and reduce waste. Whether you want a cool gym shirt, a breezy summer top, or just a fun DIY project, making tank tops out of t-shirts is simple and rewarding.
You don’t need advanced sewing skills or expensive tools—just a bit of patience, some basic materials, and a desire to experiment. This guide walks you through every step, explains different styles, and shares pro tips that even experienced DIYers sometimes overlook.
Why Make Tank Tops Out Of T Shirts
Repurposing t-shirts into tank tops goes beyond fashion. It’s about sustainability, self-expression, and making the most out of what you have. Old t-shirts often carry memories or feature graphics you still love. Instead of letting them sit unused, you can give them a second life.
Plus, custom tank tops fit better and cost much less than store-bought options.
You can also control the cut, fit, and style, allowing for creativity. Homemade tank tops are unique—no one else will have exactly the same design. And if you mess up? It’s just an old t-shirt, so there’s no big loss.
Materials And Tools You’ll Need
Before you start, gather everything so you won’t have to pause mid-project. Here’s what you’ll need:
- T-shirt (preferably 100% cotton or a cotton blend)
- Sharp fabric scissors
- Chalk or washable fabric marker
- Ruler or measuring tape
- Pins (optional, for precise cutting)
- Needle and thread or sewing machine (optional, for finishing edges)
- Iron (for crisp folds and neat finishing)
- Seam ripper (if you want to open existing seams)
- Safety pins (helpful for pinning fabric before cutting)
A key mistake beginners make is using dull scissors. Sharp fabric scissors are essential for clean edges. If you plan to make many tank tops, consider getting a rotary cutter for super straight lines.
Choosing The Right T-shirt
Not every t-shirt makes a good tank top. Look for these features:
- Size: Choose a shirt one or two sizes bigger than your normal fit if you want a relaxed tank. Tighter tanks work better with true-to-size shirts.
- Fabric: Cotton is easiest to cut and won’t fray much. Stretchy blends (like those with spandex) can work but may curl at the edges.
- Condition: Avoid shirts with thin, see-through spots, big stains, or rips in the area you want to use.
- Graphics: Think about where the print will end up after cutting. Large central logos often look best.
If you’re unsure, practice with a shirt you don’t care about first. That way, mistakes are just part of the learning process.
Planning Your Tank Top Style
There’s more than one way to turn a t-shirt into a tank top. Decide what you want before cutting:
- Classic wide-strap tank: Simple, with wide shoulder straps and a standard armhole.
- Racerback: Sporty look with a Y-shaped back.
- Muscle tank: Deep armholes, popular for gym wear.
- Cropped tank: Cut shorter for a trendy look.
- Tie-front tank: Cropped with extra length in the front for tying.
Each style needs different cuts and finishing steps. Look at photos online or in real life for inspiration. Sketch your idea or use chalk to draw lines directly on the shirt.
Step-by-step Guide: Classic Wide-strap Tank
Let’s start with the most popular method. Follow these steps for a classic tank top:
1. Lay Out Your Shirt
Wash and dry the t-shirt first. Place it flat on a table, smoothing out any wrinkles. Use your hands to align the seams.
2. Mark The Cut Lines
Use chalk or a washable marker to draw where you’ll cut:
- Neckline: Draw a gentle curve a few inches below the collar.
- Armholes: Start at the shoulder seam and curve down, ending about 1-2 inches from the side seam.
- Straps: Leave at least 2 inches of width for the shoulder straps so they’re sturdy.
Check your lines in the mirror or compare with a tank top you like.
3. Cut The Neckline
Insert your hand inside the shirt to separate the front from the back. Cut along your neckline line—only the front layer first if you want a lower front and higher back.
4. Cut The Armholes
Pinch the armhole area gently and cut both layers at once, following your chalk line. For a deeper armhole, cut more from the side.
5. Try It On
Test the fit. Adjust the neckline or armholes if needed, trimming a little at a time.
6. Finish The Edges (optional)
Cotton won’t fray much, but for a polished look:
- Fold edges inward by ¼ inch and sew with a straight stitch.
- Or, leave edges raw for a casual, rolled look.
- If you have a serger, use it for a professional finish.
7. Press And Wear
Iron the edges for a clean look. Your classic tank top is ready!
How To Make A Racerback Tank Top
Racerbacks are great for workouts and summer. Here’s how to do it:
1. Prepare The Shirt
Lay the shirt flat. Mark the armholes wider than usual.
2. Draw The Racerback Shape
On the back, draw a Y-shape starting at the shoulders and coming together between the shoulder blades. The straps should curve inward.
3. Cut The Front
Cut the neckline and armholes as before, but leave the front straps wider.
4. Cut The Back
Cut along your racerback lines, making sure the straps curve toward the center. The bottom of the Y should be about 2-3 inches wide.
5. Finish The Edges
Sew or leave raw, as preferred.
6. Reinforce The Center
Stitch across the bottom of the Y for strength, or tie the straps together with a small fabric strip for a sportier look.
Making A Muscle Tank From A T-shirt
Muscle tanks are loose, with low-cut armholes. They’re popular for layering or gym wear.
1. Mark Deep Armholes
From the shoulder seam, draw lines curving down to 2-3 inches above the shirt hem.
2. Cut The Neckline And Armholes
Follow your lines, making sure the armholes are symmetrical.
3. Adjust The Length
You can crop the bottom or leave it long.
4. Finish Or Roll The Edges
Muscle tanks often look good with raw, rolled edges. Stretch the armholes gently so they curl.
5. Add Side Ties (optional)
Cut small slits at the bottom sides and tie them for extra style.
How To Crop Your Tank Top
Cropped tanks are trendy and perfect for hot weather.
- Mark the Length: Put on the shirt and use chalk to mark where you want it to end.
- Cut Straight Across: Lay the shirt flat and cut in a straight line.
- Add a Tie Front: Leave the front a bit longer, cut up the center, and knot the ends for a cute tie.
Cropped shirts often roll at the hem, which looks relaxed and stylish.
Advanced Styles: Knotted, Braided, And Fringe Tanks
For those who want to get creative, try these techniques:
Knotted Back
- Cut three strips from the back center.
- Braid or tie them together.
- This gives both style and strength.
Braided Straps
- Cut the shoulder straps into three thin strips each.
- Braid and sew or knot them at the ends.
Fringe Bottom
- Cut vertical strips, ½ to 1 inch wide, along the bottom edge.
- Knot each strip for a boho look.
These styles are fun for festivals or beachwear.
Table: Comparison Of Tank Top Styles
Here’s a quick look at different styles and their best uses.
| Style | Strap Width | Best For | Edge Finish |
|---|---|---|---|
| Classic Tank | Wide | Everyday Wear | Raw or Sewn |
| Racerback | Narrow/Y-shaped | Workout, Sports | Reinforced |
| Muscle Tank | Wide | Gym, Layering | Raw Rolled |
| Cropped Tank | Varies | Summer, Trendy | Raw |
| Braided/Fringe | Varies | Festivals | Braided/Knotted |
How To Get A Perfect Fit
One big advantage of DIY tank tops is getting the exact fit you want. Here’s how to improve your results:
- Try on after each major cut. Don’t cut too much at once.
- Use pins to adjust fit before making final cuts.
- Mark both sides if you want a symmetrical look.
- Remember that cotton stretches over time—start with a snug fit if in doubt.
A common mistake is cutting both armholes or the neckline too deep at first. Always cut less than you think, then adjust after trying on.
Finishing Techniques: Sewn Vs. Raw Edges
You can leave edges raw for a relaxed look, but there are ways to finish them for durability.
Raw Edges
- Quick and easy
- Good for casual wear
- Edges will curl after washing
Folded And Sewn
- Fold edge by ¼ inch and sew with a straight stitch
- Looks neat and lasts longer
Bias Tape
- Adds color contrast
- Wraps around the edge and is sewn in place
Serger Finish
- Professional look
- Needs a serger machine
Think about how you’ll wear the tank. For heavy workouts, a sewn edge is stronger. For beachwear or lounging, raw is fine.

Credit: www.youtube.com
Table: Edge Finishing Comparison
Compare edge finishing options:
| Finish Type | Durability | Skill Level Needed | Look |
|---|---|---|---|
| Raw | Low | Beginner | Casual, Rolled |
| Sewn | High | Basic Sewing | Neat, Fitted |
| Bias Tape | Very High | Intermediate | Contrasting, Decorative |
| Serger | Very High | Advanced | Professional |
Tips For Cutting And Measuring
A little planning saves a lot of frustration. Here’s what experienced DIYers wish they knew sooner:
- Use a ruler for straight lines and symmetry.
- Draw on the inside of the shirt so marks don’t show.
- Keep the shirt flat to avoid jagged edges.
- Cut slowly, especially around curves.
- Try on often. Every body is different—customize as you go.
If you make a mistake, don’t worry. You can always trim more or turn a slip-up into a new design idea.
Adding Personal Touches
Your tank top doesn’t have to be basic. Here’s how to make yours stand out:
- Fabric paint or markers: Draw designs or write messages.
- Iron-on patches: Cover up small holes or stains.
- Studs or rhinestones: Add sparkle to the straps.
- Tie-dye: Transform plain white shirts with color.
- Embroidery: Stitch a small design or your initials.
Be careful not to add too much weight, especially near the straps. Test decorations on scrap fabric first.
Table: Customization Ideas And Difficulty
Explore different ways to customize:
| Customization | Difficulty | Best Applied To |
|---|---|---|
| Fabric Paint | Easy | All Styles |
| Iron-on Patches | Easy | Classic, Muscle |
| Studs/Rhinestones | Intermediate | Racerback, Cropped |
| Tie-Dye | Intermediate | Wide-strap, Muscle |
| Embroidery | Advanced | Classic, Cropped |

Credit: www.creatinglaura.com
Washing And Caring For Diy Tank Tops
Homemade tank tops can last a long time if you treat them right:
- Wash in cold water to prevent shrinking and fading.
- Use a gentle cycle for raw edges.
- Hang dry to keep the shape.
- Iron on low heat if needed, especially after customizing.
Avoid bleach, which can damage both fabric and decorations. If you used fabric paint or dye, let the shirt cure for at least 24 hours before washing.
Common Mistakes And How To Avoid Them
Even experienced crafters make mistakes. Here’s how to avoid the most common ones:
- Cutting too much at once: Always start small. You can’t add fabric back.
- Not trying on between cuts: Bodies are all different. Frequent fitting is key.
- Choosing the wrong shirt size: Too small, and the tank will feel tight. Too big, and it may not look flattering.
- Cutting unevenly: Use a ruler and double-check your lines.
- Ignoring the graphic placement: Plan cuts so designs stay centered.
If you do make a mistake, get creative. Add a patch, cut a new style, or layer the tank over another shirt.
Who Should Try This Project?
Anyone can make tank tops from t-shirts. It’s perfect for:
- Teens wanting a unique look.
- Fitness fans needing gym gear.
- Parents making fun summer clothes for kids.
- Eco-friendly shoppers who like upcycling.
Even if you’ve never sewn before, you can start with a no-sew, raw-edge tank. If you love sewing, challenge yourself with advanced finishes.
Where To Find Inspiration
Look beyond your own closet. Here are smart ways to get inspired:
- Thrift stores: Find shirts with cool graphics or colors.
- Social media: Search for #diytanktop or #upcycledfashion.
- Athletic brands: Check out current tank top styles and copy the shapes you like.
- Fashion blogs: Many share free patterns and tutorials.
One excellent resource for creative upcycling is Instructables, which features step-by-step guides and photos from crafters worldwide.
Non-obvious Insights For Beginners
Some details often surprise first-timers:
- Fabric will stretch more after the first wash and wear. Make the armholes and neckline a bit smaller than you think.
- Graphics may crack or peel at the edge after cutting. If you want a clean look, cut just outside the graphic, or reinforce the area with interfacing or an iron-on patch.
Also, if you want a tank for workouts, avoid shirts with heavy print or vinyl graphics. These don’t breathe well and can feel sticky.
Experimenting And Learning
Don’t be afraid to experiment. The more you try, the better you’ll get. Mix and match styles: combine a racerback with a fringe bottom, or add braided straps to a muscle tank. Share your results with friends or online communities to get feedback and new ideas.
If you want to improve your sewing skills, use your DIY tank tops as practice. Try different stitches or edge finishes. Each attempt will teach you something new.
Frequently Asked Questions
What’s The Easiest Tank Top Style To Make From A T-shirt?
A classic wide-strap tank is the easiest. You just cut off the sleeves and lower the neckline. There’s no need for tricky shapes or extra sewing. Even beginners can finish one in less than 30 minutes.
Do I Need To Sew The Edges Of My Diy Tank Top?
No, you can leave the edges raw if you want a quick project. Cotton t-shirts usually don’t fray much, and the edges will roll naturally. For a neater look or more durability, fold and sew the edges.
How Do I Make Sure Both Sides Match When Cutting?
Fold the shirt in half lengthwise with the side seams together. Then cut both sides at once. Use pins or chalk to mark your lines before cutting to help keep everything even.
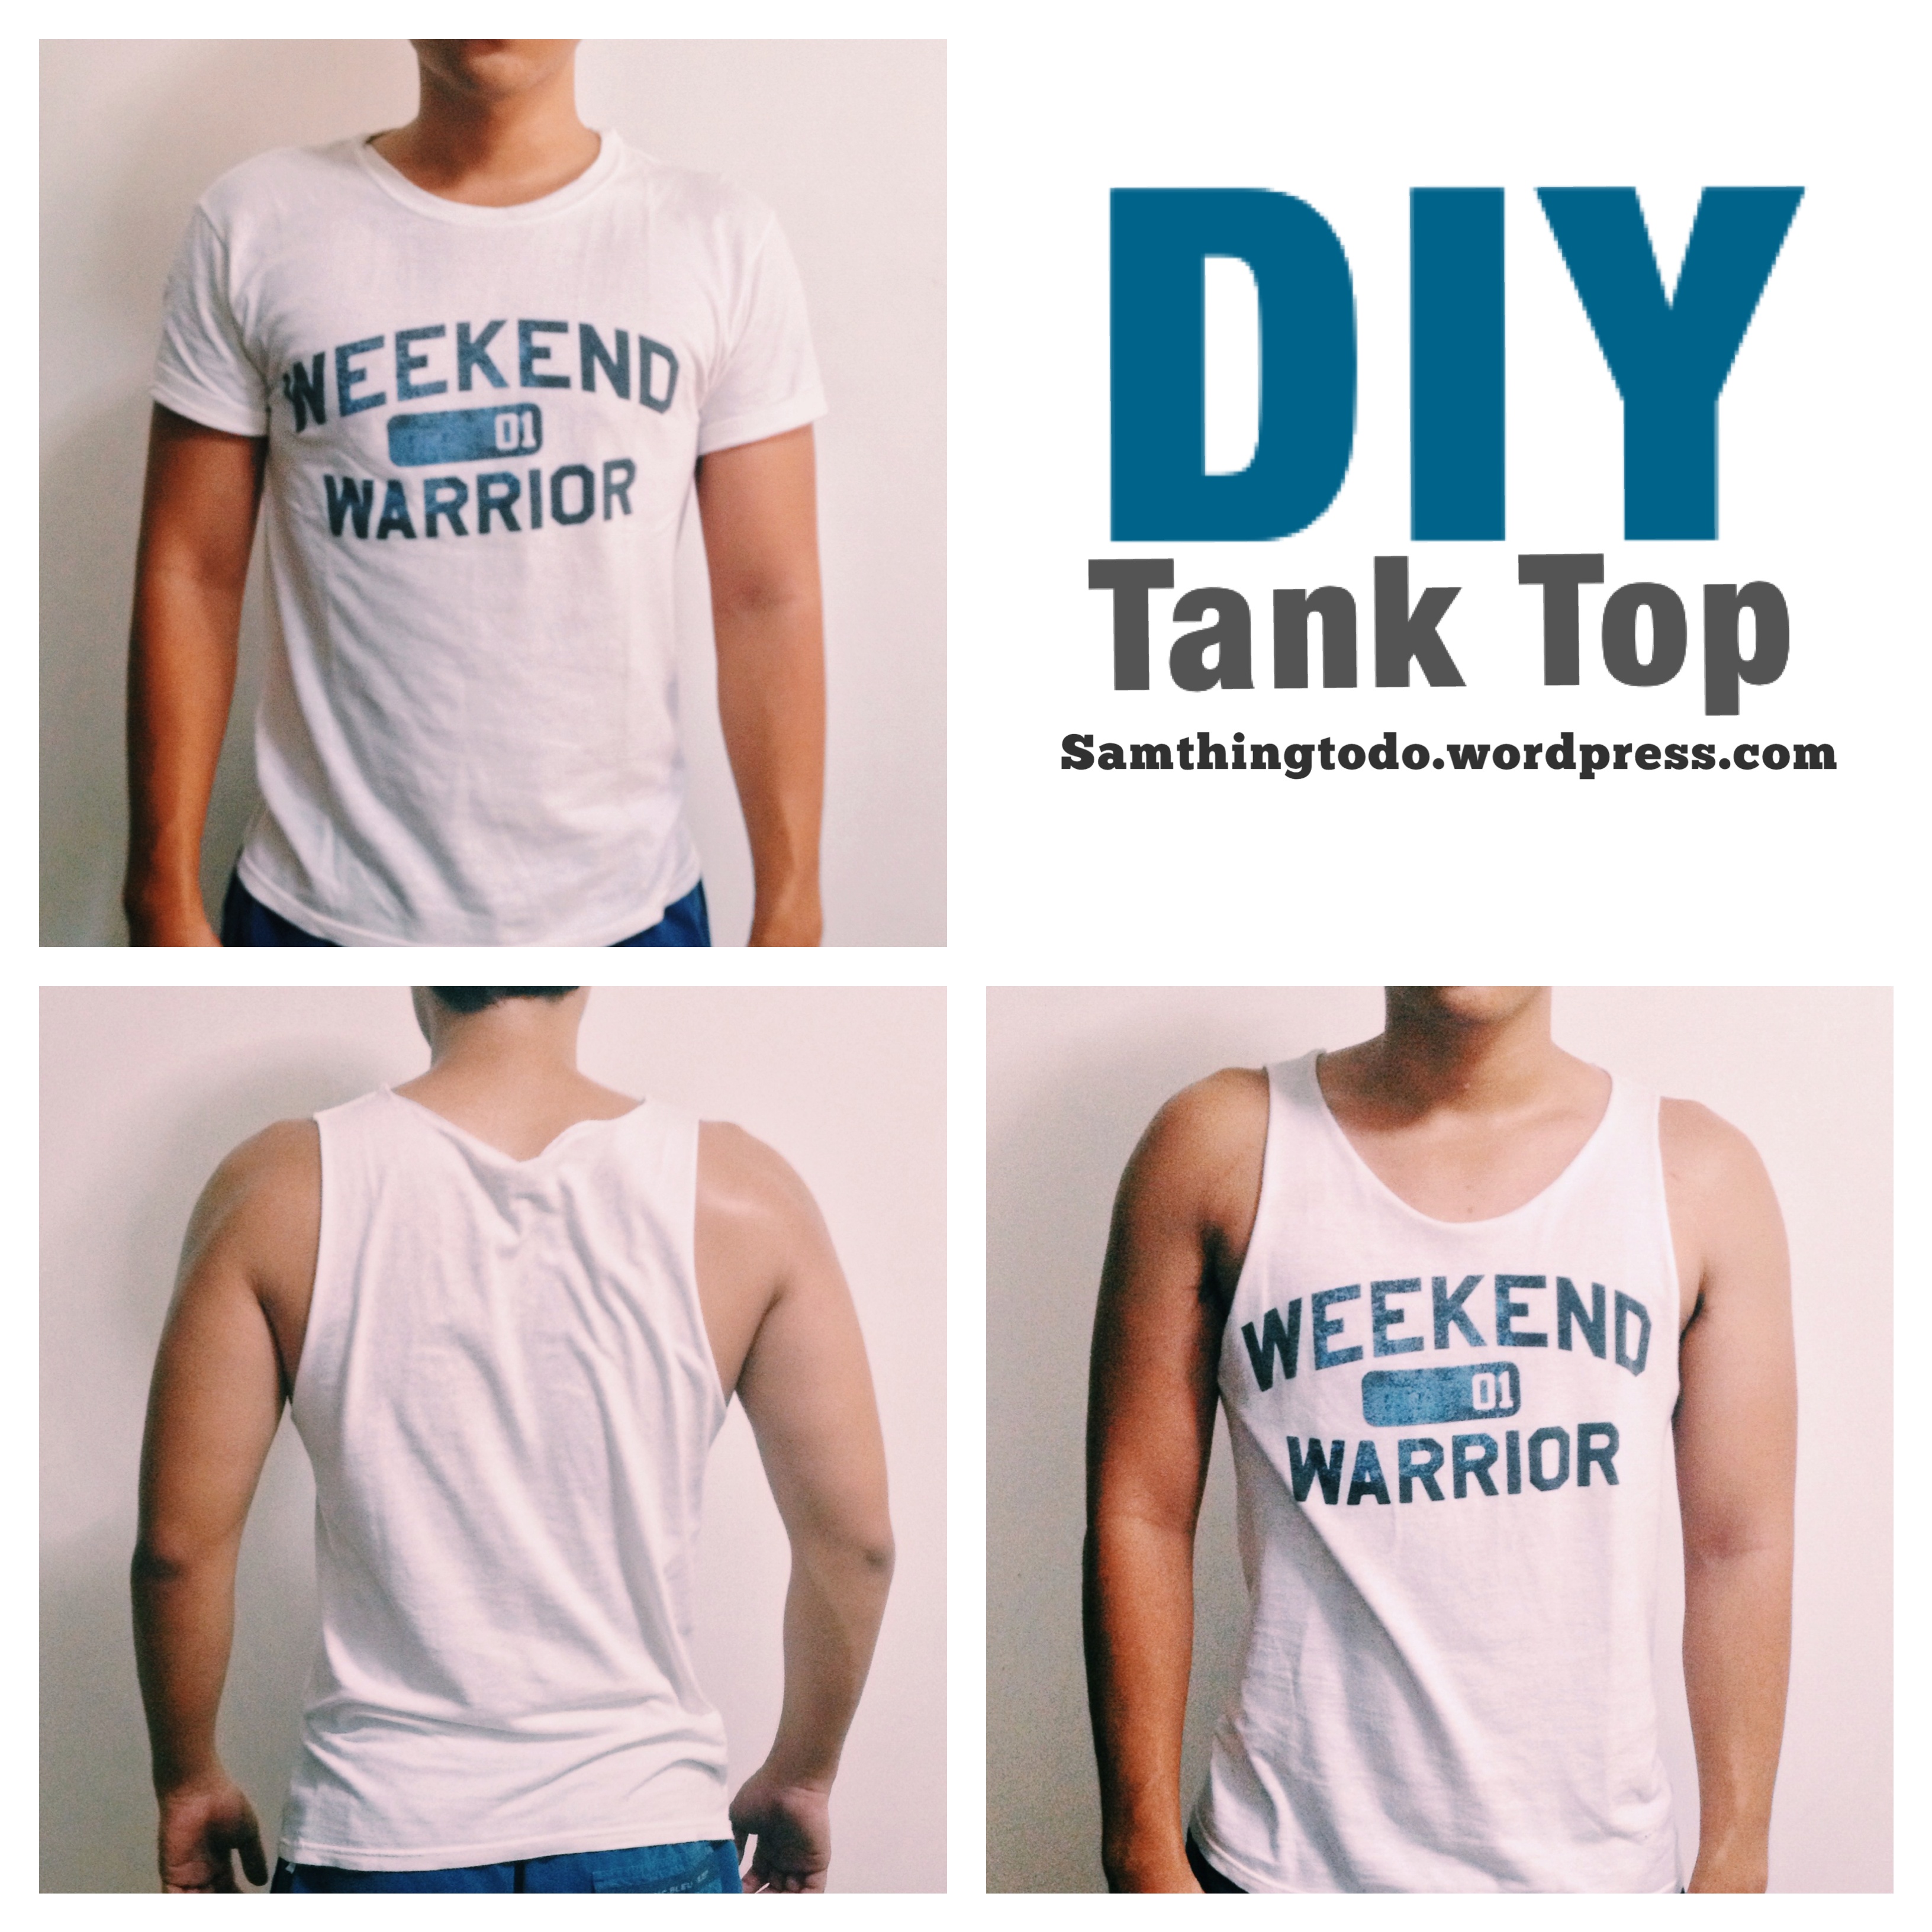
Credit: samthingtodo.wordpress.com
Can I Make A Tank Top From Any T-shirt Fabric?
Most t-shirts work, but 100% cotton is best for beginners. Stretchy or thin fabrics are harder to cut and sew, and edges may curl more. Avoid shirts with lots of holes or very heavy graphics.
How Do I Stop My Tank Top From Stretching Out Too Much?
Wash in cold water, and avoid pulling on the straps when wearing. If the armholes or neckline stretch too much, sew a small hem or add bias tape to reinforce the edges.
Creating your own tank tops from t-shirts is a fun way to upcycle and express your personal style. With a little practice, you’ll soon have a collection of unique tops for every occasion. Enjoy the process, experiment with new ideas, and wear your creations with pride.