
How to Make T Shirt Dress: Easy DIY Steps for a Trendy Look
How To Make T Shirt Dress
Turning a simple t-shirt into a dress is a smart way to refresh your wardrobe, save money, and express your creativity. Many people think making a t-shirt dress is difficult or only for experienced tailors, but that’s not true. With a few basic tools, some patience, and clear steps, anyone can transform an oversized t-shirt or a couple of regular shirts into a comfortable and stylish dress.
This guide will walk you through every detail of making a t-shirt dress, from choosing the right materials to adding your personal touch. Along the way, you’ll learn practical sewing tips, how to fix common mistakes, and ways to make your dress look professional.
Even if you have never sewn before, you’ll find this process friendly and rewarding. Let’s get started on your new favorite piece of clothing.
Why Make A T Shirt Dress?
A t-shirt dress is more than just a simple garment. It offers freedom, comfort, and a touch of fashion that fits almost any casual occasion. Here’s why many people love making their own:
- Cost-effective: Making your own dress is usually much cheaper than buying one.
- Personalization: You control the length, fit, color, and design.
- Sustainable: Upcycling old shirts helps reduce waste.
- Beginner-friendly: No advanced sewing skills needed.
Most beginners don’t realize that you can use shirts already in your closet. You don’t need to buy expensive fabric. Also, a t-shirt’s natural stretch makes it forgiving if your measurements aren’t exact.
Choosing The Right T Shirt
Before you start, picking the right t-shirt is important. This decision affects how your dress will look and feel.
Key Factors To Consider
- Size: For a relaxed fit, choose a t-shirt two to three sizes bigger than you normally wear. If you want a snug or bodycon look, use a shirt closer to your regular size.
- Material: Cotton and cotton-blend shirts are easiest to work with. They’re soft, breathable, and stretch slightly, which makes sewing simpler.
- Length: The longer the shirt, the longer your dress. If you’re tall, try to find extra-long t-shirts or use two shirts sewn together.
- Shape: Straight-cut shirts offer the most flexibility. Avoid shirts that are very fitted or have a lot of structure.
Where To Find The Perfect T Shirt
You don’t have to buy new shirts. Look for options in your own closet, at thrift stores, or online. Sometimes men’s t-shirts make great dresses because they’re usually longer and wider.
Tools And Materials Needed
Gathering the right tools before starting will make the process smoother. Here’s a checklist of what you’ll need:
- Oversized t-shirt (or two, if you want a color-block dress)
- Scissors (fabric scissors work best)
- Pins or fabric clips
- Measuring tape
- Chalk or washable marker
- Sewing machine (hand sewing needle if you don’t have a machine)
- Thread (matching or contrasting color)
- Iron and ironing board
- Seam ripper (helpful for mistakes)
- Elastic (optional, for waist shaping)
Most people overlook the importance of a sharp pair of scissors. Dull scissors can make your edges jagged, which affects the final look.
Planning Your Design
There are many ways to style a t-shirt dress. You can keep it simple, add a waist, create sleeves, or combine colors. It’s helpful to sketch your idea on paper first, even if it’s just a rough drawing.
Popular T Shirt Dress Styles
- Straight t-shirt dress: Simple, loose, and comfortable.
- Fitted t-shirt dress: More form-fitting, sometimes with a waist seam.
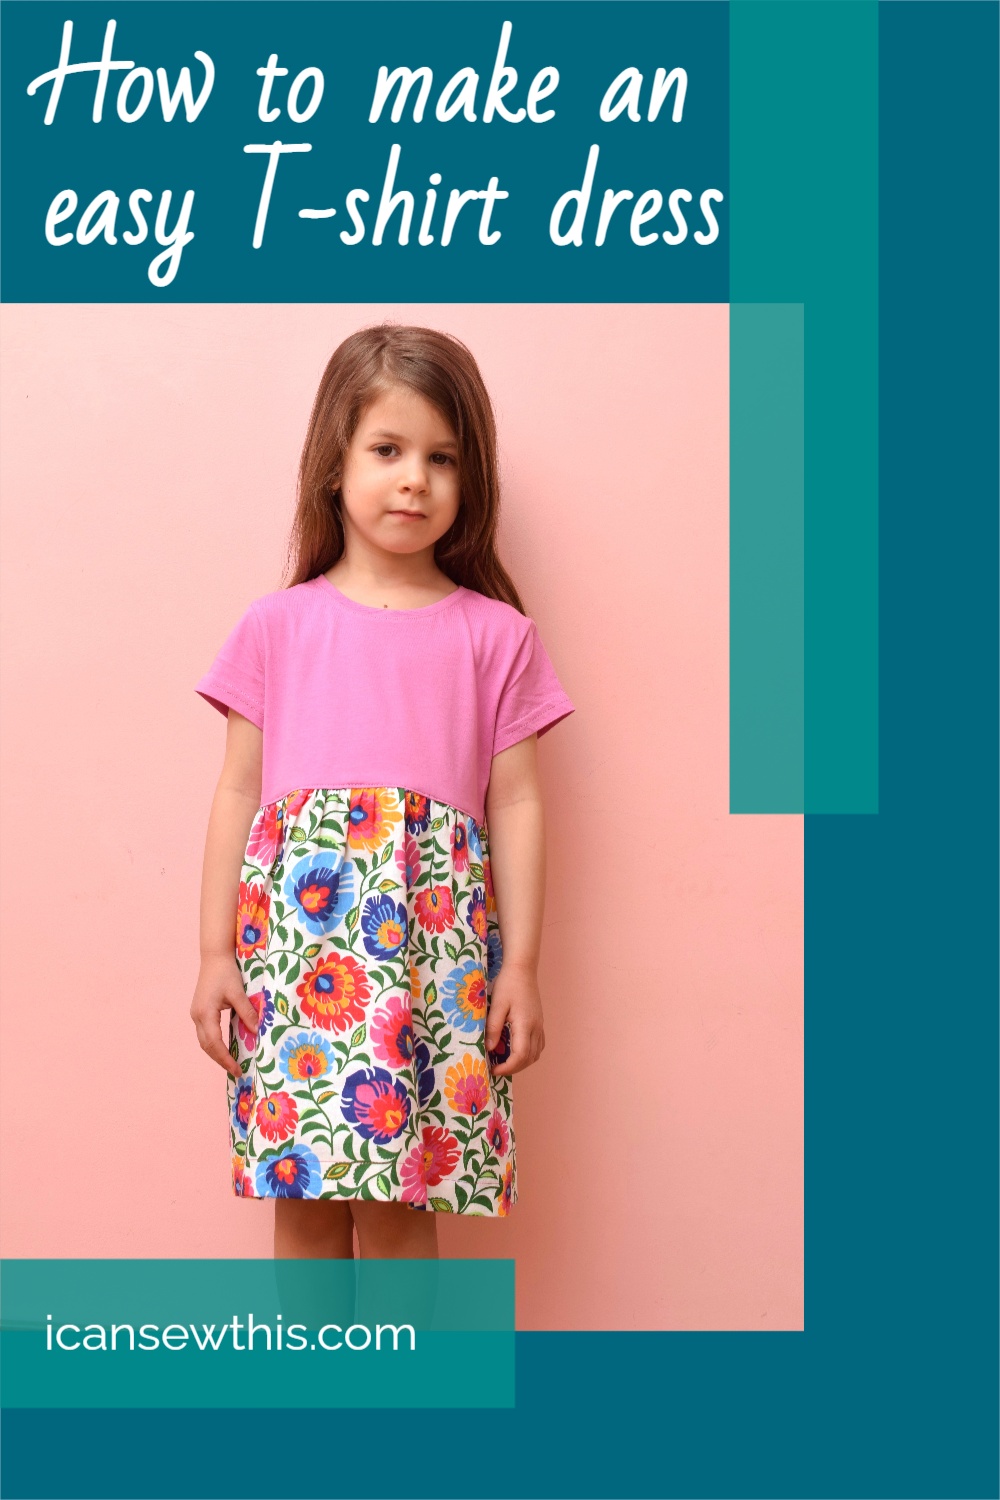
- Color-block: Uses two different shirts for a fun look.
- Off-shoulder: Cut for a casual, trendy appearance.
- With pockets: More practical and stylish.
Before starting, try the shirt on and use pins to mark your desired length and shape. Move around to make sure you’ll be comfortable in the final dress.

Credit: www.youtube.com
Measuring And Cutting
Correct measurements are the foundation of a great dress. Here’s what you need to do:
Taking Measurements
- Length: Decide where you want your dress to end (mid-thigh, knee, etc.). Measure from the top of your shoulder down to this point.
- Width: If you want a more fitted look, measure around your bust, waist, and hips. Add 1–2 cm for seam allowance.
- Sleeves: Decide if you want to keep, shorten, or remove the sleeves.
Mark these points on your shirt with chalk. Beginners often forget to add extra for the hem and seams—don’t skip this step.
Cutting The T Shirt
Lay the shirt flat on a table. Use pins to hold the fabric in place. Cut along your marks. If you’re shortening the sleeves or making an off-shoulder dress, cut carefully and save any extra fabric for possible repairs or decorations.
If you make a mistake, don’t panic. You can often fix minor errors by adjusting your design or using a small patch.
Sewing The Dress
Now you’re ready to shape your dress. Whether you use a machine or sew by hand, follow these steps for best results.
Steps To Sew Your T Shirt Dress
- Pin the sides: With the shirt inside out, use pins to mark your new side seams. Adjust for fit before sewing.
- Sew the sides: Sew a straight line from under the arm to the bottom hem. Backstitch at the start and end for strength.
- Try it on: Turn the shirt right-side out and test the fit. Make adjustments if needed.
- Hem the bottom: Fold the bottom edge up 1–2 cm, pin, and sew. This keeps the edge from fraying.
- Finish the sleeves: If you changed the sleeve length or style, hem or fold the edges for a clean look.
Adding An Elastic Waist (optional)
If you want your dress to have more shape, add elastic at the waist. Mark where you want the waistline, sew a channel, and thread elastic through. This simple step can make your dress look tailored.
Most beginners don’t realize that a simple elastic band can completely change the silhouette of the dress, making it more flattering for many body types.
Customizing Your T Shirt Dress
One of the best things about making your own dress is adding personal touches. Here are some ideas to make your dress unique:
- Decorative patches: Sew or iron on fun shapes or logos.
- Fabric paint: Create your own design or write a favorite quote.
- Lace trim: Add lace at the hem or sleeves for a feminine touch.
- Pockets: Use leftover fabric to add side or front pockets.
- Tie-dye: For a bold, colorful look.
Don’t be afraid to experiment. Even small changes can make your dress one-of-a-kind.
Comparing T Shirt Dress Styles
Here’s a comparison to help you decide what style fits your taste and sewing level:
| Style | Difficulty | Best For | Extra Materials |
|---|---|---|---|
| Straight | Easy | Beginners, comfort | None |
| Fitted | Medium | Shaped look | Elastic |
| Color-block | Medium | Creative styles | Second t-shirt |
| Off-shoulder | Medium | Trendy look | Wide elastic |
| Pockets | Medium | Practicality | Extra fabric |
Common Mistakes And How To Fix Them
Even with clear steps, mistakes can happen. Here’s how to avoid and fix common issues:
- Cutting the shirt too short: Always measure twice and cut once. If you cut too much, add a fabric band at the bottom for extra length.
- Uneven hems: Use pins and a ruler to check your lines before cutting. If the hem is uneven after sewing, trim carefully and re-hem.
- Loose stitches: Make sure your thread tension is correct. If sewing by hand, keep your stitches even and close together.
- Wavy fabric edges: Stretchy shirts can curl when cut. Iron the edge flat and use a zigzag stitch or overlock to prevent fraying.
- Dress too tight: If the dress doesn’t fit, add a side panel with extra fabric or use the original shirt’s sleeves as inserts.
Most people don’t realize that you can use fabric glue for small repairs if you don’t want to re-sew. It’s a quick fix for minor mistakes.
Washing And Caring For Your T Shirt Dress
To keep your new dress looking good, you’ll want to wash and care for it properly:
- Wash in cold water to avoid shrinking.
- Turn inside out before washing to protect decorations.
- Hang to dry or use a low heat setting.
- Iron on low if needed, especially around seams.
If you added paint or patches, check their instructions for washing. Some decorations can peel or fade if not handled gently.
Creative Variations To Try
After you’ve made your first t-shirt dress, try these creative ideas to expand your skills:
Shirt Dress With A Drawstring Waist
Instead of elastic, sew a channel around the waist and thread a ribbon or cord through. This lets you adjust the fit and adds a stylish accent.
Layered T Shirt Dress
Use two shirts of different colors. Cut one shirt in half and sew the bottom part to the other shirt for a layered effect. This is a great way to use shirts that are too short.
Maxi T Shirt Dress
Sew two extra-long shirts together at the waist, or add a skirt made from jersey fabric to the bottom of your shirt. This creates a long, flowing dress that’s perfect for summer.
Cold-shoulder Or Cut-out Designs
Cut small shapes or slits at the shoulders or back for a trendy, modern look. Reinforce the edges with stitching so they don’t stretch out.
Many people don’t realize how easy it is to combine different colors and textures for a unique dress. Trying new variations helps improve your sewing skills and keeps the process exciting.
Step-by-step Example: Making A Simple Straight T Shirt Dress
To make the process even clearer, here’s a full walkthrough for a straight t-shirt dress:
- Choose an oversized cotton t-shirt. Lay it flat and smooth out wrinkles.
- Measure your desired length. Use a tape measure from shoulder to where you want the hem. Mark with chalk.
- Cut the bottom if needed. Leave 2 cm extra for hemming.
- Try the shirt on inside out. Use pins to shape the sides if you want a closer fit.
- Sew new side seams. Start under the arms and sew down to the hem. Use a straight or zigzag stitch.
- Hem the bottom. Fold the edge, pin, and sew.
- Finish sleeves or neckline as desired. Fold and sew or leave raw for a casual look.
- Iron the seams for a crisp finish.
This simple method works for most oversized shirts and takes about 1–2 hours, even for beginners.

Credit: www.youtube.com
T Shirt Dress Vs. Store-bought Dress
It helps to see the differences between a homemade t-shirt dress and one from the store.
| Feature | Homemade T Shirt Dress | Store-Bought Dress |
|---|---|---|
| Cost | Low (often under $10) | Medium to high |
| Fit | Customizable | Standard sizes |
| Design | Unique, personal | Mass-produced |
| Time to Make | 1–3 hours | Instant (buy and wear) |
| Skill Needed | Beginner to intermediate | None |
A homemade dress gives you more control and satisfaction, while store-bought dresses offer convenience.
T Shirt Dress For Different Body Types
A great thing about t-shirt dresses is their versatility. You can adjust the fit to flatter any body shape.
- For apple shapes: Choose a looser style and add a belt or elastic at the waist.
- For pear shapes: Try a slight A-line cut by widening the hem.
- For hourglass figures: Add darts or a fitted waist to highlight curves.
- For petite frames: Keep the dress above the knee to avoid looking overwhelmed by fabric.
- For plus size: Use larger shirts and adjust side seams for comfort.
Most people don’t know that adding vertical details—like a row of buttons or a center seam—can create a slimming effect.
T Shirt Dress For Kids
Making t-shirt dresses for children is even easier. Kids’ shirts are smaller, so you’ll finish faster. You can use bright colors, fun patches, and even add ruffles.
Tips for kids’ dresses:
- Use soft, stretchy shirts for comfort.
- Avoid small decorations that could come off.
- Let kids help pick colors and designs—they love being part of the process.
Sustainable Fashion And Upcycling
Turning t-shirts into dresses is a simple way to support sustainable fashion. Instead of throwing away old clothes, you give them new life. The fashion industry is known for producing waste, and upcycling is one way to help.
According to the Fashion Revolution, millions of tons of textiles are discarded every year. Making your own clothes reduces this impact and teaches valuable skills.
Credit: icansewthis.com
Where To Learn More
If you want to advance your skills, look for sewing tutorials, join online forums, or take a beginner sewing class. Many free resources are available on YouTube and craft blogs. Ask friends or family who sew for advice—they often have tips you won’t find online.
Frequently Asked Questions
How Do I Make A T-shirt Dress Without A Sewing Machine?
You can make a t-shirt dress by sewing by hand. Use a strong needle and matching thread. Try the backstitch for side seams—it’s sturdy and looks neat. It takes more time, but the result is just as good.
What Size T-shirt Should I Use For A Dress?
Pick a shirt that’s two to three sizes larger than your normal size for a relaxed dress. For a fitted style, choose your regular size. Always check the length to make sure the dress will cover what you want.
Can I Make A T-shirt Dress From Two Shirts?
Yes, combining two shirts is a great way to add color or length. Cut one shirt for the top and another for the skirt. Sew them together at the waist for a color-block or layered effect.
How Do I Add Pockets To My T-shirt Dress?
Use extra fabric from the shirt sleeves or another shirt. Cut pocket shapes, sew the edges, and attach them to the sides or front of your dress. Make sure the pockets are deep enough to hold small items.
Is A T-shirt Dress Suitable For Formal Events?
A t-shirt dress is mostly casual, but you can dress it up with the right accessories—like a belt, statement necklace, or nice shoes. Use a plain, dark shirt and add elegant touches for a semi-formal look.
Making a t-shirt dress is a simple, enjoyable project that lets you create something unique and useful. With these steps and tips, you’ll be ready to design, sew, and show off your own personalized dress. Enjoy the process and wear your creation with pride!