
How to Make Oversized T Shirt Cropped: Easy DIY Guide
How To Make Oversized T Shirt Cropped
Oversized t-shirts are comfortable and stylish, but sometimes they can feel too baggy or long. If you want a trendy, casual look, transforming your oversized t-shirt into a cropped top is a smart idea. Cropping a t-shirt not only gives it a fresh style but also lets you create a custom fit for your body and preferences.
You don’t need advanced sewing skills or expensive tools. With the right steps, you can turn almost any old or oversized t-shirt into a fashionable cropped piece that matches your style.
In this guide, you’ll discover practical methods to crop an oversized t-shirt, from no-sew options to finishing techniques for a clean edge. You’ll learn how to measure and cut, choose the right style, and avoid common mistakes. Whether you want a simple raw-edge crop or a creative twist with knots and elastic, you’ll find everything you need here.
Let’s explore how to make your oversized t-shirt cropped and stylish.
Why Crop An Oversized T Shirt?
Cropping an oversized t-shirt is more than just a style trend. There are several reasons why people choose to crop their shirts:
- Better fit: Oversized shirts are loose and long. Cropping shortens the length and makes the shirt look more balanced on your body.
- Personal style: Cropped shirts let you show off high-waisted jeans, shorts, or skirts. You can layer them with other clothes for different looks.
- Upcycling: Cropping gives old t-shirts a new life. Instead of throwing away clothes that feel outdated or too big, you can refresh them.
- Comfort: Shorter shirts can feel lighter and cooler, especially in warm weather.
- Easy to do: Cropping a t-shirt is simple. You only need basic tools, and you don’t have to be a sewing expert.
People often overlook that cropping can also make a shirt look more expensive or custom-made. A well-cropped tee catches the eye and can turn a forgotten shirt into your new favorite.
Choosing The Right Oversized T Shirt
Not every oversized t-shirt is a good candidate for cropping. The shirt you choose will affect the final result. Here’s what to look for:
Fabric Type
- Cotton: Most t-shirts are made of cotton. Cotton is easy to cut and usually won’t unravel quickly if left raw.
- Blends: T-shirts with polyester or rayon blends may have a different drape and stretch. They might curl more at the edge when cut.
- Very thin material: Thin shirts can look flimsy when cropped. They may roll up too much at the edge and lose their shape.
Shirt Size And Fit
- The shirt should be loose and long enough that cropping won’t make it too tight or short.
- Shoulders and sleeves: Make sure the shoulders and sleeves still fit comfortably after cropping.
- Avoid shirts that are too small. Cropping will make them even shorter and may look awkward.
Color And Print
- Solid colors, stripes, or simple graphics work well for cropping.
- Large central graphics: Be careful not to cut through a main design unless that’s the look you want.
Condition
- Check for stains or holes near the bottom. Cropping can remove these if they’re low enough.
- The shirt should be clean and in good shape. Old, worn-out fabric can tear easily.

Credit: www.youtube.com
Tools And Materials Needed
Cropping a t-shirt doesn’t require a lot of equipment. Here’s what you need:
- Oversized t-shirt (washed and dried)
- Sharp fabric scissors (regular scissors can work, but fabric scissors give a cleaner edge)
- Ruler or measuring tape (for accuracy)
- Chalk, washable marker, or pencil (to mark your cut line)
- Pins or clips (optional, to hold the shirt in place)
- Iron and ironing board (optional, for a crisp edge or if sewing)
- Sewing machine or needle and thread (optional, for a finished hem)
- Cutting mat (optional, protects your surface)
Most people use only scissors and a ruler, but adding a few more tools can make the process smoother and the final result more polished.
Planning Your Crop: Finding The Right Length
Before you cut, it’s important to decide exactly how cropped you want your shirt. Making a mistake here is one of the most common errors—once you cut, you can’t go back.
How To Decide The Best Length
- Try on the shirt: Put on the oversized t-shirt and stand in front of a mirror.
- Mark the spot: Use your finger or a pin to mark where you want the shirt to end. Common crop lengths:
- Just above the waistline (shows your high-waist pants)
- At the belly button (more dramatic)
- Below the bust (super cropped, more risky)
- Bend and move: Raise your arms or sit down. Does the shirt still cover what you want? It’s easy to cut more, impossible to add fabric back.
Allow For Curling
Cotton and blends will often curl up about ½ inch to 1 inch after cutting, especially with a raw edge. If you want a finished edge, leave extra fabric for hemming (about 1 inch).
Marking The Cut
- Use a ruler or measuring tape to measure from the collar down to your desired length.
- Mark the spot with chalk or a washable marker.
- Lay the shirt flat and draw a straight line across the shirt, matching your marks on both sides.
A common beginner mistake is cutting the shirt while it’s folded or not flat, which can make the front and back uneven. Always double-check that your line is straight and both layers are even.
Basic No-sew Cropping Method
If you prefer a raw edge and want the easiest way to crop a t-shirt, the no-sew method is for you. This look is casual and often seen in street style and athleisure fashion.
Step-by-step No-sew Cropping
- Lay the shirt flat: Smooth out any wrinkles. Align the seams at the sides, and make sure the shirt is perfectly flat.
- Mark your cut line: Use your measured line from the planning section. Draw a straight line with chalk or marker.
- Cut with sharp scissors: Start at one side seam and cut straight across, following your line. Go slowly for a smooth edge.
- Check the layers: After cutting, check that the front and back are even. If not, trim slightly to even them out.
- Stretch the edge gently: Hold the shirt near the cut edge and pull gently. The edge will curl up naturally, giving a relaxed finish.
Tips For A Clean Cut
- Use fabric scissors for a smooth edge.
- Cut in one long, slow motion rather than small snips.
- If you want a slightly curved edge (shorter in front, longer in back), draw your line accordingly.
A raw edge will not unravel quickly on most t-shirts, but very thin or loose knits can fray more. If you notice threads coming loose, you can trim them or finish the edge with a quick hand-sewn hem.
Hemmed Edge Cropping (sewing Method)
If you want your cropped t-shirt to look more polished and last longer, finishing the edge with a hem is a good option. This method takes more time but prevents excessive curling and fraying.
Hemming Steps
- Measure and cut: Like the no-sew method, mark your line. But cut 1 inch below your final desired length to allow for the hem.
- Fold the edge: Turn the shirt inside out. Fold the raw edge up by about ½ inch, then fold again. Pin in place.
- Iron the fold: For a crisp edge, press the fold with an iron.
- Sew the hem: Use a sewing machine with a straight or zigzag stitch, or sew by hand with small, even stitches. Sew all the way around the bottom edge.
- Trim and finish: Remove pins, turn right side out, and iron if needed.
When To Hem
- For work or school, a hemmed crop looks more professional.
- Hemming is helpful if the fabric is thin or prone to fraying.
- If you want to add elastic or a drawstring, hemming helps hold it in place.
Many people skip hemming, but it can make a big difference in how your shirt wears and washes over time.
Creative Cropping Styles
Cropping a t-shirt doesn’t have to be basic. There are several creative ways to make your oversized tee stand out. These methods add personality and detail to your shirt.
1. Curved Or High-low Hem
- Instead of cutting straight across, cut the front shorter and the back longer for a high-low effect.
- Draw a gentle curve with chalk before cutting.
- This style covers your lower back while showing more in front.
2. Tied Knot Crop
- Instead of cutting straight, cut the shirt longer and create two strips in the center front.
- Tie the strips into a knot for a playful look.
- You can also simply gather extra fabric in the front and tie it in a single knot without cutting strips.
3. Side-tie Crop
- Cut small slits on each side of the shirt, near the bottom hem.
- Tie the front and back pieces together on each side.
- This creates an adjustable fit and a sporty look.
4. Cropped With Elastic Waist
- After cutting the shirt, sew a casing around the bottom edge.
- Insert elastic for a cinched, gathered look.
- This style is common in athletic and streetwear.
5. Cropped With Fringe Or Tassels
- Cut vertical strips (about ½ inch wide) along the bottom edge.
- Stretch the strips so they curl.
- For more detail, tie beads or knots at the end of each fringe.
Each style gives a different look and feel. Try different methods on old shirts to see what matches your style.
Step-by-step Example: Making A Raw-edge Cropped T Shirt
Let’s walk through a full example using the most popular method.
What You Need
- One oversized cotton t-shirt
- Fabric scissors
- Ruler or measuring tape
- Chalk or washable marker
Steps
- Wash and dry the shirt: This prevents shrinking later.
- Try on the shirt: Use a mirror to mark your desired length. For a classic crop, mark just above your belly button.
- Lay the shirt flat: Smooth out all wrinkles.
- Measure and mark: Measure from the collar down to your mark on both sides of the shirt. Draw a straight line across.
- Cut the shirt: Start at one side and cut across, following your line. Try to make a single, smooth cut.
- Check and adjust: Lay the shirt flat and check the front and back. Trim if necessary.
- Stretch the edge: Gently pull the cut edge to encourage curling.
- Try it on: Check the fit and style. If it’s too long, trim a little more.
This method is quick and gives a casual, trendy look.
Advanced Tips For The Perfect Crop
Small details can take your cropped t-shirt from homemade to high-fashion. Here are some expert tips:
Use A Rotary Cutter
A rotary cutter with a cutting mat can give you a perfectly straight, smooth edge. This is especially helpful for very soft or stretchy fabrics.
Double-sided Tape For Marking
Instead of chalk, place a strip of double-sided tape where you want to cut. Cut right along the edge for a straight line, then peel off the tape.
Finish With Bias Tape
For a unique, colorful edge, sew bias tape or ribbon around the hem after cropping. This adds durability and a designer touch.
Wash After Cutting
Washing the shirt after cropping helps the edge curl naturally and removes any chalk marks.
Save The Scraps
The leftover fabric from the bottom can be used as a headband, armband, or cleaning cloth.
Comparison: Raw-edge Vs. Hemmed Crop
Here’s a quick comparison to help you choose the right finish for your shirt.
| Feature | Raw-Edge Crop | Hemmed Crop |
|---|---|---|
| Difficulty | Very easy | Moderate (requires sewing) |
| Time Needed | 5-10 minutes | 20-30 minutes |
| Durability | Good for thick cotton, may fray | Excellent, doesn’t fray |
| Style | Casual, sporty | Polished, neat |
| Edge Curl | Yes | No |
Choose based on your style preference, skill level, and how you plan to wear the shirt.
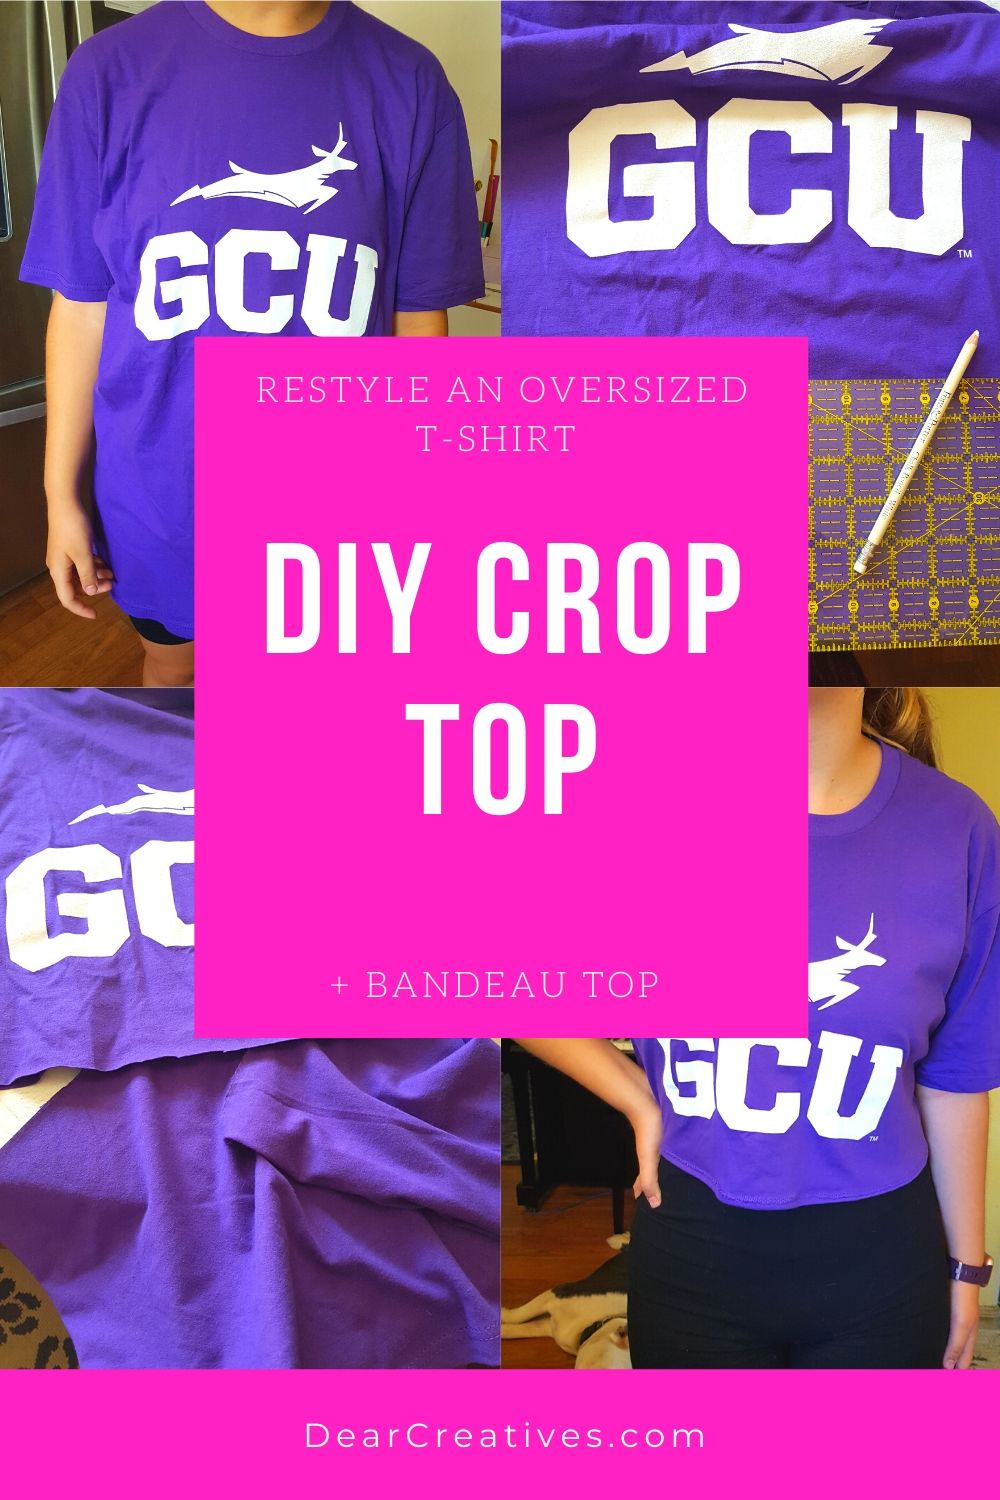
Credit: www.dearcreatives.com
Common Mistakes And How To Avoid Them
Even simple projects can go wrong. Here are the most frequent mistakes and how to prevent them:
- Cutting too short: Always cut less than you think. You can always trim more.
- Uneven front and back: Lay the shirt perfectly flat and smooth before cutting.
- Cutting while folded: Cutting both layers at once can lead to uneven edges.
- Using dull scissors: Dull blades make jagged, messy cuts. Use fabric scissors.
- Not marking the line: Cutting without marking often leads to mistakes.
A non-obvious mistake is not considering how the shirt fits after cropping. Sometimes the bottom hem is what gives structure to the shirt, and removing it can make the shirt flare out. If you want a more fitted look, consider adding elastic or taking in the sides.
Styling Your Cropped T Shirt
Once you have your cropped t-shirt, there are many ways to style it for different looks:
- Pair with high-waisted jeans for a classic casual look.
- Wear with athletic shorts or leggings for a sporty vibe.
- Layer over a tank top for extra coverage or color contrast.
- Match with a skirt for a feminine style.
- Add a jacket or blazer for a street-chic outfit.
Cropped t-shirts are also great for layering with longer pieces, like flannel shirts or denim jackets. Experiment with accessories to personalize your look.
How Cropping Affects Fabric And Fit
Cropping changes the way a t-shirt drapes and fits. Some changes are easy to predict, but others may surprise you:
Shrinkage
After cutting, washing and drying may cause the fabric to shrink slightly. That’s why you should always wash and dry your t-shirt before cropping.
Curling
Most cotton fabrics will curl up at the cut edge. This is normal and part of the raw look, but if you want a flat edge, hemming is necessary.
Weight And Drape
Removing the bottom hem can make the shirt feel lighter and looser. Sometimes the sides flare out more after cropping, especially if the shirt is very oversized. If you prefer a more fitted look, you can take in the sides or add a tie.
Safe Cutting And Care Tips
Safety matters, even for simple DIY projects:
- Always cut on a flat, stable surface.
- Keep scissors away from children.
- Wash hands after using markers or chalk.
- Store fabric scissors separately from paper scissors; using them on paper can dull the blades.
For care, machine-wash your cropped t-shirt in cold water and air-dry if possible. This keeps the edge from fraying quickly and helps your shirt last longer.

Credit: www.shirtspace.com
Comparing Crop Styles: Which Is Best For You?
Each cropping method creates a different look and feel. Here’s a simple comparison to help you decide:
| Style | Best For | Skill Needed | Unique Feature |
|---|---|---|---|
| Raw Edge | Casual, quick changes | Beginner | Curls naturally, easy to do |
| Hemmed Edge | Professional, neat look | Intermediate | Lasts longer, no curling |
| Knot Crop | Trendy, playful looks | Beginner | Adjustable length, adds detail |
| Elastic Crop | Sporty, fitted looks | Intermediate | Snug waist, gathers fabric |
| Fringe Crop | Boho, festival style | Beginner | Unique texture, creative |
Try different styles on old shirts before cropping a favorite one.
Upcycling Ideas With Cropped T Shirt Scraps
Don’t throw away the bottom piece you cut off. Here are creative ways to use the leftover fabric:
- Headband: Fold and tie the strip as a sweatband or accessory.
- Wristband: Wrap and knot for sports or style.
- Cleaning cloth: Soft t-shirt fabric is perfect for dusting.
- Patchwork: Save scraps for future sewing or craft projects.
- Drawstring: Use the hem as a drawstring for bags or other clothes.
Upcycling helps reduce waste and makes your project eco-friendly.
Real-life Examples And Inspiration
Many fashion influencers and stylists use cropped t-shirts as a staple item. For example, streetwear brands often sell cropped shirts for a premium price, even though the look can be achieved at home for free.
A viral trend is cropping vintage band t-shirts for a retro look. You can find inspiration on Pinterest or by searching for “cropped t-shirt outfit ideas” on social media.
If you want more visual guides, you can check out detailed instructions and style tips on WikiHow.
Frequently Asked Questions
How Do I Stop The Edge From Rolling Up After Cropping?
If you want the bottom edge to stay flat, you need to finish it with a hem. Fold the edge twice, pin, and sew all the way around. This prevents curling. For a no-sew option, use fabric glue to hold the edge in place, but sewing gives the best result.
Can I Crop A T-shirt Without Sewing At All?
Yes, you can use the raw-edge method. The fabric will curl naturally, and most t-shirts will not fray much. Just make sure to use sharp scissors and cut in a straight line.
How Do I Fix It If I Cut The Shirt Too Short?
If you cut the shirt too short, you cannot add fabric back easily. However, you can layer the cropped shirt over a longer tank top or bralette for a creative look. In the future, always cut less than you think and trim more if needed.
What Type Of T-shirt Works Best For Cropping?
Medium to heavy cotton t-shirts work best. They hold their shape and don’t fray quickly. Very thin or stretchy shirts may curl too much or lose their shape after cropping.
Is There A Way To Make The Crop Line Perfectly Straight?
Lay your shirt flat, smooth out all wrinkles, and use a ruler and chalk to mark your cut line. Cut slowly with fabric scissors. For extra precision, use a rotary cutter on a cutting mat.
---
Cropping an oversized t-shirt is an easy, affordable way to refresh your wardrobe and express your personal style. With a little planning, the right tools, and careful cutting, you can turn a plain oversized shirt into a trendy cropped top.
Whether you choose a raw edge, a hemmed finish, or a creative style, the possibilities are endless. Try different methods, experiment with old shirts, and enjoy your unique, custom-made look.