
How to Make Affirmation Videos: Step-by-Step Guide for Beginners
How To Make Affirmation Videos
Positive self-talk is powerful. But sometimes, simply repeating affirmations out loud is not enough. That’s where affirmation videos come in. These are short, visually engaging videos that combine spoken or written affirmations with music, images, and sometimes your own voice.
They can boost motivation, improve self-esteem, and help you rewire your thinking. If you’ve ever wondered how to make affirmation videos that actually work, you’re not alone. Many people want to create them but don’t know where to start, which tools to use, or how to make their videos truly effective.
This guide walks you through every step of the process, from planning to publishing. You’ll learn what makes a good affirmation video, how to write affirmations, which tools are best, and how to avoid common mistakes. By the end, you’ll be ready to create videos that inspire not only yourself but also others.
Why Make Affirmation Videos?
Affirmation videos are more than just pretty slides with positive words. When you combine visual and audio elements, you create a stronger impact on your brain. Watching and hearing affirmations makes it easier to focus, remember, and believe in the messages. Some key benefits include:
- Faster habit formation: Watching affirmation videos regularly can help build new habits and beliefs quicker than text alone.
- Emotional connection: Music, visuals, and spoken words create a deeper emotional response.
- Accessibility: Videos are easy to share on social media or send to friends and family.
- Flexibility: You can watch them anytime—during your morning routine, at work, or before sleep.
Many people don’t realize that affirmation videos can be tailored for specific goals, such as confidence, health, relationships, or career growth. The more personal you make them, the more powerful they become.
Step 1: Understand The Power Of Affirmations
Before you start creating, it’s important to know why affirmations work. Affirmations are positive statements you repeat to yourself. They help you challenge and control negative thoughts, and over time, they can change the way you think and feel.
Research shows that repeated positive statements can affect the subconscious mind. For example, studies have found that people who use affirmations regularly experience lower stress and higher self-esteem. However, affirmations work best when they feel believable and relevant to your life.
Many beginners believe that longer or more complex affirmations are better. In reality, simple and specific affirmations are more effective. For example, “I am confident speaking in meetings” is stronger than “I am successful in all areas of life.” Focus on what you truly want to change.
Step 2: Choose Your Focus And Audience
Ask yourself: Who is this video for? Is it for your own use, or do you want to share it with others? The audience will guide your choices for language, images, and even background music.
Some common topics for affirmation videos are:
- Self-confidence
- Health and fitness
- Career success
- Stress relief
- Relationships
- Wealth and abundance
Pick one main theme per video. This keeps the message clear and helps viewers focus. If you try to include too many topics, the video loses its impact.
Example
If your goal is to boost self-confidence, your affirmations might include statements like:
- “I believe in myself.”
- “I speak with clarity and confidence.”
- “My ideas are valuable.”
Step 3: Write Powerful Affirmations
Writing affirmations is a skill. Here’s how to do it right:
- Keep them positive: Avoid words like “not” or “never.” For example, use “I am calm” instead of “I am not stressed.”
- Use present tense: Write as if the affirmation is already true. “I am strong,” not “I will be strong.”
- Make them personal: Use “I” or “my” to connect with yourself.
- Be specific: Target one area at a time.
- Stay realistic: Believe what you say. If an affirmation feels too far from your reality, soften it. For example, “I am learning to be confident” is better than “I am always confident” if you’re just starting out.
Common Mistake
Many people use generic affirmations from the internet. While these can work, making your own statements is much more powerful. Personal affirmations feel real and connect better with your emotions.
Sample Affirmations By Category
| Category | Sample Affirmation |
|---|---|
| Confidence | I trust myself to make good decisions. |
| Health | I choose foods that nourish my body. |
| Success | Every day, I move closer to my goals. |
| Calmness | I am relaxed and at peace. |
| Relationships | I attract positive and loving people into my life. |
Step 4: Plan Your Video Structure
A good affirmation video has a clear flow. Start by deciding how long the video should be. Most effective affirmation videos are between 2 to 10 minutes. Shorter videos work well for daily use, while longer ones are better for deep relaxation or before sleep.
Typical video structure:
- Opening: Welcome message or relaxing introduction (optional)
- Main affirmations: Display each affirmation for 3–8 seconds, with a calm background
- Closing: Gentle ending with a positive phrase or encouragement
You can repeat each affirmation multiple times, but avoid making the video too repetitive or boring. If using spoken affirmations, pause after each one so viewers can repeat them.
Non-obvious Tip
Many beginners forget to include breathing spaces. Adding a few seconds of silence or gentle music between affirmations gives viewers time to absorb each message.
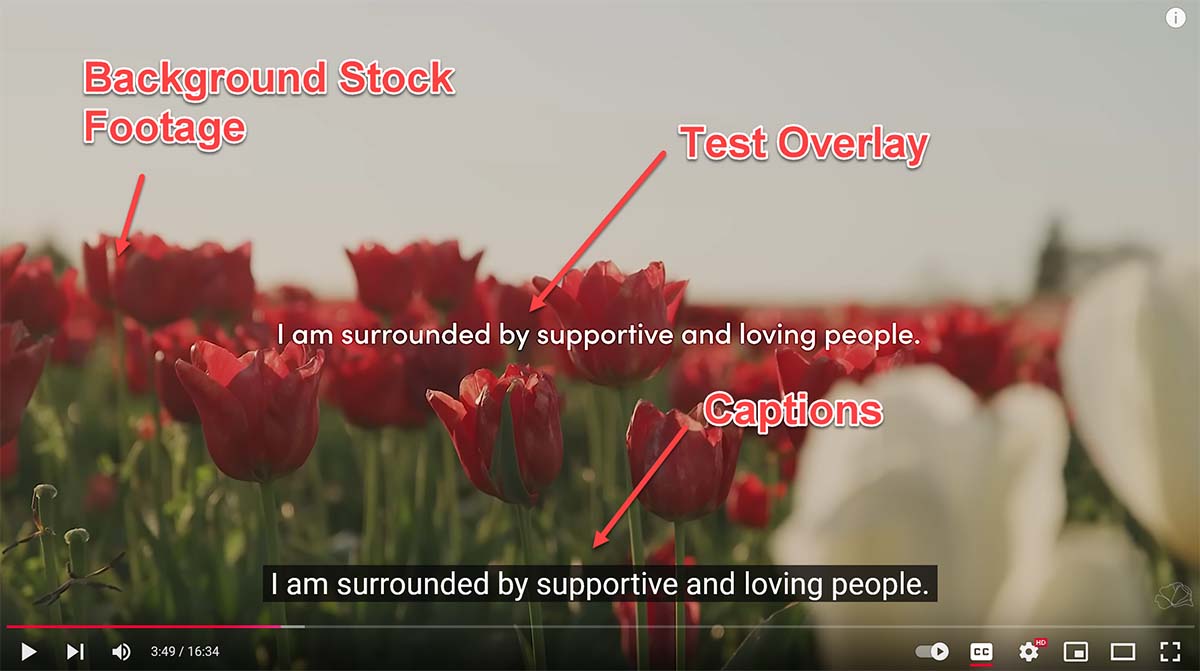
Step 5: Gather Your Visual Elements
The visuals in your affirmation video set the mood. You can use photos, short video clips, animations, or even simple colored backgrounds. Choose visuals that match your topic and feel uplifting.
Sources For Visuals
- Stock image/video sites (Unsplash, Pexels, Pixabay)
- Your own photos for a personal touch
- Simple animations using Canva or similar tools
Important Guidance
Always check if you have the right to use the images or videos. Many free sites allow personal and commercial use, but some require credit. If you’re making videos for YouTube or public sharing, use only royalty-free or your own visuals.
Visual Style Tips
- Keep colors soft and calming for relaxation videos.
- Use bright, energetic images for motivation.
- Avoid fast transitions or flashy effects that distract from the affirmations.
Example
For a health and fitness affirmation video, you might use images of nature, people jogging, healthy meals, or peaceful scenes.

Credit: www.youtube.com
Step 6: Choose Or Create Background Music
Music is important in affirmation videos. The right background music can make your affirmations more memorable and emotional. Here’s how to pick the best audio:
- Use instrumental tracks: Lyrics can distract from your affirmations.
- Pick a tempo that matches your goal: Slow for relaxation, upbeat for motivation.
- Keep the volume low so your words are clear.
Where To Find Music
- YouTube Audio Library: Free for videos and social media
- Free Music Archive
- Bensound, Purple Planet, or other royalty-free music sites
Common Mistake
Many creators use popular songs or copyrighted tracks. This can get your video removed or muted, especially on platforms like YouTube or Instagram. Always use music you have permission to use.
Advanced Tip
Layering gentle sound effects, like waves or birds, under your music can increase relaxation and help your affirmations feel more immersive.
Step 7: Record Or Find Affirmation Voiceovers
You have two main choices for voice: record your own or use a text-to-speech (TTS) tool. Your own voice is usually more powerful because it feels personal and genuine. But TTS can work if you’re not comfortable recording.
How To Record Your Own Voice
- Use your phone or computer’s voice recorder.
- Find a quiet place—background noise can ruin the mood.
- Speak slowly, clearly, and with warmth.
- Pause after each affirmation to let it sink in.
Useful Tools
- Audacity: Free audio recording and editing
- Voice Memos: Built-in on most phones
- Online voice recorders: Simple and quick
Non-obvious Insight
You don’t need a professional microphone. Even basic phone mics can sound good if you record in a quiet room and speak close to the device.
Using Text-to-speech
If you prefer not to use your own voice, some free and paid tools let you turn text into spoken words. Choose a natural-sounding voice and adjust speed as needed.
Popular TTS tools:
- Natural Reader
- Google Text-to-Speech
- Speechelo (paid)
Step 8: Select Your Video Editing Tool
There are many ways to put your affirmation video together, from simple phone apps to advanced desktop software. Beginners often think they need expensive tools, but many free options work just as well.
| Platform | Best For | Example Tools | Skill Level |
|---|---|---|---|
| Smartphone | Quick videos, social media | InShot, CapCut, iMovie | Beginner |
| Desktop | Longer, higher quality videos | DaVinci Resolve, HitFilm Express, Canva | Intermediate |
| Online | Easy, no install needed | Canva, Adobe Express, Animoto | Beginner |
Key Features To Look For
- Easy drag-and-drop interface
- Ability to add text overlays
- Import audio and images
- Export in high quality (HD)
Pro Tip
Test a few tools before starting your full video. Some offer free versions with basic features, which is enough for most affirmation videos.
Step 9: Build Your Video Step By Step
Now you’re ready to assemble your video. Here’s a step-by-step process:
- Import visuals: Add images or video clips to your editor’s timeline.
- Add affirmations as text: Place each affirmation where you want it to appear. Make the text easy to read (large font, clear color).
- Add voiceover (if using): Import your recorded audio or TTS file. Sync the text and visuals with your voice.
- Add background music: Layer music under your voice. Lower the music volume so affirmations are clear.
- Adjust timing: Make sure each affirmation stays on screen long enough to read and absorb.
- Transitions and effects: Use simple fades or cuts. Avoid overusing effects.
- Preview and edit: Watch your video all the way through. Fix any errors or awkward moments.
- Export: Save your video in a common format like MP4 for sharing.
Example Timeline
If you’re making a 5-minute video with 15 affirmations, each affirmation could appear for about 15–20 seconds, allowing for gentle transitions and a calm pace.
Insider Tip
Don’t try to make your first video perfect. The more you practice, the better your editing and design will become.
Step 10: Add Finishing Touches
Small details can turn a good affirmation video into a great one.
Add Subtitles Or On-screen Text
Not everyone watches with sound on. Adding on-screen text for each affirmation increases accessibility and impact.
Use Simple Animations
Light animations, such as fade-ins or slow zooms, can make your video more engaging without being distracting. Most editors offer built-in animation presets.
Include Your Branding (optional)
If you plan to share your video online, add your name, website, or logo in a corner. This builds your brand and helps others find more of your content.
Add A Call To Action
At the end, you might invite viewers to “Repeat this video daily” or “Share with someone who needs encouragement. ” This encourages engagement.
Step 11: Export And Optimize Your Video
When you’re happy with your video, export it at the highest quality your editor allows. HD (1080p) is ideal for YouTube and most social platforms. Keep the file size reasonable for easy uploading.
Video Formats
- MP4: Most common and widely accepted
- MOV: High quality, larger size (good for Apple devices)
Optimization Tips
- Name your video file clearly (e.g., “Morning Affirmations.mp4”)
- Add a short description and keywords if uploading online
- Choose a strong thumbnail image that matches the video’s mood
Step 12: Share And Use Your Affirmation Video
How you use your video depends on your goals. Some keep affirmation videos private for personal viewing, while others share them widely.
Where To Share
- YouTube: Reach a large audience and build a channel
- Instagram/Facebook: Share short clips or reels
- WhatsApp/Telegram: Send videos directly to friends and family
- Personal devices: Set as a morning or bedtime routine
Non-obvious Guidance
If you want to keep your video private, save it in a special folder or cloud storage. For daily use, set a reminder to watch at the same time each day. Repetition builds the habit.
Encouraging Engagement
Ask friends or viewers to comment their favorite affirmation. This creates community and spreads positivity.
Common Mistakes To Avoid
Many first-time creators make similar errors. Here’s what to watch out for:
- Too many affirmations in one video: This can overwhelm viewers. Stick to 10–20 per video.
- Distracting visuals or music: Keep the focus on the affirmations.
- Low audio quality: Test your sound on different devices.
- Ignoring copyright rules: Only use visuals and music you have rights to.
- No consistency: If you want real change, watch your video regularly.
Tracking Your Progress And Results
Affirmation videos work best with regular use. Track your mood, confidence, or other goals before and after using your video for a few weeks. Notice small changes—these add up over time.
Some people keep a journal to write about their experiences. Others use apps to track habits. The key is to stay consistent and patient. Change takes time.
Advanced Tips For Powerful Affirmation Videos
If you want to take your videos to the next level, try these advanced ideas:
- Custom visuals: Create your own drawings, art, or photos for a unique look.
- Personal footage: Record yourself or your environment for a more authentic video.
- Multilingual affirmations: Add subtitles or voiceovers in other languages to reach more people.
- Interactive videos: Invite viewers to say the affirmations with you.
- Themed series: Make a set of videos for different times of day or life challenges.
Example
If you’re making a video for students, include affirmations about learning, focus, and growth mindset. Use images of books, classrooms, and happy students.
Credit: www.tunepocket.com
Comparing Diy Vs. Professional Affirmation Videos
Should you make your own video or use a professional service? Here’s a comparison:
| Feature | DIY Video | Professional Service |
|---|---|---|
| Cost | Free to low cost | Moderate to high |
| Customization | Full control | Limited by templates |
| Learning Curve | Some effort needed | Usually easy |
| Personalization | Highly personal | Generic or semi-personal |
| Time to Create | 30 mins – few hours | Few minutes |
DIY videos are more personal and meaningful, but professional tools offer quick results if you’re short on time or skills.
Real-life Examples And Success Stories
Many people worldwide use affirmation videos as part of their daily routine. For example, a teacher created custom videos for her students to boost their confidence before exams. After watching the videos daily, students reported feeling calmer and more positive.
Another person made a short affirmation video for morning motivation. After a month of daily viewing, they noticed more energy and less negative self-talk.
The key takeaway: Consistency and personalization matter more than technical perfection.
Useful Resources To Learn More
If you want to dive deeper, check out this helpful resource on the science behind positive self-talk: Wikipedia - Affirmations.
You can also explore YouTube for affirmation video examples, or join online forums to share your creations and get feedback.
Frequently Asked Questions
How Long Should An Affirmation Video Be?
Most effective affirmation videos are between 2 and 10 minutes. Shorter videos are great for daily routines, while longer ones work well for deep relaxation or before sleep. The key is to keep the video focused and not overwhelm the viewer with too many affirmations.
Do I Need To Use My Own Voice In The Video?
No, using your own voice is not required, but it can make the video more personal and powerful. If you prefer, you can use text-to-speech tools or even just display the affirmations as text with music.
Can I Use Copyrighted Music Or Images?
Always use royalty-free music and visuals, or your own creations. Using copyrighted material without permission can result in your video being removed or your account penalized, especially on platforms like YouTube.
How Many Affirmations Should I Include In One Video?
A good number is 10 to 20 affirmations per video. This allows each message to be absorbed without overwhelming the viewer. Quality and clarity are more important than quantity.
How Often Should I Watch Affirmation Videos For The Best Results?
For best results, watch your affirmation video daily. Consistency helps reinforce positive beliefs and habits. Many people watch their videos in the morning or before bed as part of their routine.
Making affirmation videos is a creative process. The more you practice, the better your videos will become. Start simple, stay consistent, and enjoy the positive changes in your life and others’.

Credit: www.youtube.com